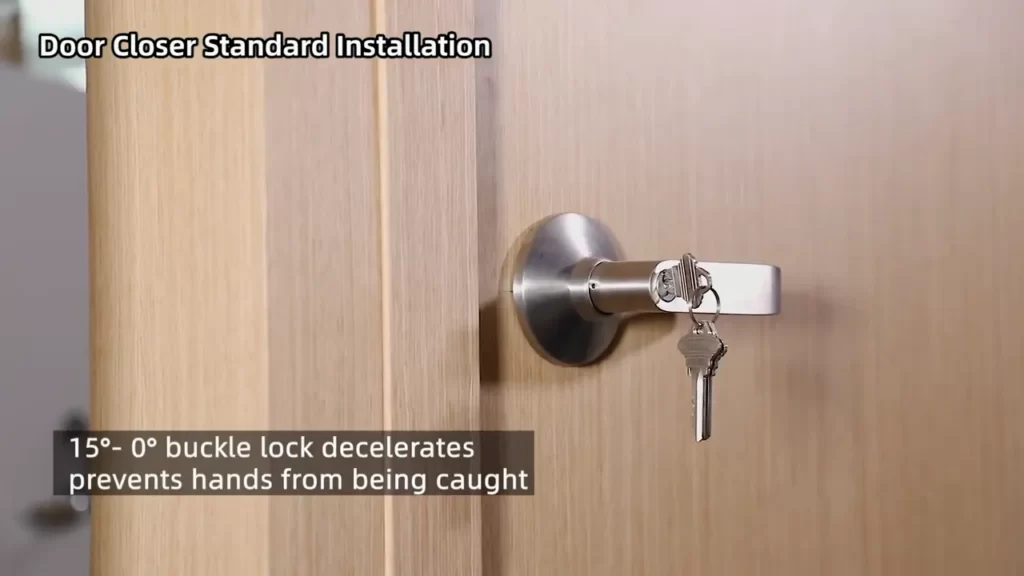
To install an automatic door closer, start by choosing the appropriate model for your door size and weight. Then, follow the manufacturer’s instructions to attach the closer to the top of the door frame and the door itself, ensuring proper alignment and tension.
Understanding Automatic Door Closers
Understanding Automatic Door Closers
An automatic door closer is an essential component for ensuring safety, convenience, and smooth operation in various settings. These devices are designed to automatically close doors after they have been opened, providing added security and ease of use. In this section, we will explore the different types of automatic door closers, the benefits they offer, and the factors to consider before installing one.
Differentiating Automatic Door Closers from Manual Door Closers
One of the primary distinctions between automatic door closers and manual door closers is their mode of operation. While manual door closers require physical force to close the door, automatic door closers use mechanical or hydraulic mechanisms to close the door automatically. This key difference allows for a hands-free operation, making it an ideal choice for high-traffic areas, people with disabilities, and environments that require touchless solutions.
Benefits of Installing an Automatic Door Closer
Installing an automatic door closer offers a myriad of benefits for both residential and commercial settings. Some of the key advantages include:
- Enhanced safety and security: With an automatic door closer, doors are ensured to close properly after each use, minimizing the risk of unauthorized access and providing a secure environment.
- Convenience and accessibility: The hands-free operation of automatic door closers allows for easy access for individuals with mobility challenges, parents with strollers, or people carrying heavy objects.
- Energy efficiency: Automatic door closers help conserve energy by preventing air leakage and maintaining consistent indoor temperatures.
- Noise reduction: These devices ensure quiet and gentle door closing, creating a more peaceful and comfortable environment.
Factors to Consider before Installing an Automatic Door Closer
Prior to installing an automatic door closer, it is crucial to consider various factors to ensure optimal performance and longevity. These include:
- Door type and weight: Determine the door type and its weight to select a suitable automatic door closer with the right capabilities.
- Closing speed and force adjustments: Check if the chosen door closer offers adjustable settings to customize the closing speed and force according to the specific requirements of the door.
- Installation requirements: Understand the installation process and hardware needed to ensure proper installation and compatibility with the door frame.
- Quality and durability: Select a high-quality automatic door closer that is built to last and withstand the demands of the environment.
By considering these factors and understanding the benefits of automatic door closers, you can make an informed decision and ensure a smooth installation process that enhances the convenience, safety, and efficiency of your space.
Tools And Materials Required
Installing an automatic door closer can greatly improve the functionality and security of your doors. Whether you want to ensure that the door always closes behind you or you want to comply with fire safety regulations, a door closer is an essential addition to any building. But before you begin the installation process, it’s important to gather all the necessary tools and materials to ensure a smooth and successful installation. In this section, we will discuss the essential tools and necessary materials that you will need for installing an automatic door closer.
Essential Tools for Installing an Automatic Door Closer
Before you start installing an automatic door closer, it’s crucial to have the right tools at your disposal. Here are some essential tools that you will need:
- Screwdriver (Phillips or flathead, depending on the type of screws used)
- Drill
- Hammer
- Measuring tape
- Pencil or marker
- Level (a laser level can be more accurate)
- Adjustable wrench
Having these tools handy will make your installation process much smoother and ensure that you can complete the job efficiently.
Necessary Materials for Installing an Automatic Door Closer
In addition to the tools, there are several materials that you will need to install an automatic door closer. These materials include:
- Automatic door closer (make sure to choose one that is suitable for the size and weight of your door)
- Screws and fasteners (usually provided with the door closer)
- Mounting brackets (if not included with the door closer)
- Drill bits (if the ones provided are not suitable for your door material)
- Wood filler (to fill any holes or gaps from previous installations)
- Safety glasses (to protect your eyes during the installation process)
Having all these necessary materials ready beforehand will save you time and ensure that you have everything you need to complete the installation successfully.
Now that you know the essential tools and materials required for installing an automatic door closer, you are ready to move on to the next steps of the installation process. Make sure to follow the manufacturer’s instructions and take all necessary safety precautions to ensure a smooth and secure door closer installation.
Step 1: Preparing The Door
Before you can install an automatic door closer, it’s essential to properly prepare the door and the surrounding area. This step ensures that the installation process goes smoothly and that the new door closer functions optimally. Let’s go through the necessary steps to prepare your door for installation.
Examining the Door and Frame for Compatibility
The first thing you need to do is examine the door and frame to ensure compatibility with the automatic door closer. Take a close look at the door’s material, weight, and size, as well as the frame’s construction. Consider the following factors:
- Door material: Is it made of wood, metal, or another material?
- Door weight: Heavy doors may require a more robust door closer.
- Door size: Larger doors might need a closer with a higher weight capacity.
- Frame construction: Check if the frame is solid and able to support the door closer.
By examining these compatibility factors, you ensure that the automatic door closer you choose is suitable for your specific door and frame. This step helps prevent any issues with the installation or functioning of the device.
Removing the Existing Door Closer (if applicable)
If you already have a door closer installed, you’ll need to remove it before installing the new automatic door closer. Follow these steps:
- Close the door to take the tension off the old door closer.
- Locate the screws that hold the old closer in place.
- Use a screwdriver to carefully remove these screws.
- Gently remove the old door closer from the door and set it aside.
- Inspect the area where the old closer was installed for any damage or debris.
By removing the existing door closer correctly, you create a clean slate for installing the new automatic door closer. This ensures a secure and efficient fit for the new device.
Preparing the Surface for Installation
Before installing the automatic door closer, take a moment to prepare the surface for optimal performance. Follow these steps:
- Wipe down the area where the door closer will be installed.
- Remove any dirt, dust, or debris that might affect the adhesive or screws.
- If necessary, use a mild cleaner to remove stubborn stains or residues.
- Dry the surface thoroughly using a clean cloth.
By ensuring a clean and smooth surface, you provide the ideal conditions for installing the automatic door closer. This step helps maximize the device’s lifespan and effectiveness.
Step 2: Choosing The Right Location
Once you have chosen the right automatic door closer for your needs, the next crucial step is to determine the appropriate location for its installation. Choosing the right location for your door closer is essential to ensure its functionality, safety, and accessibility. In this article, we will guide you through the factors to consider when determining the right placement for your automatic door closer.
Determining the Appropriate Placement for the Door Closer
When deciding the placement of your door closer, there are a few key factors to keep in mind. First and foremost, you should consider safety and accessibility factors. Additionally, ensuring proper clearance for installation is crucial to allow the door closer to function optimally. Let’s explore each of these factors in detail.
Considering Safety and Accessibility Factors
Safety and accessibility are of utmost importance when choosing the location for your automatic door closer. Here are a few factors to consider:
- Ensure the door closer is installed at a height that is convenient for users, especially individuals with disabilities or mobility challenges. Placing it too high or too low can hinder accessibility.
- Consider the direction of the door swing. The door closer should be positioned to allow the door to close smoothly, avoiding any potential hazards.
- Check for any potential obstructions near the door closer, such as light fixtures or protruding objects, that may interfere with its proper operation. Remove or relocate these obstructions to ensure clear movement.
Ensuring Proper Clearance for Installation
In addition to safety and accessibility factors, proper clearance is crucial to enable the correct installation and functioning of the automatic door closer. Here’s what you need to keep in mind:
| Clearance Considerations | Measurements |
|---|---|
| Sideroom Clearance | Bold: 3-6 inches |
| Top Clearance | Bold: 1.5 inches minimum |
| Bottom Clearance | Bold: 0.25-0.75 inches |
| Back Clearance | Bold: 2 inches minimum |
Ensuring the appropriate clearance measurements will allow the automatic door closer to operate smoothly without any obstructions or interference during its motion.
By considering safety and accessibility factors and ensuring proper clearance for installation, you can choose the optimal location for your automatic door closer. This will help improve the efficiency and functionality of your door while enhancing overall safety for users. Move on to the next step after assessing these considerations to successfully install your automatic door closer.
Step 3: Installing The Door Closer
Now that you have prepared the door and gathered all the necessary tools, it’s time to install the automatic door closer. Follow these steps carefully to ensure a secure and functional installation.
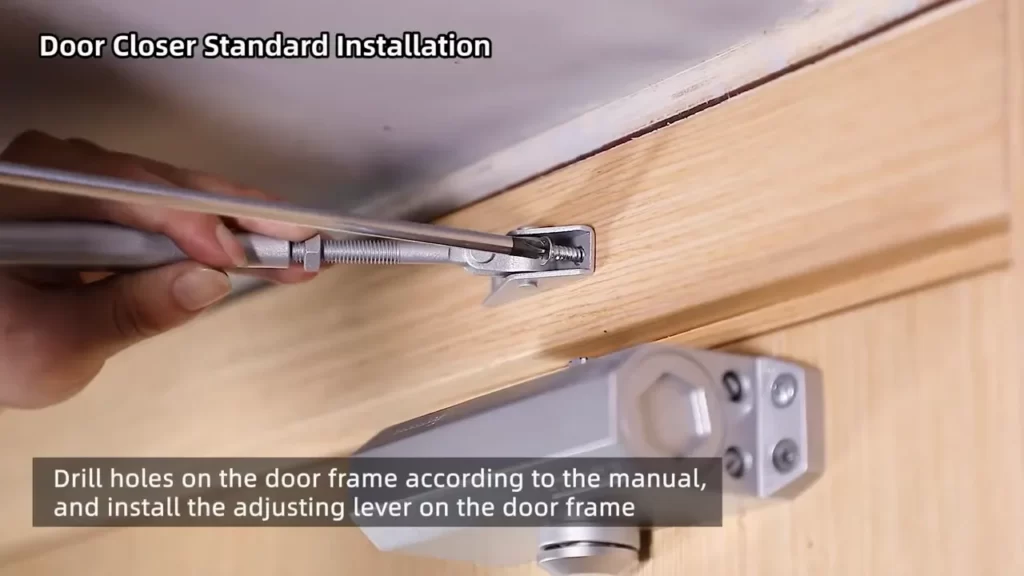
Attaching the Mounting Bracket to the Door Jamb
The first step in installing the door closer is to attach the mounting bracket to the door jamb. The mounting bracket serves as the foundation for the door closer and provides a secure base for its operation. Here’s how you can do it:
- Start by positioning the mounting bracket on the desired location of the door jamb, typically on the top corner of the door.
- Using a pencil or a marker, mark the screw holes on the door jamb through the holes on the mounting bracket.
- Next, using a drill and an appropriate size drill bit, create pilot holes on the marked points.
- Align the mounting bracket with the pilot holes and secure it in place using screws.
Mounting the Door Closer on the Bracket
Once the mounting bracket is securely attached to the door jamb, you can now proceed with mounting the door closer. The door closer is responsible for controlling the opening and closing speed of the door. Here’s how you can mount it:
- Place the door closer on the mounting bracket, aligning the holes on the closer with the holes on the bracket.
- Insert the provided screws through the holes and tighten them using a screwdriver or a drill, ensuring that the screws are securely fastened.
- Verify that the door closer is straight and level to ensure smooth operation.
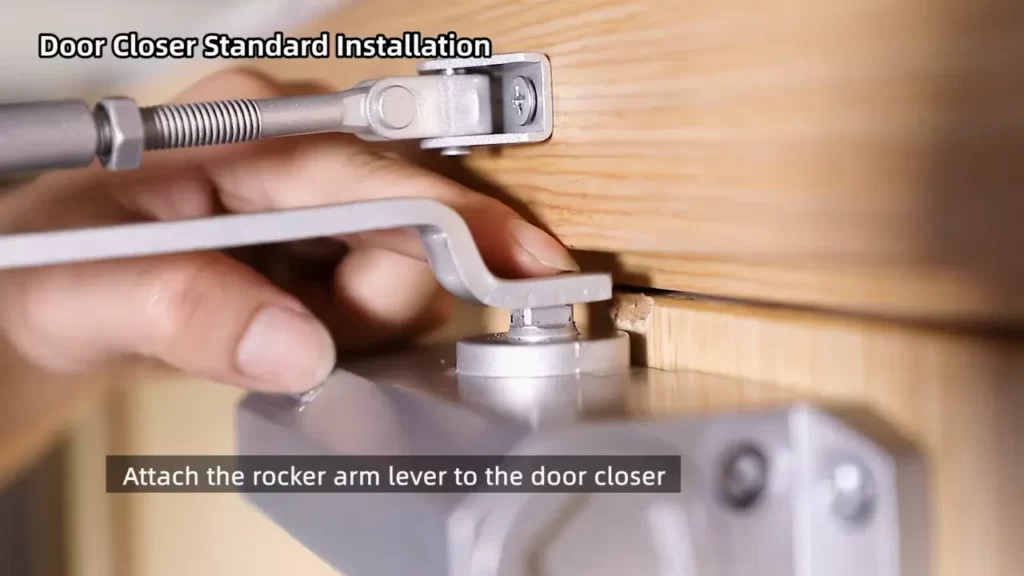
Connecting the Arm and Adjusting the Tension
With the door closer mounted on the bracket, the next step is to connect the arm and adjust the tension. The arm connects the door closer to the door itself, enabling it to control the door’s movement. Here’s how you can do it:
- Attach one end of the arm to the door closer, following the manufacturer’s instructions.
- Attach the other end of the arm to the door, again following the manufacturer’s instructions.
- Once the arm is securely connected, you can now adjust the tension on the door closer. The tension adjustment will determine how fast or slow the door closes.
- Refer to the manufacturer’s instructions on how to adjust the tension on your specific door closer model. Typically, this can be done using an adjustment screw or knob located on the closer itself.
- Gradually adjust the tension until you achieve the desired closing speed and tension level.
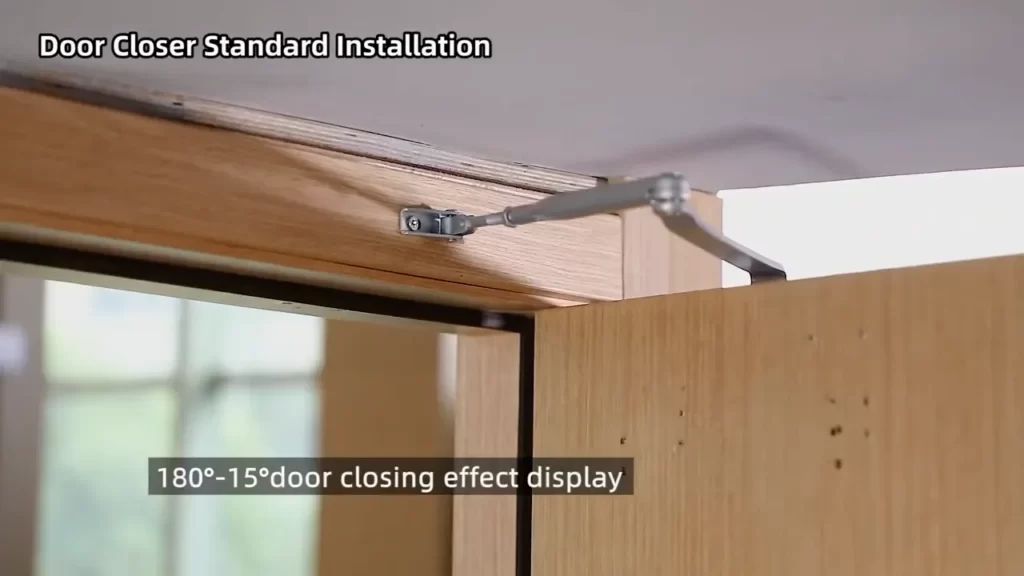
By following these steps, you can successfully install an automatic door closer. Ensure that all the components are securely attached and adjusted to ensure optimal performance. Now that the door closer is installed, you can enjoy the convenience and safety it provides by automatically closing the door behind you.
Step 4: Adjusting And Testing
Now that you have successfully installed the automatic door closer, it’s time to move on to the crucial step of adjusting and testing the functionality to ensure smooth operation. Follow the steps below to make the necessary adjustments and thoroughly test the door closer.
Testing the Door Closer’s Functionality
Before you begin any adjustments, it’s important to test the door closer’s basic functionality. This will give you a starting point to work from when making further adjustments. To test the door closer, follow these steps:
- Open the door to a 90-degree angle and release it.
- Observe the door closing action. It should close smoothly and latch securely without slamming or bouncing back.
- If the door closer is not functioning properly, proceed to the next section to make the necessary adjustments.
Making Necessary Adjustments for Smooth Operation
If the door closer is not functioning as desired during the initial test, you will need to make some adjustments to ensure smooth operation. Follow these steps to make the necessary adjustments:
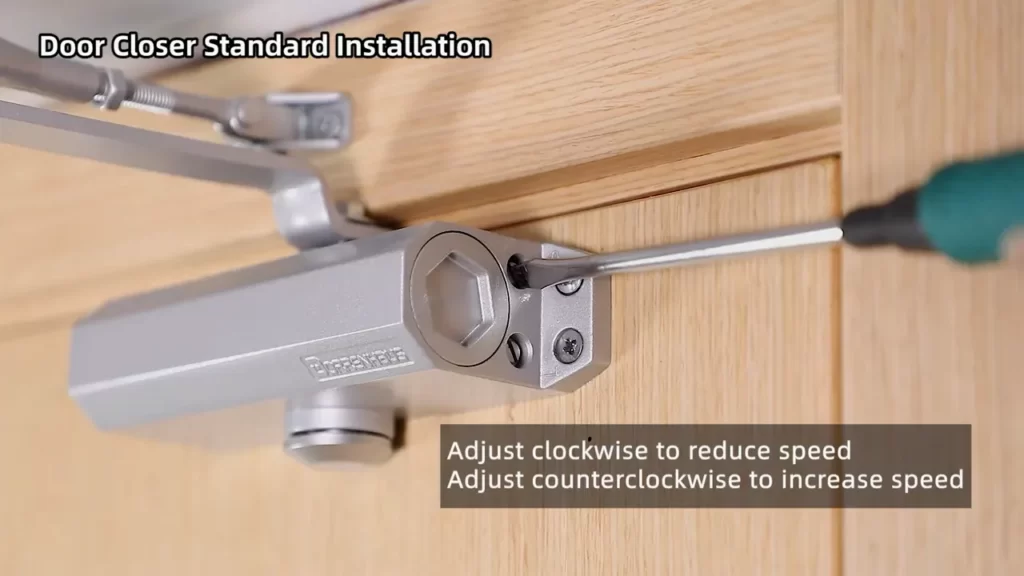
- Locate the adjustment screws on the door closer. These screws are usually labeled with symbols indicating their functions.
- Use a flathead screwdriver to turn the appropriate adjustment screw to adjust the closing speed of the door closer. Turning the screw clockwise will slow down the closing speed, while turning it counterclockwise will increase the speed. Make small adjustments and test the door closer after each adjustment to achieve the desired speed.
- Next, adjust the latch control screw to ensure that the door latches securely. Turning the screw clockwise will increase the latch tension, while turning it counterclockwise will decrease the tension. Make small adjustments and test the door closer after each adjustment to achieve the proper latch.
- Repeat the testing process after each adjustment until you achieve the desired functionality.
Checking for Proper Latch and Closing Speed
After making the necessary adjustments, it’s important to thoroughly check the door closer for proper latch and closing speed. Follow these steps to ensure everything is in order:
- Open the door and release it to check if it closes smoothly and latches securely.
- Observe the closing speed to ensure it is neither too fast nor too slow for your liking.
- If any further adjustments are needed, repeat the adjustment process until you are satisfied with the latch and closing speed.
By following these steps and making the necessary adjustments, you can ensure that your automatic door closer operates smoothly and effectively, providing convenience and security to your space.
Step 5: Maintenance And Troubleshooting
Once you have successfully installed your automatic door closer, it is important to perform regular maintenance to ensure its prolonged efficiency. Additionally, troubleshooting common issues that may arise with your door closer is essential to keep it functioning optimally. In this section, we will discuss the necessary maintenance tasks, how to troubleshoot common problems, and when it is advisable to seek professional assistance.
Regular Maintenance for Prolonged Efficiency
To maintain the efficiency of your automatic door closer, regular maintenance is required. By following these simple steps, you can ensure smooth operation and prevent any major issues from occurring:
- Regularly clean the door closer: Use a soft cloth or sponge dampened with mild soap and water to clean the exterior surfaces of the door closer. Avoid using harsh chemicals or abrasive cleaners as they may damage the finish.
- Lubricate moving parts: Apply a small amount of lubricating oil to the moving parts of the door closer, such as the arm, pivot, and hinges. This will help reduce friction and ensure smooth operation.
- Check for loose screws and fasteners: Regularly inspect the door closer for any loose screws or fasteners. Tighten them if necessary to prevent the door closer from becoming unstable.
- Test the closing speed: Occasionally, check the closing speed of the door closer to ensure it is operating at the desired pace. Adjust the speed if needed according to the manufacturer’s instructions.
- Inspect for any damage: Inspect the door closer for any signs of damage, such as cracks or dents. If you notice any, contact the manufacturer or a professional for further assistance.
Troubleshooting Common Issues with Automatic Door Closers
Despite regular maintenance, automatic door closers may encounter some common issues. Here are a few troubleshooting tips to help you address these problems:
- Door not closing properly: If the door does not close properly, check for any obstructions or dirt on the door closer’s arm or track. Clean them thoroughly and ensure they are free from any debris.
- Door closing too slowly or too quickly: If the door closes too slowly or too quickly, adjust the closing speed using the adjustment screw located on the door closer. Make small adjustments and test the door’s closing speed until it is satisfactory.
- Door making unusual noises: If you hear squeaking or grinding noises when the door closes, it may indicate a lack of lubrication. Apply a small amount of lubricating oil to the affected parts and test the door again.
- Inconsistent door closing: Inconsistent door closing may be caused by a misaligned door closer. Check the alignment of the door closer arm and adjust it accordingly to ensure smooth operation.
Seeking Professional Assistance if Needed
While regular maintenance and troubleshooting can resolve most issues with automatic door closers, there may be situations where professional assistance is required. If you encounter any of the following problems, it is advisable to seek the help of a professional:
- Severe damage to the door closer: If the door closer is severely damaged, such as a cracked casing or broken components, it is best to contact the manufacturer or a professional for repair or replacement.
- Complex installation issues: If you experience difficulties during the installation process or encounter complex issues that you are unsure how to resolve, consulting with a professional can ensure the correct installation and functionality of the door closer.
- Persistent problems despite troubleshooting: If you have followed all troubleshooting steps and the door closer continues to malfunction, it is recommended to seek professional assistance. They will have the expertise to identify and resolve underlying issues.
By following these maintenance tips and troubleshooting guidelines, you can prolong the efficiency of your automatic door closer and address common issues effectively. Remember, regular maintenance and timely intervention can prevent more significant problems and ensure the smooth operation of your automatic door closer.
Frequently Asked Questions Of How To Install Automatic Door Closer
How Do You Install An Automatic Door Closer Hinge?
To install an automatic door closer hinge, follow these steps: 1. Ensure the door and frame are clean and in good condition. 2. Position the hinge on the top of the door and align it with the frame. 3. Mark the screw holes and drill pilot holes.
4. Attach the hinge to the door and frame using screws. 5. Adjust the tension and speed settings of the closer hinge as needed.
What Is The Proper Way To Install A Door Closer?
To properly install a door closer, follow these steps: 1. Begin by adjusting the closer’s spring tension to match the weight and size of the door. 2. Mount the closer on the door frame or top jamb, ensuring it aligns with the door hinge.
3. Attach the closer arm to the door and adjust its length as needed. 4. Test the closure speed and ensure the door closes smoothly without slamming. 5. Lastly, ensure all screws and components are securely tightened.
Are Door Closers Easy To Install?
Yes, door closers are easy to install. They require minimal effort and can be done quickly. Simply follow the provided instructions and use basic tools to ensure proper installation.
Do Door Closers Go On The Inside Or Outside?
Door closers are typically installed on the inside of doors.
How Does An Automatic Door Closer Work?
An automatic door closer works by using a spring mechanism to control the closing speed and force of a door, ensuring it closes smoothly and securely.
What Are The Benefits Of Installing An Automatic Door Closer?
Installing an automatic door closer comes with several benefits, including improved energy efficiency, enhanced security, convenience, and ease of use for individuals with mobility challenges.
Conclusion
Installing an automatic door closer is a simple yet effective way to improve convenience and security in your home or office. By following the step-by-step guide provided in this blog post, you can easily install an automatic door closer on your own.
Remember to choose a high-quality door closer and carefully follow the manufacturer’s instructions for optimal results. With an automatic door closer in place, you can enjoy the benefits of a smoothly functioning door that automatically closes behind you, providing added safety and peace of mind.