o install barn sash windows, measure the window opening and purchase the appropriate size window. Remove any existing window and frame, and prepare the opening for installation by applying a waterproof membrane.
Insert the window into the opening, securing it with screws or nails. Seal the edges with weatherproof caulk to prevent drafts and water infiltration. Finally, add any necessary finishing touches, such as trim or window hardware. Installing barn sash windows can provide natural light and ventilation to your barn or shed, while also adding a touch of rustic charm.
By following these steps, you can easily and efficiently install barn sash windows in your structure.
Preparing For Installation
When it comes to adding charm and functionality to your barn, installing barn sash windows is a great choice. These windows not only provide natural light and ventilation but also enhance the overall aesthetic appeal of your barn. However, proper preparation is essential for a successful installation. In this section, we will guide you through the necessary steps for preparing to install barn sash windows.
Choosing the Right Barn Sash Windows
The first step in preparing for the installation is to choose the right barn sash windows. Consider the style and size that will best suit your barn and its architectural design. Determine whether you need single-sash or multiple-sash windows, and whether you prefer fixed or operable ones. Think about the materials and finishes that will complement your barn’s exterior. By carefully choosing the barn sash windows, you will ensure that they fit seamlessly into your barn and meet your functional needs.
Gathering the Necessary Tools and Materials
Before you can start the installation, gather all the necessary tools and materials. Having everything at your disposal will make the process smoother and more efficient. Here is a list of tools and materials you will likely need:
| Tools | Materials |
|---|---|
| Screwdriver | Barn Sash Windows |
| Tape measure | Shims |
| Level | Screws |
| Drill | Weatherstripping |
| Saw | Exterior caulking |
| Hammer |
Measuring and Planning for Installation
The next step in preparing for the installation is to measure and plan accordingly. Careful measurements will ensure that your barn sash windows fit perfectly and function properly. Start by measuring the rough openings and determining the size of the windows you require. Consider the desired height, width, and depth. With these measurements, you can then plan the positioning and placement of the windows. Additionally, take into account any necessary adjustments for leveling and shimming.
Once you have chosen the right barn sash windows, gathered the necessary tools and materials, and completed the measuring and planning process, you are ready to move on to the actual installation. Proper preparation is the key to a successful installation, so make sure to invest time and effort in this initial phase.
Removing Old Windows
Before you can begin the process of installing barn sash windows, you need to remove the old windows. This step is crucial to ensure a smooth and efficient installation process.
Removing Existing Window Frame and Trim
The first step in removing old windows is to take out the existing window frame and trim. This involves carefully removing any screws or nails that are securing the frame and trim to the wall. Start by using a pry bar or a putty knife to gently pry away the trim from the wall. Be sure to take your time and work slowly to avoid damaging the surrounding wall or trim.
Once the trim is removed, you can then begin to remove the window frame. Use a screwdriver or drill to remove any screws or nails that are holding the frame in place. Again, work slowly and carefully to avoid causing any damage. Once all screws or nails are removed, you should be able to easily lift the window frame out of the opening.
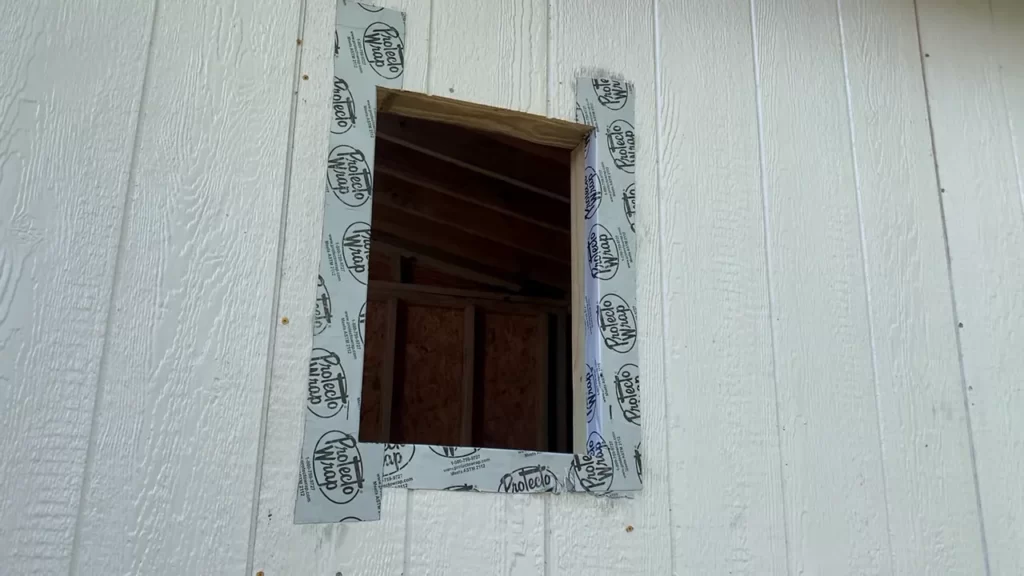
Repairing or Preparing Window Opening
After the window frame and trim have been removed, it’s important to assess the condition of the window opening. This is a good time to inspect for any damage or rot that may need to be repaired before installing the new barn sash windows.
If you notice any signs of damage or rot, you’ll need to take the necessary steps to repair the window opening. This may involve replacing any damaged or rotted wood, applying wood filler to fill in any gaps or holes, or reinforcing the structure to ensure it is sturdy and secure.
Once any necessary repairs have been made, it’s important to clean and prepare the window opening for the installation of the new windows. Use a brush or vacuum to remove any debris or dirt from the opening, ensuring a clean and smooth surface for the new windows to be installed.
By following these steps to remove old windows, you’ll be one step closer to installing your new barn sash windows. Taking the time to carefully remove the existing window frame and trim, and repair or prepare the window opening, will ensure a successful and professional installation.
Installing Barn Sash Windows
Installing barn sash windows is a great way to add charm and functionality to your space. The process might seem daunting, but with the right tools and a step-by-step guide, you can have your barn sash windows installed in no time. In this section, we will walk you through the process of preparing the window sash, applying caulk and weatherstripping, placing the barn sash window into the opening, and securing the window in place.
Preparing the Window Sash
To begin the installation process, you’ll first need to prepare the window sash. Start by examining the sash for any damage or defects. Ensure that the glass is intact, and the frame is in good condition. Next, clean the sash thoroughly using a non-abrasive cleaner, and allow it to dry completely. If necessary, sand any rough areas to create a smooth surface for painting or staining. Finally, apply a protective finish to the wood to prevent rot and extend the window’s lifespan.
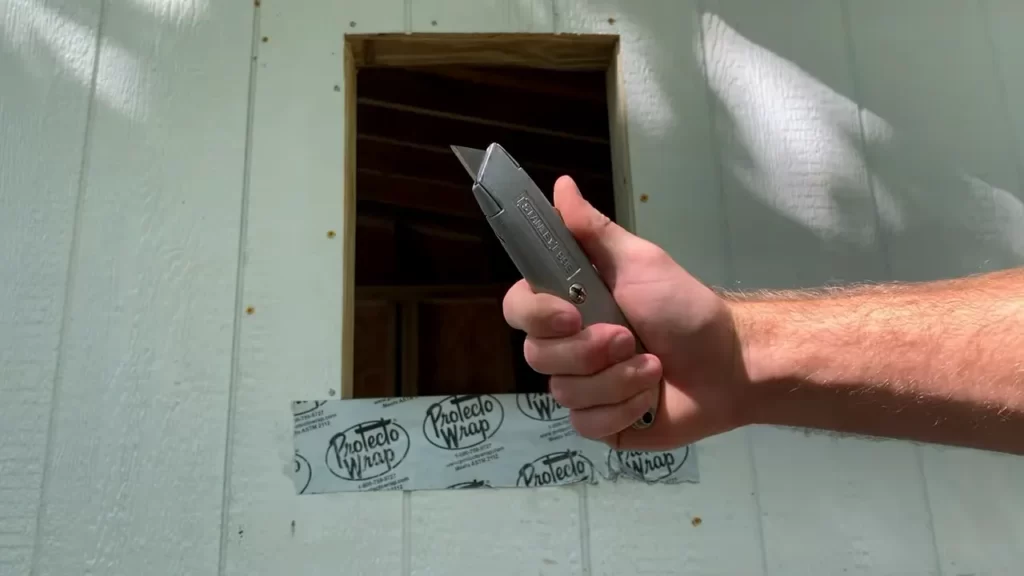
Applying Caulk and Weatherstripping
Before placing the barn sash window into the opening, it’s important to apply caulk and weatherstripping to create an airtight seal. This will help to minimize drafts and improve energy efficiency. Start by applying a bead of caulk along the edges of the window frame. Be sure to fill any gaps or cracks to prevent air leakage. Once the caulk has dried, measure the dimensions of the sash and cut weatherstripping to fit. Apply the weatherstripping along the perimeter of the sash, pressing it firmly into place to ensure a tight seal.
Placing the Barn Sash Window into the Opening
Now that you have prepared the window sash and applied caulk and weatherstripping, it’s time to place the barn sash window into the opening. Carefully position the sash in the frame, ensuring it is level and centered. Use shims if necessary to make any adjustments. Once the sash is in the correct position, gently tap it into place using a rubber mallet. Ensure that the window is aligned correctly and sits flush with the frame.
Securing the Window in Place
After placing the barn sash window into the opening, it’s important to secure it in place to prevent movement and ensure stability. Start by inserting screws or nails into the pre-drilled holes located along the sides of the window frame. Be careful not to overtighten, as this may cause damage to the wood. Finally, check that the window operates smoothly and locks securely.
By following these steps and taking the necessary precautions, you can successfully install barn sash windows and enhance the functionality and aesthetics of your space.
Ensuring Proper Insulation And Sealing
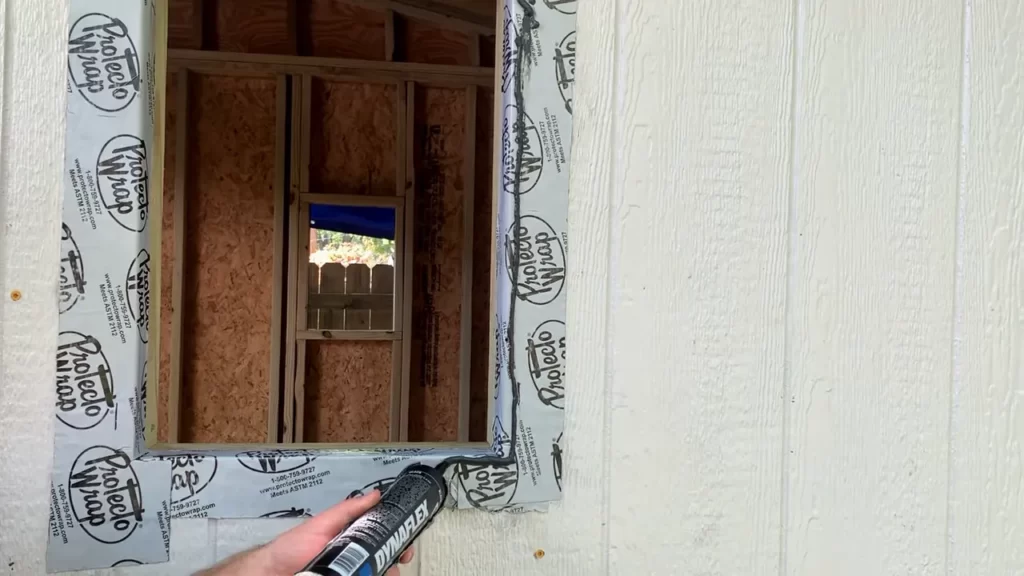
When it comes to installing barn sash windows, one crucial step that should not be overlooked is ensuring proper insulation and sealing. Proper insulation and sealing will help to keep your space warm in the winter, cool in the summer, and save you money on energy bills. In this section, we will discuss two key aspects of insulation and sealing: insulating around the window frame and sealing window gaps and cracks.
Insulating Around the Window Frame
Insulating around the window frame is an essential step to prevent drafts and air leakage. Without proper insulation, you might find that your barn sash windows are not able to provide the level of insulation you desire. To ensure effective insulation around the window frame, here are a few things to keep in mind:
- Choose the right insulation material: There are several types of insulation materials available, such as spray foam, fiberglass batts, or rigid foam boards. Consider the specific needs of your barn and choose an insulation material that is suitable for the location, climate, and budget.
- Measure and cut the insulation: Take accurate measurements of the window frame and cut the insulation material accordingly. Ensure a snug fit around the frame to prevent any gaps or spaces that may let air through.
- Properly seal any gaps: Inspect the window frame and fill any gaps with insulation. Pay close attention to the corners and edges, as these areas are prone to air leakage. Use an adhesive or caulk to seal the gaps and ensure a tight seal.
Sealing Window Gaps and Cracks

Even with proper insulation, it is important to seal any window gaps and cracks to maximize energy efficiency. Here are some steps to help you seal window gaps and cracks effectively:
- Inspect the window for gaps and cracks: Carefully examine the window frame, sashes, and surrounding areas for any gaps or cracks. Common areas where gaps may be present include the junction between the frame and the wall, the window sashes, and the edges of the window.
- Use weatherstripping: Weatherstripping is an effective way to seal gaps and cracks. It can be applied to the window sashes, frame, and any movable parts to prevent air leakage. Ensure that the weatherstripping is of high quality and properly installed for optimal performance.
- Apply caulk or sealant: For larger gaps or cracks, use a caulk or sealant to fill them in. This will help to create a tight seal and prevent air infiltration. Make sure to choose a caulk or sealant that is appropriate for the material of your window and follow the manufacturer’s instructions for application.
- Check for proper sealing: Once you have applied the weatherstripping and caulk, check for proper sealing by conducting a simple test. Stand near the window and feel for any drafts or air leakage. If you notice any, make the necessary adjustments to ensure a tight seal.
By following these steps for insulation and sealing, you can ensure that your barn sash windows provide the utmost energy efficiency and comfort for your space. Take the time to properly insulate and seal your windows, and you will reap the benefits of improved insulation, reduced energy consumption, and increased savings in the long run.
Finishing Touches
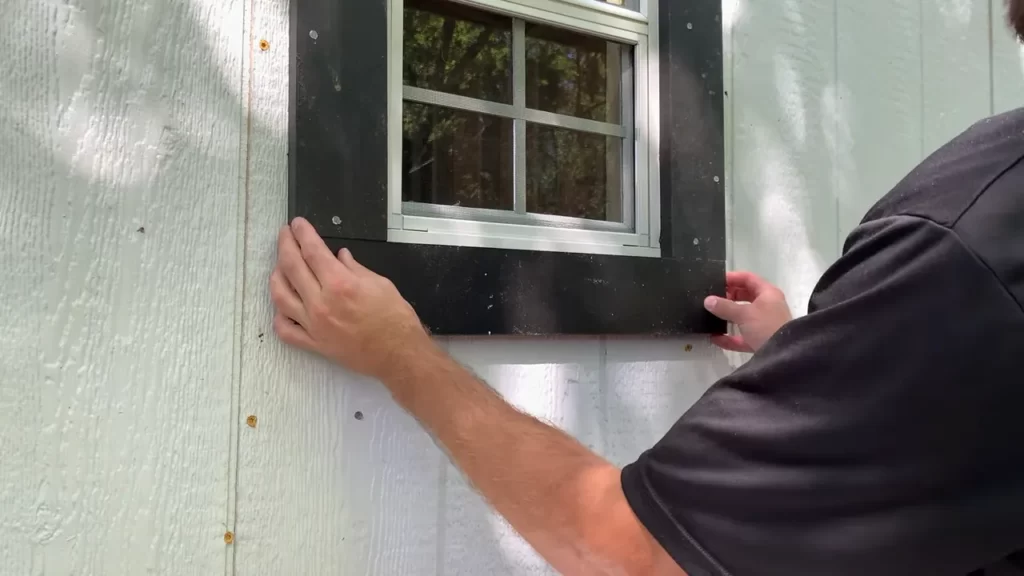
Applying Exterior Trim and Siding
After successfully installing your barn sash window, it’s time to focus on the finishing touches that will enhance both the appearance and durability of your window. One essential step is applying exterior trim and siding to create a seamless integration of the window into your barn or shed.
Start by measuring the dimensions of your window and purchasing the appropriate trim and siding materials. You can choose from a variety of options such as wood, vinyl, or fiber cement, depending on your preference and budget. Ensure that the trim pieces are primed on all sides before installation to protect them from moisture and ensure longevity.
When installing the trim, make sure to use galvanized or stainless-steel nails to prevent rusting over time. Begin by attaching the side trim pieces and then move on to the top and bottom pieces. Use a level to ensure that the trim is straight and aligned with the window frame. Finally, fill any gaps or nail holes with an exterior-grade caulk or wood filler, and allow it to dry completely before moving on to the next step.
Painting or Staining the Barn Sash Window
Once the trim and siding are in place, it’s time to give your barn sash window a final touch of color. Painting or staining the window not only enhances its aesthetic appeal but also provides an added layer of protection against the elements.
If you choose to paint the window, select a high-quality exterior paint that is designed for use on wood surfaces. Before applying the paint, make sure the window is clean and free of any dust or debris. Apply an even coat of paint using a brush or roller, following the manufacturer’s instructions regarding drying times and additional coats if necessary. Allow the paint to dry thoroughly before handling the window.
If staining is your preference, you’ll need to select a stain that is suitable for exterior use and compatible with the type of wood used in your barn sash window. Clean the window thoroughly before applying the stain, and follow the manufacturer’s instructions for application. Depending on the desired depth of color, multiple coats of stain may be required. Ensure each coat is allowed to dry completely between applications.
Cleaning and Maintaining the Installed Window
Proper maintenance is essential to ensure the longevity and performance of your newly installed barn sash window. Regular cleaning will help keep it looking its best and prevent any buildup of dirt or grime that could potentially compromise its functionality.
Begin by gently wiping down the window with a soft cloth or sponge dampened with a mild soap solution. Avoid using abrasive cleaners or rough materials that could scratch the window surface. Rinse with clean water and dry with a soft cloth.
Inspect the window periodically for any signs of damage or wear, including cracks in the glass or gaps in the trim. Address any issues promptly to prevent further deterioration. Additionally, ensure that the window’s hardware, such as hinges and latches, are properly lubricated to maintain smooth operation.
By following these simple steps, you can give your barn sash window the finishing touches it deserves and enjoy its beauty and functionality for years to come.
Troubleshooting And Tips For Success
Installing barn sash windows can be a rewarding and transformative project that enhances the aesthetic appeal and functionality of your space. However, like any home improvement endeavor, it is not without its challenges. In this section, we will address common installation issues and provide tips to ensure a seamless and professional installation of barn sash windows. By following these troubleshooting tips and expert advice, you can overcome obstacles and achieve a successful outcome.
Common Installation Issues and how to Address Them
During the installation of barn sash windows, you may encounter certain issues that can hinder the process. Here are some common problems that homeowners face and effective solutions to address each one:
1. Misaligned Frames
Issue: Sometimes, the window frame may not align perfectly with the surrounding structure, causing difficulty in securing the window in place.
Solution: Before installing the window, ensure that the frame is properly aligned by using a level tool. If the misalignment persists, you can use shims to adjust and level the frame.
2. Poor Insulation and Drafts
Issue: Insufficient insulation and drafts can disrupt the energy efficiency of the installed window, leading to discomfort and increased energy consumption.
Solution: To prevent drafts and improve insulation, apply weatherstripping or caulk along the edges of the window frame. This will create a tight seal and reduce heat or air leakage.
Tips for a Seamless and Professional Installation
In addition to troubleshooting specific issues, following these tips will help you achieve a seamless and professional installation of barn sash windows:
- Measure Twice, Cut Once: Accurate measurements are crucial for a perfect fit. Double-check your measurements before cutting any materials.
- Use the Right Tools: Having the appropriate tools on hand, such as a drill, screwdriver, and level, will streamline the installation process and ensure precise results.
- Follow Manufacturer’s Instructions: Always refer to the manufacturer’s instructions for guidance on proper installation techniques and specific requirements for your barn sash window.
- Work with a Partner: Installing barn sash windows can be a two-person job, so having a partner to assist you will make the process safer and more efficient.
- Take Safety Precautions: Wear safety goggles, gloves, and other protective gear when handling tools, materials, or sharp objects to minimize the risk of injury.
By addressing common installation issues and implementing these tips, you can overcome challenges and install barn sash windows with confidence. Remember, attention to detail and patience are key to achieving a successful installation that enhances your space for years to come.
Frequently Asked Questions Of How To Install Barn Sash Windows
How Do You Hang A Sash Window?
To hang a sash window, follow these steps: 1. Prepare the window frame and sashes. 2. Install the balance system and attach the sashes. 3. Adjust the tension in the balances to ensure smooth operation. 4. Mount and secure the window frame in the opening.
5. Seal and finish the installation for proper insulation and appearance.
What Is A Barn Sash Window?
A barn sash window is a type of window often used in barns and agricultural buildings. It features a traditional design with divided panes of glass and is typically made from wood. Barn sash windows are known for their durability and rustic charm.
Do Sash Windows Open Top And Bottom?
Yes, sash windows open both top and bottom, allowing for improved air circulation and temperature control in a room. These windows are designed to slide vertically, and both sashes can be opened to various degrees, giving you flexibility in ventilation options.
Do Sash Windows Open Up Or Down?
Sash windows open vertically, either up or down, allowing for easy airflow and ventilation.
How Do You Install Barn Sash Windows?
Installing barn sash windows is a straightforward process. Start by measuring the opening, then order the right size window. After that, remove the old window and prepare the opening. Finally, apply sealant and install the new barn sash window securely.
What Tools Do You Need To Install Barn Sash Windows?
To install barn sash windows, you’ll need a few essential tools. These include a tape measure, screwdriver, hammer, level, caulk gun, and a ladder. Having these tools handy will make the installation process much easier and more efficient.
Conclusion
Installing barn sash windows may seem daunting, but with the right tools and steps, it can be a straightforward process. By ensuring proper measurements, using quality materials, and following the recommended techniques, you can enjoy the beauty and functionality these windows bring to your space.
Don’t hesitate to seek professional help if needed, as a well-installed barn sash window can enhance the charm and value of your property for years to come. So, roll up your sleeves and let the transformation begin! Keywords: barn sash windows, installing, measurements, quality materials, recommended techniques, professional help, enhance, charm, value, transformation.