To install a basement door, follow these steps: measure the opening, purchase a pre-hung door, remove the old door, prepare the opening, install the new door, and make necessary adjustments for a proper fit. We will guide you through the process of installing a basement door, ensuring a secure and efficient installation that will enhance your basement’s functionality.
A basement door serves as both an entrance and an exit, providing access to the basement area. Whether you are renovating your basement or simply updating an old door, installing a basement door can be a straightforward task if you have the right tools and follow the correct steps.
We will outline the necessary steps and provide you with tips to successfully install a basement door. Let’s get started!
Step 1: Gathering Tools And Materials

To successfully install a basement door, it is crucial to start with the right tools and materials. Having everything you need ready before beginning the installation process not only ensures that you can work efficiently but also minimizes the risk of errors and delays. In this first step, we will discuss the essential tools and materials needed for a smooth basement door installation.
Essential tools and materials needed for basement door installation
Before you begin installing a basement door, make sure you have the following tools and materials ready:
| Tools | Materials |
|---|---|
| ScrewdriverDrillMeasuring tapeLevelUtility knifePry barHammerChiselCaulking gunSafety gogglesProtective gloves | Basement door kitDoor frameWeatherstrippingInsulationScrewsNailsShimsCaulkPaint or stain (optional) |
Why it is important to have everything ready before starting the installation process
Having all the necessary tools and materials prepared before starting the installation process is crucial for several reasons:
- Efficiency: By gathering all the tools and materials beforehand, you can work without interruption and complete the installation smoothly.
- Accuracy: When everything is readily available, you can follow the installation instructions accurately and minimize the chance of errors or mistakes.
- Safety: Wearing safety goggles and protective gloves and having all the required tools ensures that you can work safely throughout the installation process.
- Time-saving: Gathering the tools and materials in advance saves time that would otherwise be spent searching for missing items or making trips to the hardware store.
- Professional finish: By having all the necessary materials at hand, you can achieve a professional-looking finish for your basement door installation.
Now that you know the importance of having everything ready, let’s move on to the next step of the basement door installation process.
Step 1.1: Measuring And Preparing The Door Opening
Before installing a basement door, it is crucial to accurately measure and prepare the door opening. This will ensure that the door fits properly and functions efficiently. In this step, we will guide you through the process of properly measuring the door opening and preparing the door frame for installation.
Properly measuring the door opening
In order to ensure a perfect fit for your basement door, it is vital to take precise measurements of the door opening. Follow these steps to measure your door opening accurately:
- Using a tape measure, measure the width of the door frame from one side to the other. Measure both the top and bottom of the frame, as well as the middle to make sure the frame is level.
- Next, measure the height of the door frame from the floor to the top of the frame. Again, measure at both sides and the center to ensure accuracy.
- Once you have the width and height measurements, compare them to the dimensions of the new door you are planning to install. Make sure the door is slightly smaller than the door opening to allow for proper clearance and installation.
It is essential to note any irregularities in the door opening, such as uneven surfaces or out-of-square frames, as these may require additional adjustments during the installation process. Always remember to double-check your measurements before proceeding to the next step.
Preparing the door frame for installation
Preparing the door frame is a vital step in ensuring a successful basement door installation. Here are some key steps to follow:
- Clear the area around the door opening, removing any obstructions such as debris, old doors, or furniture that may hinder installation.
- Inspect the door frame for any damages or structural issues. Repair or reinforce the frame as necessary to ensure proper installation and stability.
- Apply a coat of primer or paint to the door frame to protect it from moisture and rot. This step will also enhance its appearance and longevity.
- Install weatherstripping along the edges of the door frame to provide an airtight seal and enhance energy efficiency.
By following these steps, you will ensure that your basement door installation process starts on the right foot. Properly measuring the door opening and preparing the door frame will set the stage for a smooth and successful installation.
Step 1.2: Choosing The Right Door For Your Basement
When it comes to installing a basement door, one of the most crucial steps is selecting the right door for your specific needs. There are several considerations to keep in mind, as well as various types of doors suitable for basement installations. In this section, we will explore these considerations and the different door options available, helping you make an informed decision for your basement door installation.
Considerations when selecting a basement door
Before diving into the types of doors suitable for basement installations, it’s essential to consider a few factors that can influence your decision. By keeping these considerations in mind, you’ll ensure that you choose a basement door that meets both your functional and aesthetic requirements.
- Security: The security of your basement is of utmost importance. Look for a door that has sturdy construction and reliable locking mechanisms to keep your belongings safe.
- Waterproofing: Basements are prone to moisture problems, so opt for a door that offers waterproofing features. This will help prevent water infiltration and keep your basement dry.
- Insulation: Energy efficiency is a vital aspect to consider, especially if you plan to use your basement as a living space. Choose a door that provides good insulation to reduce heat loss and save on energy costs.
- Accessibility: Depending on the purpose of your basement, you may need a door that allows easy access. Consider the size, opening mechanism, and any specific accessibility requirements for your basement door.
- Budget: Set a realistic budget for your basement door installation and look for options that fit within your financial constraints. However, keep in mind that quality and durability are important factors that should not be compromised solely for cost savings.
Types of doors suitable for basement installations
Now that you understand the important considerations for selecting a basement door, let’s explore the different types of doors that are suitable for basement installations. Each type offers its own set of features and benefits, catering to various needs and preferences.
| Type of Door | Description |
|---|---|
| Steel Doors | Durable and secure, steel doors are an excellent choice for basement entrances. They offer strength and resistance against forced entry. |
| Fiberglass Doors | Fiberglass doors are known for their insulating properties and low maintenance requirements. They are available in a variety of styles and designs. |
| Wooden Doors | Wooden doors provide a classic and natural look for your basement entrance. They can be customized to match your interior design and offer good insulation. |
| Glass Doors | Glass doors are an ideal choice to bring in natural light to your basement while maintaining a sleek and modern appearance. They can be combined with other materials for added security. |
Each of these door types has its own advantages and disadvantages. Consider your priorities and requirements to determine which type best suits your basement.
By carefully considering the essential factors and exploring the various types of doors available, you can confidently choose the right door for your basement installation. Remember, the right door not only enhances the functionality of your basement but also adds to its overall appeal and security.
Step 2: Removing The Old Door (If Applicable)
When it comes to installing a new basement door, the first step is to remove the old one, if there is one. Before proceeding, it’s important to identify the reasons why the old basement door needs to be removed and then follow a set of steps to safely remove it. In this section, we will discuss these reasons and provide a step-by-step guide on how to remove the old door. Let’s dive in!
Reasons to remove the old basement door
Before installing a new basement door, it’s essential to understand the reasons behind removing the old one. Here are a few common reasons:
- The old door is damaged or worn out, compromising its functionality.
- You want to upgrade to a more secure and energy-efficient door.
- The current door doesn’t fit the aesthetic of your basement or home.
By removing the old basement door, you can address these issues and create a fresh foundation for the installation of a new door.
Steps to safely remove the old door
Now that you understand the reasons, let’s proceed with removing the old basement door. Follow these steps:
- Gather the necessary tools: Before you begin, make sure to collect the required tools for the job. These may include a screwdriver, pry bar, hammer, reciprocating saw, safety glasses, and gloves to protect yourself during the process.
- Inspect the door: Carefully examine the old door to identify any screws, hinges, or nails used to secure it. Take note of their locations, as you will need this information for the next step.
- Remove the hardware: Use the appropriate tools to unscrew any screws, remove hinges, or pry apart any nailed areas that hold the door in place. Take your time with this step to avoid causing any damage to the surrounding walls or flooring.
- Detach the door: Once the hardware is removed, gently pry the old door away from the frame, ensuring it is completely detached. If necessary, use a reciprocating saw to cut through any stubborn attachments.
- Dispose of the old door: Properly dispose of the old door according to local regulations. Consider recycling options to minimize environmental impact whenever possible.
By following these steps, you can safely and effectively remove the old basement door, making way for the installation of a new one. Stay tuned for the next step in our series on how to install a basement door!
Step 2.1: Inspecting The Door Frame
Before proceeding with the installation of your basement door, it is crucial to assess the condition of your door frame. The door frame provides stability and support for your door, ensuring a proper fit and functionality. In this step, we will guide you on how to inspect the door frame and address any potential issues or damage.
Assessing the condition of the door frame
The first step in inspecting your door frame is to visually examine its overall condition. Look for any signs of wear and tear, rot, or structural damage that may compromise the door’s integrity. Here are some important aspects to consider:
- Check for cracks or splits: Thoroughly inspect the door frame for any visible cracks or splits. These can weaken the frame and affect its ability to hold the door securely.
- Examine for rot or water damage: Moisture and water can cause wood frames to rot over time. Look for discolored or soft areas on the frame, as well as signs of mold or mildew growth.
- Evaluate the alignment: Ensure that the door frame is straight and properly aligned. Any noticeable warping or twisting can affect the door’s ability to close and seal correctly.
- Inspect the hinges and hardware: Check that the hinges are securely attached to the frame and in good working condition. Similarly, assess the condition of any other hardware, such as locks or latches.
- Assess the weatherstripping: Examine the weatherstripping around the frame to ensure it is intact and effectively sealing the door. Damaged or deteriorated weatherstripping can allow drafts and moisture to enter the basement.
Addressing any potential issues or damage
If you encounter any issues or damage during the inspection, it is crucial to address them before proceeding with the installation. Here’s what you can do:
- Repairing cracks or splits: Depending on the severity, you can use wood putty or epoxy to fill in small cracks or splits. For more significant damage, it might be necessary to replace the affected sections of the frame.
- Replacing rotted wood: If you notice any areas of rot or water damage, it’s important to remove and replace the affected portions of the frame. Ensure that the new wood is properly treated to prevent future damage.
- Correcting alignment issues: If the door frame is warped or misaligned, you can use shims to adjust and level the frame. This will ensure that the door operates smoothly and fits securely.
- Replacing worn-out hardware: If the hinges or other hardware appear worn or damaged, it’s advisable to replace them with new ones. This will ensure that the door operates properly and securely.
- Installing new weatherstripping: If the weatherstripping is worn or damaged, remove the old one and replace it with fresh weatherstripping. This will help to improve energy efficiency and prevent drafts.
By thoroughly inspecting and addressing any issues or damage to the door frame, you are setting the stage for a successful and secure basement door installation. Taking the time to evaluate and rectify any problems ensures that your door will function optimally and provide protection for your basement.
Step 2.2: Detaching The Old Door
One crucial step in installing a basement door is to safely detach the old door from its hinges. This step is essential to ensure a smooth and successful installation process. In this section, we’ll outline the methods to detach the old door from its hinges and highlight the safety precautions that need to be followed during the removal process.
Methods to detach the old door from its hinges
Detaching the old door from its hinges requires careful attention to detail and proper technique. There are a few methods you can consider for a successful removal:
- Method 1: Unscrewing the hinges: Start by locating the screws that hold the door hinges in place. Using a screwdriver, carefully unscrew these screws to detach the hinges from the door frame. Be sure to support the door properly as you unscrew the hinges to avoid any accidents.
- Method 2: Pry bar technique: If the doors are held in place by multiple screws or the hinges are difficult to access, you can use a pry bar. Insert the pry bar between the door and the frame, applying gentle pressure to wedge it open. Gradually increase the pressure and wiggle the pry bar until the door starts to pull away from the hinges.
- Method 3: Cutting the hinges: In some cases, the hinges might be damaged or rusted, making it challenging to unscrew them. In such situations, you can use a reciprocating saw or a hacksaw to carefully cut through the hinges. Take extra precaution to avoid any damage to the door frame or nearby surfaces.
Safety precautions during the removal process
While detaching the old door from its hinges, it’s important to prioritize safety. Keep the following safety precautions in mind:
- Protective gear: Wear appropriate protective gear such as gloves and safety goggles to protect your hands and eyes during the removal process.
- Secure the door: Ensure that the door is properly supported and secured while working on the hinges. This prevents the door from falling and causing injuries.
- Use caution with tools: When using tools like screwdrivers, pry bars, or saws, exercise caution and follow the manufacturer’s instructions to avoid accidents.
- Watch out for sharp edges: Be aware of sharp edges on the door and hinge components. Use caution and handle them with care to prevent cuts or injuries.
By following these methods and safety precautions, you can detach the old door from its hinges safely and effectively, making way for the installation of a new basement door.
Step 3: Installing The New Basement Door
After successfully removing the old basement door and preparing the opening, it’s time to move on to the exciting step of installing the new basement door. This process may seem intimidating at first, but with the right approach and a handy set of tools, you’ll be able to enjoy a smooth and effortless installation. In this step-by-step guide, we’ll outline the overview of the installation process and provide you with some valuable tips to ensure your new basement door is securely in place.
Overview of the installation process
Installing a new basement door requires a systematic approach to ensure everything fits perfectly and functions as intended. By following these key steps, you’ll be well on your way to completing the installation:
- Measure the opening: Start by measuring the dimensions of the basement door opening. Accuracy is crucial here, so take multiple measurements and record the smallest ones to ensure a snug fit.
- Prepare the doorframe: Before placing the new basement door, make sure the doorframe is clean, level, and free from any debris or obstructions. This will ensure a proper seal and prevent any future issues.
- Position the door: Carefully align the new basement door in the doorframe, ensuring it sits plumb and square. Use shims to make any necessary adjustments to achieve a perfect fit.
- Secure the door: Once the door is properly positioned, secure it in place using screws or nails. Be sure to follow the manufacturer’s instructions to ensure proper installation.
- Test the operation: After securing the door, thoroughly test its operation by opening and closing it multiple times. Check for any sticking points or misalignments that may require further adjustments.
- Weatherproofing: To protect your basement from moisture and drafts, apply weatherstripping and sealant around the edges of the door. This will help create a tight seal and improve energy efficiency.
Tips for a smooth and effortless installation
As you embark on the journey of installing your new basement door, keep these tips in mind to ensure a stress-free experience:
- Read the instructions carefully: Before starting the installation, thoroughly read the accompanying instructions provided by the manufacturer. This will give you a clear understanding of the specific requirements and steps involved.
- Enlist a helping hand: Installing a basement door can be a two-person job, so don’t hesitate to ask a friend or family member for assistance. Having an extra set of hands will make the process smoother and safer.
- Use high-quality tools: Invest in good quality tools and equipment to make the installation process easier and more efficient. This includes a level, tape measure, screwdriver, drill, and any specialized tools recommended by the manufacturer.
- Take safety precautions: Whenever handling tools, be sure to wear appropriate safety gear such as gloves and safety glasses. Additionally, use caution when working with heavy objects or using power tools.
- Double-check your measurements: Accuracy is crucial when it comes to installing a basement door. Double-check all measurements before making any cuts or adjustments to ensure a proper fit.
- Don’t rush: Take your time during each step of the installation process. Rushing can lead to mistakes and compromise the overall quality of the installation.
Follow these guidelines, and you’ll be well on your way to a successful installation of your new basement door. Enjoy the satisfaction of a job well done and the improved aesthetics and functionality it brings to your basement.
Step 3.1: Prepping The Door Frame
Preparing the door frame for the new door is a crucial step to ensure a smooth and secure installation. By properly prepping the door frame, you can minimize any potential issues and create a solid foundation for your basement door.
Preparing the door frame for the new door
The first step in prepping the door frame is to thoroughly clean the area. Use a broom or vacuum cleaner to remove any dirt, debris, or cobwebs that may have accumulated over time. This will ensure that the new door fits snugly and without any obstructions.
Next, inspect the door frame for any signs of damage or decay. Check for rot, cracks, or loose joints that may impact the stability of the installation. If you notice any issues, it’s essential to address them before proceeding. You may need to repair or replace damaged sections to ensure a secure fit for your new door.
Making adjustments if necessary
Once the door frame is clean and in good condition, you may need to make some adjustments to ensure a proper fit. Measure the width and height of the frame to verify that it matches the dimensions of your new door. If there is any discrepancy, you may need to trim or shim the frame accordingly.
Using a level, check the vertical and horizontal alignment of the door frame. Adjust the frame as needed to ensure that it is plumb and square. This will prevent any issues with the door’s operation and provide a tight seal once installed.
Ensuring each H3 heading adheres to HTML syntax
Step 3.2: Positioning And Securing The Door
Proper Placement of the New Door in the Frame
When installing a basement door, it is crucial to ensure proper placement within the frame. This step determines the door’s functionality, security, and overall aesthetic appeal. To achieve the ideal positioning, follow these simple yet important guidelines:
- Measure the height and width of the door opening to determine the appropriate size for your new door. Take into account any adjustments needed due to the frame’s condition or the door’s design.
- Place the door within the frame, ensuring it aligns perfectly and opens and closes smoothly. If required, utilize shims to achieve a flush fit.
- Check the door’s swing direction and adjust it accordingly for optimal functionality. Consider factors like nearby obstacles or wall configurations that may impact the door’s movement.
- Double-check the door’s levelness by using a bubble level. Adjust as necessary to ensure proper alignment and prevent any uneven pressure or gaps.
Following these steps will help you position the new basement door accurately and provide a solid foundation for the next stage of securing the door.
Securing the Door Using Appropriate Hardware
Properly securing the basement door is essential to ensure its stability, security, and longevity. Adequate hardware selection and installation are key factors in achieving this. Here’s how to secure the door using appropriate hardware:
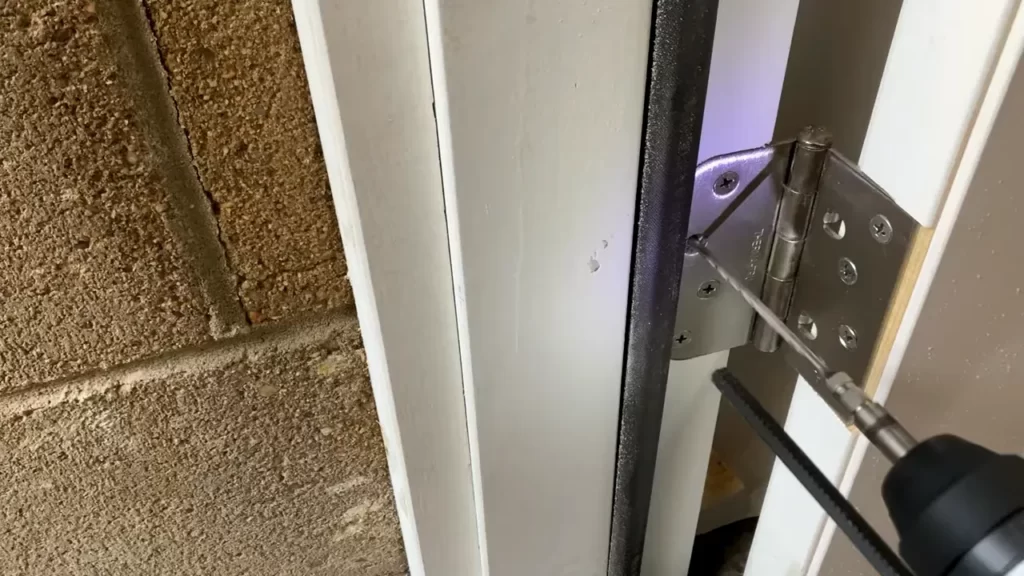
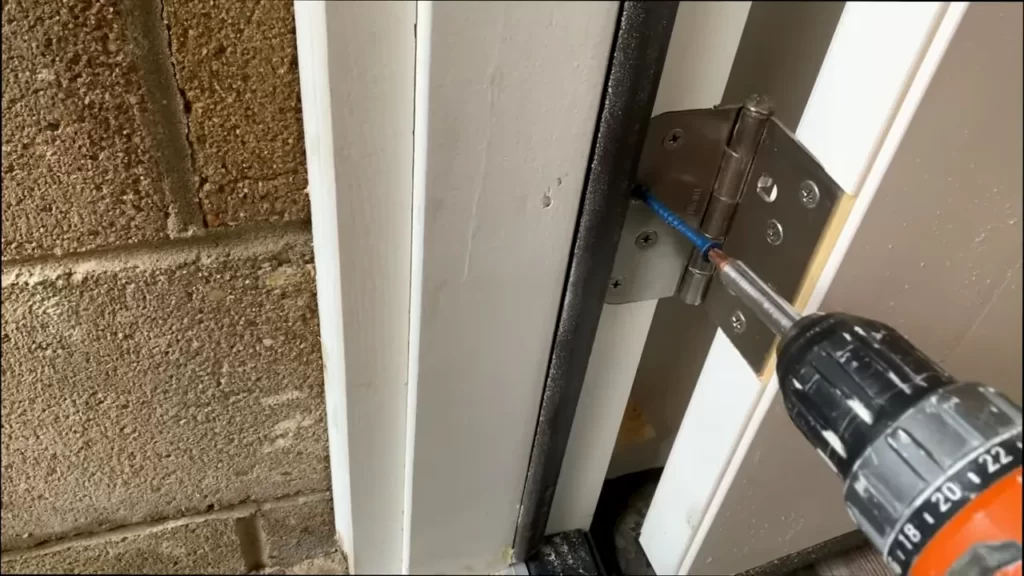
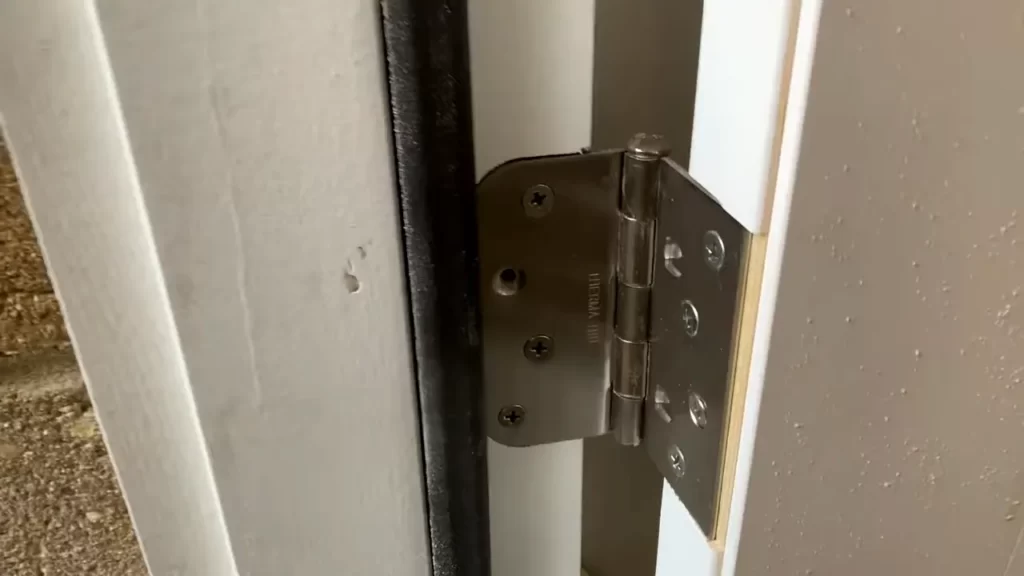
- Choose the right hinges: Select hinges that are sturdy and suitable for your door’s weight and size. Make sure to install at least three hinges to evenly distribute the weight and ensure smooth operation.
- Install the strike plate: Position the strike plate on the door frame, ensuring it aligns perfectly with the door’s lockset. Use screws long enough to secure the strike plate firmly onto the frame.
- Add a deadbolt: For enhanced security, consider adding a deadbolt lock. Follow the manufacturer’s instructions to install it properly, ensuring it is aligned with the strike plate.
- Attach a door handle: If your door requires a handle, make sure to select a durable and easy-to-use option. Install it following the manufacturer’s guidelines, providing a comfortable grip and proper functionality.
- Test the door’s security: After installing the hardware, thoroughly test the door to ensure it locks, unlocks, and operates smoothly. Make any necessary adjustments to guarantee proper alignment and security.
By following these steps and using appropriate hardware, you can secure your basement door effectively, providing peace of mind and protection for your home.
Step 3.3: Testing And Adjusting The Door
Once the basement door has been successfully installed and framed, it’s time to test and adjust the door to ensure proper functionality and alignment. This step is crucial to ensure that the door functions smoothly and securely. Follow these guidelines to check and adjust your basement door:
Checking the functionality and alignment of the door
To begin, test the functionality of the newly installed basement door. Make sure it opens and closes smoothly without any resistance. Check for any sticking points, squeaking sounds, or obstructions that may hinder its operation. If you encounter any issues, it’s important to address them right away to prevent further problems down the line.
In addition to functionality, it’s crucial to assess the alignment of the door. Check if the door sits properly within the frame and aligns correctly when closed. Inspect the sides and top of the door to ensure there are no visible gaps or misalignments. An improperly aligned door can lead to energy loss, security vulnerabilities, and difficulties in opening or closing.
Adjustments to ensure proper operation
If you come across any issues during the functionality and alignment check, adjustments may be necessary to ensure the proper operation of the basement door. Here are some adjustments you can make:
- Weatherstripping: Check the weatherstripping around the door for any signs of wear or gaps. Replace or repair it as needed to prevent drafts and energy loss.
- Hinges: Inspect the hinges and ensure they are securely attached. Lubricate them if necessary to improve their movement and prevent squeaking.
- Lock and latch: Test the lock and latch mechanisms to ensure they operate smoothly. If they are stiff or difficult to use, apply lubricant or make adjustments to ensure proper functionality.
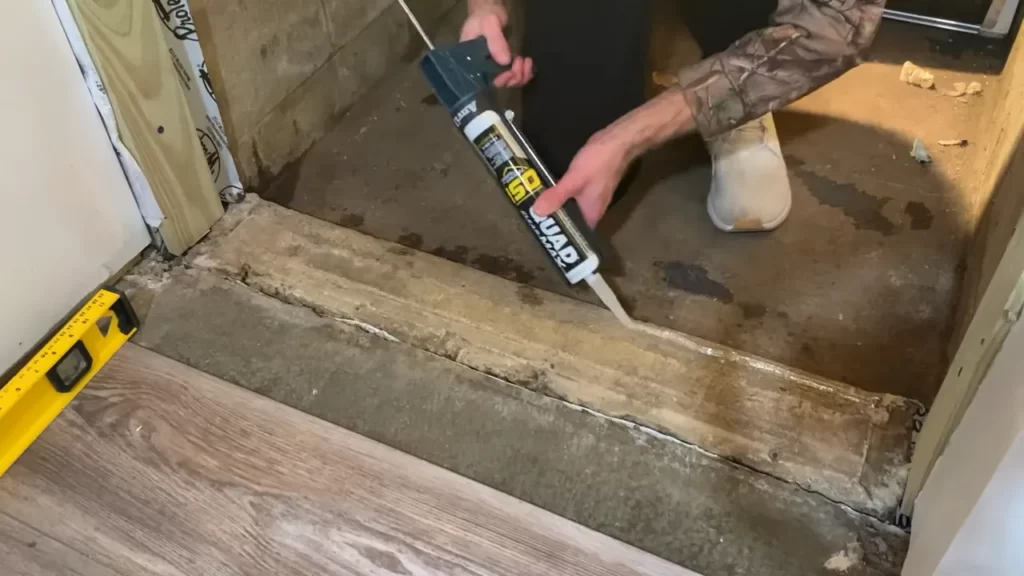
- Threshold: Examine the threshold of the door. It should be level and flush with the floor to prevent tripping hazards and water infiltration.
- Sealing: Check the sealing around the door to ensure it forms a tight seal when closed. Use weatherstripping or caulk to fill any gaps or cracks, improving energy efficiency and preventing water penetration.
By making these adjustments and addressing any potential issues, you can ensure that your basement door operates smoothly, enhances energy efficiency, and provides adequate security. Testing and adjusting the door at this stage will save you from future inconveniences and costly repairs.
Step 4: Finishing Touches And Maintenance
Once you have successfully installed your basement door, it’s time to give it the finishing touches and ensure regular maintenance to keep it in great condition. These final touches not only enhance the appearance of the door but also contribute to its longevity. In this step, we will discuss how to add those final touches to enhance the door’s appearance and the maintenance that should be done to prolong its lifespan.
Adding final touches to enhance the door’s appearance
Now that your basement door is installed, it’s essential to add some final touches to make it visually appealing. These touches will not only make the door look more aesthetically pleasing but also provide added protection and functionality. Here are some steps you can follow:
- Paint or Stain: Choose a paint color or stain that complements the overall design of your basement. Apply it evenly, following the manufacturer’s instructions, for a professional and polished look.
- Weatherstripping: Install weatherstripping around the door frame to prevent drafts and keep moisture out. This will improve energy efficiency and provide additional insulation.
- Door Accessories: Consider adding door accessories such as handles, knobs, or kickplates to enhance the functionality and appearance of your basement door. Select accessories that match the overall style you want to achieve.
- Lighting: Install lighting fixtures near the door or above it to improve visibility and add a welcoming touch. This will not only enhance the door’s appearance but also increase safety when entering or exiting the basement.
Regular maintenance to prolong the lifespan of the door
Maintaining your basement door is crucial to ensure it stays in optimal condition for years to come. Regular maintenance can prevent issues and prolong the door’s lifespan. Here are some maintenance tips to follow:
- Keep it Clean: Regularly clean your basement door using a mild soap and water mixture. Avoid using abrasive cleaners or tools that might damage the door’s surface.
- Inspect for Damage: Routinely inspect the door for any signs of damage, including cracks, warping, or loose parts. Address these issues promptly to prevent further damage.
- Lubricate Moving Parts: Lubricate hinges, locks, and other moving parts of the door to ensure smooth operation. Use a silicone-based lubricant for better results.
- Seal and Repaint/Stain: If you notice any signs of wear and tear on the door’s paint or stain, reseal and repaint/stain it as needed. This will protect the door from outside elements and maintain its visual appeal.
- Clear Surrounding Area: Keep the area around the basement door clear of debris, snow, or other obstacles. This will prevent damage to the door and make it easier to access.
By following these final touches and maintenance tips, you can ensure that your basement door not only looks great but also lasts for years without any major issues. Regular care and attention will keep your door in top-notch condition and provide a comfortable and secure access point to your basement.
Step 4.1: Insulating The Door Frame
Importance of Insulating the Door Frame for Energy Efficiency
Insulating the door frame is a crucial step in the process of installing a basement door. By properly insulating the door frame, you can significantly enhance the energy efficiency of your basement and improve overall comfort. The door frame acts as a barrier between the inside and outside environments, and without proper insulation, cold or hot air can seep through, leading to increased energy consumption and discomfort.
Methods to Properly Insulate the Door Frame
Insulating the door frame is a relatively simple process, but it requires careful attention to detail to ensure optimal results. Here are some methods you can use to properly insulate your basement door frame: 1. Weatherstripping: Weatherstripping is an effective and affordable way to seal gaps and prevent air leakage around the door frame. There are different types of weatherstripping materials available, such as adhesive-backed foam tape or V-strip weatherstripping. Make sure to choose the appropriate type for your door frame and follow the manufacturer’s instructions for installation. 2. Insulating Foam: Insulating foam can be used to fill gaps and cracks around the door frame. Spray foam insulation is a popular choice as it expands to fill even the smallest openings. Apply the foam carefully, ensuring it adheres well to the frame and surrounding area. Allow the foam to cure completely before proceeding with further installation steps. 3. Door Sweep: A door sweep is a weather-stripping component installed at the bottom of the door to seal the gap between the door and the floor. It is typically made of rubber or bristles and helps to prevent drafts and insects from entering your basement. Install the door sweep by attaching it to the bottom of the door, following the manufacturer’s instructions. 4. Insulated Door Jamb: An insulated door jamb provides additional insulation to the door frame. These specialized jambs are made with insulating materials and help improve energy efficiency by reducing thermal transfer. Consider investing in an insulated door jamb for added insulation benefits. 5. Caulking: Caulking is another effective method to seal gaps and cracks around the door frame. Use a caulking gun to apply a bead of caulk along the edges of the frame, filling any visible gaps. Smooth out the caulk with a caulking tool for a neat and clean finish. Allow the caulk to dry before continuing with the installation process. Properly insulating the door frame not only improves energy efficiency but also helps to reduce noise transmission and enhance the overall durability of your basement door. Remember to select the appropriate materials and follow the manufacturer’s instructions to achieve optimal insulation results. By taking the time to insulate your basement door frame properly, you can enjoy a more comfortable and energy-efficient basement space.
Step 4.2: Adding Weatherstripping And Sealing
Step 4.2: Adding Weatherstripping and Sealing In this step, we will discuss the importance of weatherstripping and sealing when installing a basement door. Properly insulating your basement door not only helps to maintain a comfortable temperature inside your home but also prevents drafts, moisture, and insects from entering the basement. This simple yet crucial step can significantly improve the energy efficiency and overall functionality of your basement space. Let’s dive into the benefits of weatherstripping and sealing, as well as the application techniques for effective insulation.
Benefits of Weatherstripping and Sealing
Weatherstripping and sealing play a vital role in maintaining a well-insulated and energy-efficient home. By sealing gaps and cracks around your basement door, you can reap various benefits, including: 1. Energy Efficiency: Proper insulation minimizes heat loss in the winter and reduces heat gain in the summer, resulting in lower energy costs and a more comfortable living environment for you and your family. 2. Draft Prevention: Weatherstripping and sealing can effectively seal off any gaps or drafts around your basement door, preventing cold air from infiltrating your home during the winter months and hot air during the summer. 3. Moisture Protection: Basement areas are prone to excess moisture, which can lead to mold, mildew, and water damage. Weatherstripping and sealing prevent moisture from seeping into your basement, keeping it dry and free from potential water-related issues. 4. Pest Control: Small gaps and cracks can serve as entry points for insects, rodents, and other pests. By effectively sealing these openings, you can prevent unwanted visitors from making their way into your basement. 5. Noise Reduction: Weatherstripping and sealing also help reduce external noise infiltration, providing a quieter and more peaceful living space.
Application Techniques for Effective Insulation
To ensure proper insulation and effective weatherstripping and sealing, follow these application techniques: 1. Identify Problematic Areas: Inspect your basement door thoroughly, identifying any gaps, cracks, or areas prone to drafts. Look for light coming in around the edges of the door or feel for air movement. 2. Choose the Right Weatherstripping Materials: There are various types of weatherstripping materials available, including adhesive-backed foam tape, V-strip, door sweeps, and more. Choose the material that best suits the specific gaps and cracks you need to seal. 3. Measure and Cut: Measure the length of weatherstripping required for each gap or crack, leaving a slight overlap. Cut the weatherstripping with a utility knife or scissors to fit perfectly. 4. Clean and Prepare Surfaces: Before applying the weatherstripping, ensure that the surfaces are clean and free from dust, debris, or any previous sealant residue. Use a damp cloth or mild cleaner to prepare the areas. 5. Apply Weatherstripping: Peel the backing off the adhesive side of the weatherstripping and press it firmly onto the desired surface, making sure it adheres securely. 6. Test for Proper Seal: Close the basement door and check for any light infiltration or air movement. If necessary, make adjustments to the weatherstripping to achieve a snug and proper seal. Remember, the effectiveness of weatherstripping and sealing depends on the quality of installation, so take your time and ensure a thorough application. Properly sealing your basement door will not only provide energy savings but also enhance your overall indoor comfort and protect your basement from potential issues. By following these simple application techniques, you can achieve optimal insulation and create a more energy-efficient and comfortable home.
Step 4.3: Painting Or Staining The Door
When it comes to installing a basement door, one important step is painting or staining the door to enhance its aesthetics and protect the surface from weathering. This step plays a vital role in ensuring that your basement door blends seamlessly with the overall design of your home. In this guide, we will walk you through the process of painting or staining your basement door, helping you achieve a professional and appealing finish.
Options for Enhancing the Aesthetics of the Door
Before diving into the step-by-step guide, it’s essential to understand the different options available to enhance the aesthetics of your basement door. By making an informed choice, you can achieve the desired look that complements your home’s style and architecture. Here are a few options:
- Painting: This is a popular choice that allows you to add a splash of color to your basement door. With a wide range of paint colors available, you can choose one that matches your exterior or complements other elements of your home.
- Staining: If you prefer a more natural and rustic look, staining is a great option. It allows the natural beauty of the wood to shine through, giving your basement door a warm and inviting appeal. Stains come in various shades, allowing you to choose the right tone to match your home’s decor.
- Combining Painting and Staining: For a unique look, you can also consider a combination of painting and staining. This technique allows you to create a contrasting or complementary effect by using different finishes on different parts of the door.
Step-by-Step Guide for Painting or Staining
Now that you have a clear understanding of the different ways to enhance your basement door, let’s dive into the step-by-step guide for painting or staining:
Step 1: Prepare the Surface
The first step is to prepare the surface of the door for painting or staining. Begin by cleaning the door with a mild detergent and water to remove any dirt, dust, or grease. Once the surface is clean, sand it gently to create a smooth and even texture. Make sure to remove any loose paint or stain that may affect the finish.
| Tip: | Ensure you wear gloves and a dust mask to protect yourself during the sanding process. |
|---|
Step 2: Apply Primer (If Required)
If you are painting the door, applying a primer is essential to ensure adhesion and create a smooth base for the paint. If you are staining the door, you can skip this step. Choose a primer that is compatible with the type of paint you intend to use and apply it according to the manufacturer’s instructions. Allow the primer to dry completely before moving on to the next step.
Step 3: Paint or Stain the Door
Now it’s time to apply the paint or stain to the door. Use a high-quality brush or roller to ensure a smooth and even application. Start by painting or staining the edges and corners of the door, then move to the larger flat surfaces. Apply thin coats and allow each coat to dry before adding another layer. Repeat this process until you achieve the desired color depth and coverage.
Step 4: Apply a Protective Finish
To ensure the longevity of your basement door’s new finish, it’s crucial to apply a protective topcoat. This will protect the surface from UV rays, moisture, and other elements. Choose a clear polyurethane or varnish that is compatible with the type of paint or stain you used. Apply the protective finish according to the manufacturer’s instructions, ensuring complete coverage of the door’s surface.
By following these steps, you will be able to achieve a professional and appealing finish for your basement door. Remember to take your time and pay attention to detail to ensure the best results. Now that your basement door is beautifully painted or stained, it’s time to admire your handiwork and enjoy the enhanced aesthetics it brings to your home.
Step 4.4: Maintaining The Basement Door
Step 4.4: Maintaining the Basement Door
Maintenance plays a crucial role in preserving the longevity and functionality of your basement door. By performing regular upkeep tasks, you can ensure that your door remains in optimal condition, preventing any potential issues from escalating. In this section, we will discuss the maintenance tasks you should incorporate into your routine and the signs of potential problems you should look out for.
<h3>Regular maintenance tasks for prolonging the door’s lifespan</h3>
To keep your basement door functioning smoothly for years to come, it’s essential to prioritize regular maintenance tasks. By dedicating a little time to these routine upkeep tasks, you can prolong the lifespan of your door and prevent the need for costly repairs down the line.
- Inspect and clean the door regularly: Regularly inspect your basement door for any signs of dirt, debris, or damage. Use a soft cloth or a mild detergent to clean the door’s surface, removing any accumulated dirt or grime. Additionally, inspect the hinges, handles, and locks, ensuring they are secure and functioning properly.
- Lubricate the door components: Over time, the moving parts of your basement door may start to squeak or become stiff. Apply a suitable lubricant to the hinges, rollers, and tracks to ensure smooth and noise-free operation. Regular lubrication can help prevent rust and keep the door functioning properly.
- Check and replace weatherstripping: Weatherstripping plays a vital role in preventing drafts, moisture, and insects from entering your basement. Regularly inspect the weatherstripping around the door frame and replace any damaged or worn-out sections. This will help maintain a sealed and insulated environment within your basement.
- Keep the tracks clear: It is important to keep the tracks of your basement door clear of any debris, such as leaves or dirt. Regularly remove any obstructions to ensure smooth movement of the door along the tracks.
<h3>Signs of potential issues and how to address them</h3>
Despite regular maintenance, there might be times when your basement door encounters problems. By being aware of the signs of potential issues, you can address them promptly and prevent further damage.
Here are some common signs to watch out for:
- Difficulty in opening or closing: If you notice any difficulty in operating your basement door, such as sticking or resistance, it could indicate an issue with the hinges, tracks, or rollers. Check for any obstructions or misalignment and make the necessary adjustments or contact a professional for assistance.
- Unusual noises: Strange noises when opening or closing the door may signify problems with the rollers or tracks. Inspect these components for any damage or wear and lubricate them if necessary.
- Drafts or leaks: Drafts or moisture seeping through the door can indicate gaps or deteriorated weatherstripping. Replace the weatherstripping promptly to maintain proper insulation and prevent any further damage to your basement.
- Visible damage: If you notice any cracks, dents, or other visible damage to your basement door, address it immediately. Depending on the severity of the damage, you may need to repair or replace the affected parts.
Remember, regular maintenance and timely repairs are key to ensuring the longevity and functionality of your basement door. By incorporating these tasks into your routine, you can enjoy a secure and well-maintained basement entrance for years to come.
Frequently Asked Questions Of How To Install Basement Door
Is It Possible To Add A Door To A Basement?
Yes, it is possible to add a door to a basement. You can hire professionals to assess the structure and install a door that meets your needs. Ensure proper planning and consider any necessary permits before starting the process.
How Do You Install A Door In Concrete?
To install a door in concrete, follow these steps: 1. Measure and mark the desired position for the door on the concrete surface. 2. Use a masonry drill to create holes in the concrete for the door frame anchors. 3.
Insert the anchors into the holes and tighten them securely. 4. Fit the door frame into the anchors and ensure it is level. 5. Attach the door to the frame using hinges and secure it in place.
Can You Add A Door To A Basement Wall?
Yes, it is possible to add a door to a basement wall. This can provide easier access to the basement and improve the functionality of the space. Hiring a professional contractor is recommended to ensure proper installation and structural integrity.
How Do You Secure A Basement Door?
To secure a basement door, first reinforce it with a sturdy deadbolt lock. Install a metal security bar to prevent forced entry. Apply laminated glass or security film to make the door more resistant to break-ins. Make sure the hinges are on the inside and install a door sensor or alarm system for added protection.
How Much Does It Cost To Install A Basement Door?
The cost of installing a basement door can vary depending on factors such as the type of door, materials used, and labor involved. On average, homeowners can expect to spend between $500 to $2,500 for the installation.
What Are The Different Types Of Basement Doors Available?
There are several types of basement doors available, including steel cellar doors, bulkhead doors, and Bilco doors. Each type has its own advantages and suitability for different basement spaces.
Conclusion
To sum up, installing a basement door can greatly enhance the functionality and aesthetics of your basement. By following the step-by-step guide provided in this post, you can successfully install a basement door and enjoy the benefits it brings. Remember to prioritize safety, gather the necessary materials, and carefully follow the instructions.
With patience and attention to detail, you can transform your basement into a more accessible and desirable space. Start your basement door installation project today, and take the first step towards maximizing the potential of your basement.