To install batteries in a Blink camera: 1. Open the battery compartment.
2. Insert the batteries as indicated by the polarity markings. If you’ve recently purchased a Blink camera or need to replace the batteries, it’s vital to know the correct procedure. The installation process is straightforward and can be done in just a few steps.
By following the simple instructions, you’ll have your Blink camera up and running in no time. We’ll guide you through the process of installing batteries in a Blink camera, ensuring that you don’t encounter any difficulties along the way. With the right batteries and a few minutes of your time, your Blink camera will be ready to capture high-quality footage.
Checking The Blink Camera Battery Status
One of the key factors to consider when using a Blink camera is the battery life. After all, you want to make sure your camera is always up and running to keep your home secure. In this section, we will guide you through the process of checking the Blink camera battery status, so you know when to replace the battery.
How to determine if the Blink camera battery needs to be replaced
It is essential to regularly check the battery status of your Blink camera to ensure its optimal performance. Fortunately, determining if the battery needs replacement is a straightforward process. Follow these steps to check the Blink camera battery status:
- Launch the Blink mobile app: Open the Blink app on your smartphone or tablet. If you haven’t installed it yet, you can download it from the App Store or Google Play Store.
- Select the camera: Choose the Blink camera for which you want to check the battery status. The app will display a list of cameras linked to your account.
- Navigate to the device settings: Tap on the camera’s name or the gear icon to access the device settings.
- Check battery status: Within the device settings, you will find the battery status. If the battery is healthy, it will show as “Good.” If it needs replacement, the status will indicate “Replace Soon” or “Replace Now.”
By following these simple steps, you can easily determine if it is time to replace the battery in your Blink camera. It is recommended to check the battery status regularly to ensure your camera continues to function optimally.
Understanding Blink camera battery life indicators
The Blink camera provides helpful indicators to monitor its battery life. It’s important to understand these indicators to ensure you are aware of the battery’s condition. Here are the different battery life indicators on the Blink camera:
| Battery Status | Meaning |
|---|---|
| Good | The battery is in good condition and has sufficient charge. |
| Replace Soon | The battery is getting low and may need replacement soon. It is recommended to have a spare battery ready. |
| Replace Now | The battery is critically low and requires immediate replacement. To prevent interruptions in camera functionality, replace the battery promptly. |
By familiarizing yourself with these battery life indicators, you can stay proactive in managing the battery status of your Blink camera. Remember, a well-maintained battery ensures your camera operates smoothly and effectively.
Gathering The Required Tools And Materials
Before you begin installing the batteries in your Blink camera, it’s important to make sure you have all the necessary tools and materials on hand. By gathering everything you need beforehand, you can streamline the installation process and avoid any unnecessary delays. In this article, we’ll outline the tools you’ll need and recommend some battery options for your Blink camera.
What tools you will need to install batteries in a Blink camera
Installing batteries in a Blink camera requires a few basic tools that you most likely already have at home. Here’s a list of what you’ll need:
- A small Phillips screwdriver: This tool will come in handy for removing the screws on the battery compartment of your Blink camera.
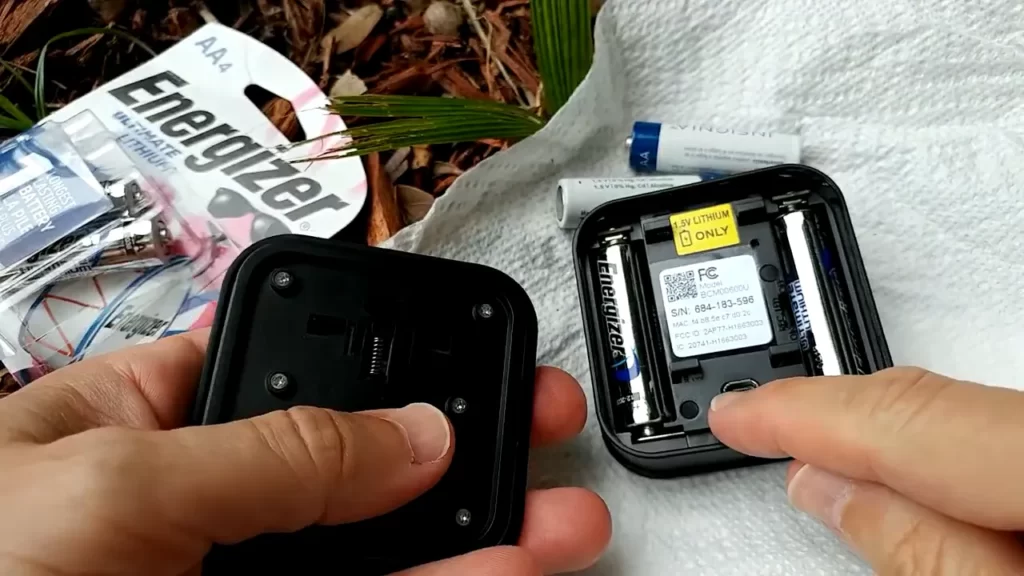
- A fresh set of AA batteries: The Blink camera operates on AA batteries, so make sure you have a set of new batteries ready to go.
- A clean, lint-free cloth: Before inserting the batteries, it’s important to wipe down the battery contacts in the camera and on the batteries themselves to ensure a good connection.
Recommended battery options for the Blink camera
When it comes to choosing the right batteries for your Blink camera, it’s important to consider both performance and longevity. Here are some recommended battery options that can help maximize the lifespan of your Blink camera:
| Battery Type | Advantages |
|---|---|
| Lithium AA Batteries | – Longer lifespan compared to alkaline batteries – Better performance in extreme temperatures – Lightweight and portable – Less risk of leakage |
| Rechargeable AA Batteries | – Environmentally friendly – Cost-effective in the long run – Can be recharged multiple times – Lower risk of leakage |
While both options are suitable for the Blink camera, lithium AA batteries tend to provide better overall performance and longevity. However, if you want a more eco-friendly solution and don’t mind recharging your batteries regularly, rechargeable AA batteries can be a great choice.
With your tools and battery options sorted, you’re now ready to proceed with the battery installation process for your Blink camera. Make sure to follow the manufacturer’s instructions carefully and enjoy the reliable performance of your Blink camera with its new set of batteries.
Step-By-Step Guide To Installing Batteries In Blink Camera
Step-by-Step Guide to Installing Batteries in Blink Camera
Installing batteries in your Blink camera is a simple process that ensures your camera continues to capture high-quality footage. Whether you’re replacing depleted batteries or installing new ones, this step-by-step guide will walk you through the process, ensuring you can get your camera up and running in no time.
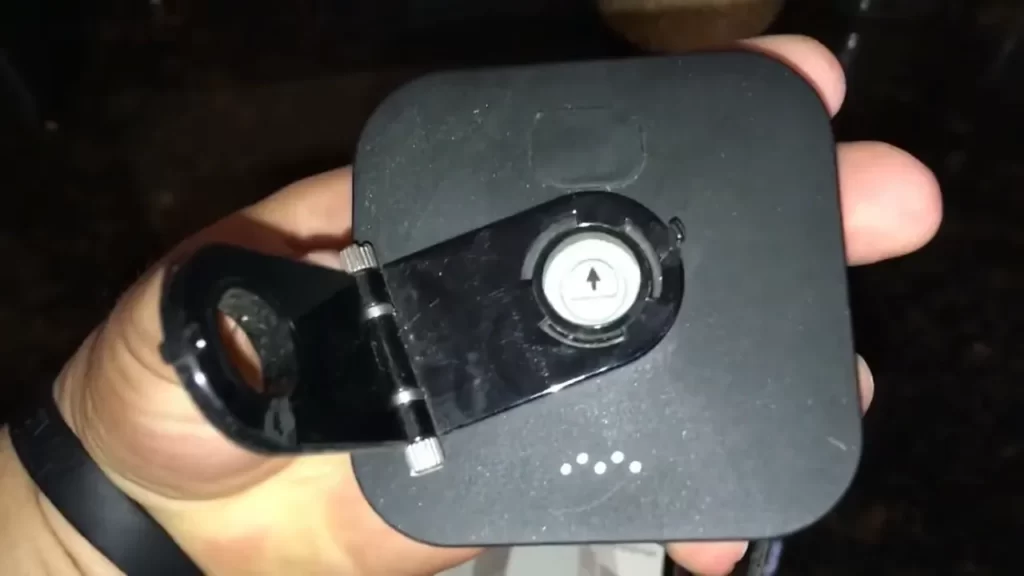
Removing the Blink camera cover
Before accessing the battery compartment, you need to remove the Blink camera cover. Begin by locating the small arrow indicator on the cover. Press down on the cover and simultaneously slide it in the direction indicated by the arrow. The cover will easily come off, allowing you to access the internal components of the camera.
Accessing the battery compartment
With the cover removed, you can now locate the battery compartment. The compartment is typically located at the bottom of the camera, marked with a battery icon. Look for a small latch or release button that allows you to open the compartment.
Removing the depleted batteries

- Open the battery compartment by following the instructions provided on your particular Blink camera model.
- Once the compartment is open, carefully remove the depleted batteries one by one. Take note of their orientation to ensure proper installation of the new batteries.
Inserting the new batteries correctly
With the depleted batteries removed, it’s time to insert the new batteries. To do this:
- Check the polarity markings on the inside of the battery compartment to ensure proper alignment of the new batteries.
- Take the new batteries and insert them one by one into the compartment, following the polarity markings.
Closing the battery compartment and securing the cover
Once the new batteries are correctly inserted, it’s time to close the battery compartment and secure the cover:
- Align the cover back on the camera, making sure it fits securely.
- Slide the cover in the opposite direction of the arrow indicator until it clicks into place.
Your Blink camera is now ready to be powered back on. Ensure the cover is securely closed to protect the internal components from dust and moisture.
Tips For Maximizing Blink Camera Battery Life
Adjusting the Camera’s Power-Saving Settings
To extend the battery life of your Blink camera, it is crucial to optimize its power-saving settings. Adjusting these settings will help conserve energy and ensure that your camera operates efficiently. Follow these simple steps to adjust the power-saving settings:
- Open the Blink Camera app on your smartphone and select the camera you want to adjust.
- Navigate to the settings menu and locate the “Power Saving” option.
- By default, Blink cameras are set to provide optimal battery life, but you can fine-tune the settings to suit your requirements.
- Consider enabling the “Scheduled Arm/Disarm” feature, which allows you to specify specific times during which the camera will not be active. This can be useful if you know there will be no activity in the monitored area during certain periods.
- Additionally, you can adjust the camera’s motion detection sensitivity to avoid unnecessary triggered recordings, conserving battery power.
By making these adjustments, you can significantly prolong the battery life of your Blink camera while ensuring that it captures any important events in the designated area.
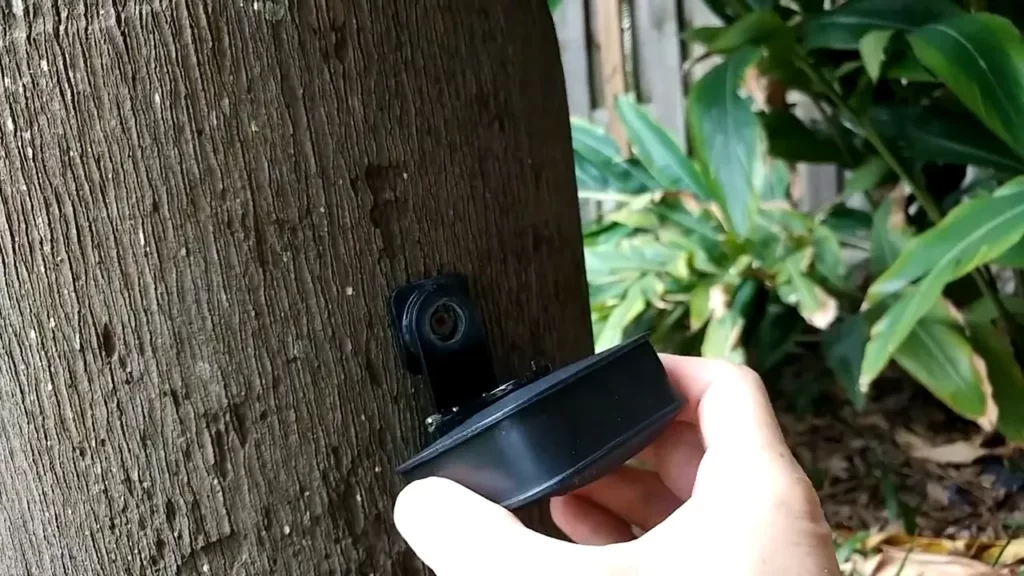
Optimal Placement of the Blink Camera for Longer Battery Life
Proper placement of your Blink camera can have a substantial impact on its battery life. Here are a few tips to ensure optimal placement:
- Position your camera strategically, focusing on areas where you expect the most activity or potential security risks. Avoid pointing the camera towards constant sources of motion, such as busy roads or tree branches constantly swaying in the wind.
- Take advantage of the adjustable mount provided with your Blink camera. Experiment with different angles and heights to achieve the best field of view without sacrificing battery life.
- Aim to avoid direct exposure to harsh weather conditions as extreme temperatures can negatively affect battery performance. Mount the camera in areas protected from heavy rain, snow, or excessive sunlight.
- Keep in mind that the distance between the camera and the Sync Module can impact battery life. Strive to place the camera within a reasonable range to ensure reliable signal transmission without overexerting battery power.
By following these placement guidelines, you can optimize the battery life of your Blink camera while capturing crucial footage effectively.
Regular Maintenance Practices to Prolong Battery Performance
Ensuring that your Blink camera’s batteries are well-maintained is essential for maximizing their longevity and performance. Prolong the life of your batteries with these regular maintenance practices:
- Regularly clean the camera lens and the surrounding area to prevent dust or dirt buildup. Use a soft cloth or lens cleaning solution to gently wipe the lens and keep the camera’s motion detection accurate and efficient.
- Check your camera’s firmware regularly to ensure it is up to date. Manufacturers often release firmware updates that fix bugs and improve energy efficiency.
- Consider investing in rechargeable batteries specifically designed for Blink cameras. These batteries can provide extended usage, and you’ll have the convenience of recharging them whenever necessary rather than regularly purchasing disposable ones.
By incorporating these maintenance practices into your routine, you can enhance the battery performance of your Blink camera and enjoy its surveillance capabilities for an extended period.
Common Troubleshooting Issues And Solutions
Installing batteries in your Blink camera is a straightforward process, but sometimes you might encounter some common issues. In this section, we will discuss the potential problems you may face and provide simple solutions to help you resolve them quickly.
Blink camera not turning on after battery replacement
One of the most common issues with Blink cameras is when the camera does not turn on after replacing the batteries. This can be easily resolved by following these troubleshooting steps:
- Ensure that you have inserted the batteries correctly. Double-check the battery orientation and make sure they are aligned properly.
- Confirm that the batteries you are using are fully charged and functional. Sometimes, new batteries can be faulty or have low power.
- Try removing and reinserting the batteries. This can help establish a proper connection and resolve any minor issues.
- If the issue persists, try using a different set of batteries to rule out the possibility of a battery problem.
- If none of the above steps work, contact Blink customer support for further assistance.
Blink camera indicating low battery even with new batteries
If your Blink camera keeps indicating low battery even after installing new batteries, you can try the following troubleshooting steps to fix the issue:
- Check that you have correctly inserted the batteries. Ensure they are properly aligned and making good contact with the camera’s battery terminals.
- Make sure that you are using the recommended type and brand of batteries for your Blink camera model. Using low-quality or incompatible batteries may lead to inaccurate battery level readings.
- Remove the batteries and clean the battery contacts on both the camera and batteries. Dust or dirt accumulation can interfere with the electrical connection and cause the low battery warning.
- If the issue persists, try using a different set of batteries from a reliable brand. There could be a chance that the new batteries you initially installed are defective.
- If none of the above steps resolve the issue, it is recommended to reach out to Blink customer support for further assistance.
By following these simple troubleshooting steps, you can easily address common battery-related issues with your Blink camera. Ensure that you always use high-quality batteries and regularly monitor the battery levels to ensure optimal performance.
Frequently Asked Questions On How To Install Batteries In Blink Camera
How Do I Install Batteries In A Blink Camera?
To install batteries in a Blink camera, simply open the battery compartment, insert the batteries according to the polarity guide, and close the compartment securely.
What Type Of Batteries Do Blink Cameras Use?
Blink cameras use AA lithium batteries, which provide long-lasting power and better durability compared to regular alkaline batteries.
How Often Do I Need To Replace The Batteries In My Blink Camera?
The frequency of battery replacement in Blink cameras depends on various factors such as usage, camera settings, and environmental conditions. On average, Blink cameras’ batteries can last up to two years with typical usage.
Can I Use Rechargeable Batteries In Blink Cameras?
Yes, you can use rechargeable batteries in Blink cameras. Make sure to use high-quality rechargeable batteries and follow the manufacturer’s instructions for charging and installation.
Will I Lose Any Settings Or Recordings When Replacing Blink Camera Batteries?
No, you will not lose any settings or recordings when replacing the batteries in your Blink camera. The camera’s settings and recordings are stored in the cloud, ensuring they remain intact even during battery changes.
Conclusion
Installing batteries in your Blink Camera is a simple process that ensures uninterrupted surveillance. By following the steps outlined in this guide, you can easily power your camera and enjoy its many features. Remember to handle the batteries with care and always verify their compatibility.
Make sure to complete all necessary troubleshooting steps to maximize the camera’s efficiency. With Blink Camera installed and powered up, you can have peace of mind knowing your property is secure.