Installing the battery in the Arlo Pro 4 is a simple process that involves following a few steps. Begin by removing the camera from its mount, locate the battery compartment, and insert the battery, ensuring a secure fit.
Introducing the Arlo Pro 4 into your home security system provides peace of mind, but first, you need to know how to properly install its battery. In this guide, we will outline the exact steps required to seamlessly insert the battery into the Arlo Pro 4, ensuring a hassle-free installation.
With these instructions, you’ll be one step closer to safeguarding your property effectively. So let’s get started by understanding the straightforward process of inserting the battery into the Arlo Pro 4.
Unboxing The Arlo Pro 4
When it comes to setting up your Arlo Pro 4 security camera, the first step is unboxing. This exciting process involves opening up the package and discovering all the components that come with the camera. In this section, we will guide you through the unboxing process of the Arlo Pro 4, ensuring you have everything you need to start installing the battery and setting up your camera.
What’s included in the box

Before diving into the unboxing process, it’s important to have an understanding of what should be included in the box. When you open your Arlo Pro 4 package, you can expect to find the following components:
- 1 Arlo Pro 4 wireless security camera
- 1 Rechargeable battery
- 1 Magnetic wall mount
- 1 Power adapter and cable
- 1 Quick start guide
- Mounting screws and anchors
These components are essential for setting up your Arlo Pro 4 camera and ensuring it is securely mounted for optimal coverage.
Checking the contents for any damage
Once you have unboxed your Arlo Pro 4, it is important to inspect all the contents for any damage. Before installing the battery, take a few moments to visually examine each component, including the camera, battery, and mount, for any signs of damage or defects. Look out for any cracks, dents, or visible malfunctions that could hinder the camera’s performance.
If you notice any damage or suspect that a component is faulty, it is recommended to contact Arlo support or the retailer from whom you purchased the camera for further assistance. Ensuring that all the components are in perfect condition will help guarantee a smooth installation process and optimal functionality of your Arlo Pro 4 camera.
Now that you have unboxed your Arlo Pro 4 and checked for any damage, you are ready to move on to the next step: installing the battery. Stay tuned for the next section where we will guide you through the process step by step!
Preparing For Battery Installation
Charging the Arlo Pro 4 battery
Before installing the battery in your Arlo Pro 4, it’s crucial to ensure that it is adequately charged to provide optimal performance. Follow these steps to charge your Arlo Pro 4 battery:
- Connect the charging cable to the Arlo Pro 4 camera’s charging port.
- Insert the other end of the charging cable into a power source, such as a wall outlet or a computer’s USB port.
- Wait for the battery LED on the camera to turn solid green, indicating that the battery is fully charged. It typically takes around three and a half hours to charge the Arlo Pro 4 battery.
- Once the battery is fully charged, unplug the charging cable from the power source and the Arlo Pro 4 camera.
Checking battery health
Ensuring the health of the battery is important to maintain the longevity of your Arlo Pro 4 camera. Here’s how you can check the battery health:
- Open the Arlo app on your smartphone or access the Arlo web portal on your computer.
- Select the Arlo Pro 4 camera from the list of devices.
- Navigate to the “Settings” section and click on “Device Settings”.
- Locate the “Battery” option and click on it to access detailed information about your battery.
- Check the battery health status displayed on the screen. If the battery health is low, consider replacing it for optimal performance.
Understanding battery life and usage
Battery life and usage can vary depending on factors such as camera settings, environmental conditions, and camera activity. It’s essential to understand how to maximize your battery life and usage. Consider the following tips:
- Minimize camera activity by adjusting motion detection sensitivity to prevent unnecessary triggers.
- Ensure that your camera is positioned in an area with optimal Wi-Fi signal strength to avoid excessive battery consumption.
- Regularly check and clean the camera lens to avoid false motion detection caused by dirt or debris.
- If you plan on using the Arlo Pro 4 camera continuously, consider purchasing additional batteries for seamless swapping.
- Take advantage of Arlo’s power-saving features, such as scheduling camera on/off times to conserve battery life during inactive periods.
By taking the time to charge your Arlo Pro 4 battery properly, check its health regularly, and implement strategies to optimize battery life and usage, you’ll ensure that your camera performs at its best, providing you with reliable surveillance and peace of mind.
Step-By-Step Guide To Installing Battery

If you’re looking to install the battery in your Arlo Pro 4 camera, you’ve come to the right place. In this step-by-step guide, we’ll walk you through the process of installing the battery correctly, ensuring that your camera functions optimally. Let’s get started!
Locating the battery compartment
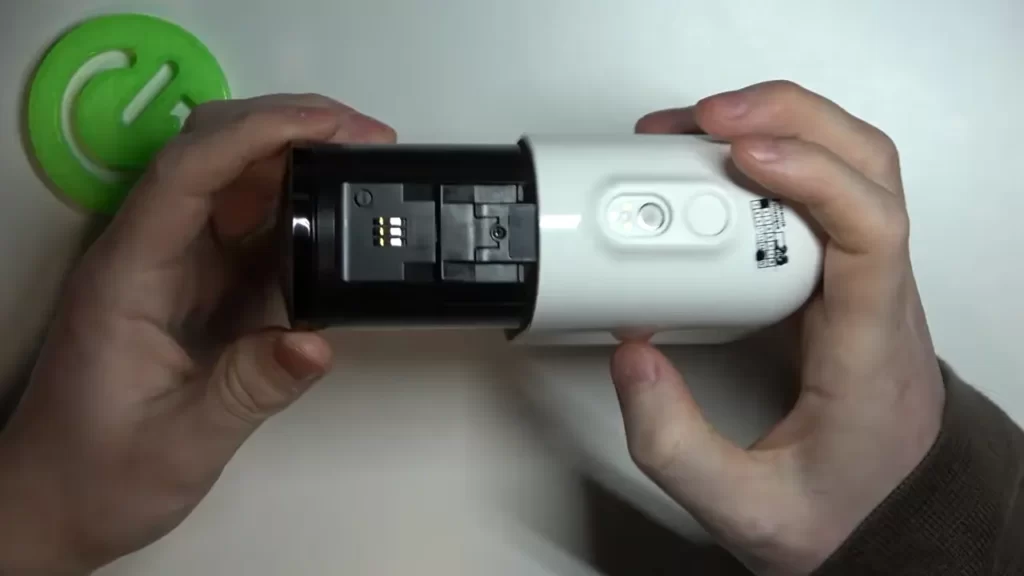
The first step in installing the battery is to locate the battery compartment on your Arlo Pro 4 camera. Normally, the battery compartment is located on the back of the camera. To find it, simply turn your camera around and look for a small latch or cover.
Opening the battery compartment
Once you’ve located the battery compartment, the next step is to open it. Gently slide the latch or unfasten the cover to open the battery compartment. Take care not to apply too much force or you may damage the cover.
Inserting the battery correctly
With the battery compartment open, it’s time to insert the battery. Take your battery and align the contacts on the battery with the contacts in the compartment. Carefully insert the battery, making sure it is securely in place. Take note of the correct orientation, as inserting the battery incorrectly can prevent your camera from functioning properly.
Securing the battery in place
Once the battery is inserted correctly, it’s important to secure it in place. Close the battery compartment cover or slide the latch back into place, ensuring that the cover is firmly closed. This will ensure that the battery stays in place and does not become dislodged during use.
And that’s it! You have successfully installed the battery in your Arlo Pro 4 camera. With the battery in place, you can now enjoy the convenience of wireless operation and long-lasting power for your security needs. If you have any further questions or need assistance, remember to consult the user manual or reach out to Arlo’s customer support. Happy monitoring!
Powering On Arlo Pro 4
Installing the battery in your Arlo Pro 4 is the first step to get your security camera up and running. In this guide, we will walk you through the process of powering on your Arlo Pro 4 and connecting it to your Wi-Fi network. Let’s get started!
Turning on the device
Before you can start using your Arlo Pro 4, you need to turn it on. Here’s how:
- Locate the power button on your Arlo Pro 4. It is usually located on the back or bottom of the device.
- Press and hold the power button for a few seconds until the LED indicators on the camera start to blink.
- Release the power button and wait for the camera to start up. This may take a minute or two.
Once the camera is powered on, you can proceed to the next step to check the battery level indicator.
Checking the battery level indicator
It’s important to know the battery level of your Arlo Pro 4 to ensure uninterrupted surveillance. Follow these steps to check the battery level:
- Launch the Arlo app on your mobile device or open the Arlo web portal on your computer.
- Sign in to your Arlo account using your credentials.
- Select the Arlo Pro 4 camera from the list of devices.
- Navigate to the “Settings” section of the camera.
- Look for the battery level indicator. It will display the current battery percentage of your Arlo Pro 4.
It is recommended to keep the battery level above 20% for optimal performance. If the battery level is low, you may need to recharge or replace the battery.
Connecting to Wi-Fi network
Now that your Arlo Pro 4 is powered on and you know the battery level, it’s time to connect it to your Wi-Fi network. Follow these steps:
- Open the Arlo app on your mobile device or access the Arlo web portal on your computer.
- Sign in to your Arlo account if you haven’t already.
- Select the Arlo Pro 4 camera from the device list.
- Navigate to the “Settings” section of the camera.
- Select “Wi-Fi settings” or a similar option.
- Follow the on-screen instructions to scan for available Wi-Fi networks and connect to your desired network.
- Enter the Wi-Fi password when prompted.
- Wait for the camera to establish a connection with the Wi-Fi network. This may take a few moments.
- Once the connection is established, the LED indicators on the Arlo Pro 4 will stop blinking and remain solid.
Congratulations! You have successfully powered on your Arlo Pro 4 and connected it to your Wi-Fi network. You can now start enjoying the advanced features and security offered by your Arlo Pro 4 camera.
Optimizing Battery Performance
Installing a battery in your Arlo Pro 4 camera is just the first step towards ensuring uninterrupted surveillance. To truly optimize its battery performance, you need to fine-tune various camera settings. In this guide, we’ll explore some key adjustments you can make to maximize battery life and overall efficiency.
Adjusting camera settings for optimal battery life
By tweaking certain settings, you can significantly extend the battery life of your Arlo Pro 4. Here are a few adjustments you should consider:
- Reduce video quality: Lowering the video quality can help conserve battery power. While high-definition footage provides crystal-clear visuals, it requires more energy to record and transmit. Adjusting the video quality to a moderate level strikes a balance between image clarity and battery consumption.
- Adjust camera positioning: Proper camera placement is crucial in reducing unnecessary triggering of the motion detection feature. Avoid pointing the camera towards busy streets, trees, or other sources of constant movement. This way, you’ll minimize false alerts and unnecessary battery drain.
- Switch off the live view: The live view feature allows you to monitor the camera in real-time, but it also drains battery power quickly. Turning off the live view when not needed can significantly conserve battery life. Only activate it when you require direct surveillance.
Managing motion detection sensitivity
Customizing the motion detection sensitivity can prevent unnecessary triggers and reduce battery consumption. Here’s what you need to keep in mind:
- Adjust sensitivity levels: Experiment with different sensitivity levels to find the optimal setting. Lower sensitivity levels may miss some events, while higher sensitivity levels may pick up too much unnecessary movement. Strike the right balance to avoid excessive battery usage.
- Create activity zones: Defining specific areas within the camera’s field of view as activity zones can help eliminate false alerts. By excluding areas where expected movements occur, such as waving trees or busy roads, you can reduce the frequency of motion-triggered recordings and ultimately conserve battery life.
- Schedule motion detection: Tailor the camera’s motion detection to specific time frames when activity is typically expected. If you want surveillance only during nighttime, adjust the motion detection schedule accordingly. This way, you’ll avoid wasting battery power during idle periods.
Troubleshooting Battery Issues
When it comes to Arlo Pro 4, the battery is an essential component that keeps your security camera powered and ready. However, there may be instances where you encounter common battery-related problems. In this section, we will explore these issues and provide you with simple solutions to troubleshoot them. So, let’s dive in and get your Arlo Pro 4 up and running smoothly!
Understanding common battery-related problems
Before we jump into troubleshooting, it’s essential to understand the common battery-related problems you may encounter with your Arlo Pro 4. Familiarizing yourself with these issues can help you identify the specific problem and take appropriate steps to resolve it. Here are a few typical battery problems:
- Battery draining quickly: If you notice that the battery of your Arlo Pro 4 is depleting faster than usual, it could be indicative of an issue.
- Failure to charge: Sometimes, you might face difficulties in charging the battery or notice that it doesn’t charge at all.
- Inaccurate battery level: The Arlo Pro 4 might display an incorrect battery level, causing confusion about its actual charge status.
- Difficulty in installing the battery: Occasionally, users may face difficulties or encounter errors while installing a new battery.
Resetting the device
If you’re facing any of the aforementioned battery-related problems, performing a reset on your Arlo Pro 4 can often resolve the issue. Resetting the device helps to clear any temporary glitches or software conflicts.
To reset your Arlo Pro 4, follow these simple steps:
- Locate the reset button on the camera’s base station.
- Using a small, pointed object such as a paperclip, press and hold the reset button for about 10 seconds.
- Release the reset button when the LEDs on the base station start blinking.
- Wait for the base station to restart itself, and then check if the battery-related issue has been resolved.
Contacting Arlo support for further assistance
If you have tried troubleshooting battery issues on your own but haven’t achieved satisfactory results, it’s time to seek further assistance from Arlo support. The Arlo support team consists of knowledgeable professionals who specialize in resolving product-related concerns.
Contacting Arlo support is relatively simple:
- Visit the official Arlo website and navigate to the support section.
- Find the contact information for your region or country.
- Reach out to the Arlo support team via phone or email, depending on the provided contact options.
- Explain the battery issue you’re facing and provide any additional relevant details.
- Follow the instructions provided by the support representative to troubleshoot and resolve the problem.
Remember, Arlo support is there to assist you, so don’t hesitate to contact them if you require further help with battery-related issues or any other concerns regarding your Arlo Pro 4.
Maintenance And Battery Replacement
Proper maintenance and timely battery replacement are crucial for the optimal performance of your Arlo Pro 4 security camera. In this section, we will walk you through the necessary steps to clean the battery compartment and replace the battery when necessary.
Cleaning the battery compartment
Regular cleaning of the battery compartment ensures that your Arlo Pro 4 camera functions smoothly. Follow these steps to clean the battery compartment:
- First, unplug the camera from its power source and remove the battery.
- Using a clean, dry cloth, gently wipe the battery compartment to remove any dust or debris.
- Inspect the contacts inside the compartment and ensure they are clean and free from any residue. If needed, you can use a small, soft brush to remove any stubborn dirt.
- Once the compartment is clean, you can reinsert the battery and plug the camera back into its power source.
It is recommended to clean the battery compartment at least once every three months or more frequently if you live in a dusty environment.
Replacing the battery when necessary
Over time, the battery of your Arlo Pro 4 camera will eventually lose its capacity to hold a charge. When you notice a significant reduction in battery life, it’s time to replace it. Follow these steps to replace the battery:
- Start by turning off the camera and unplugging it from the power source.
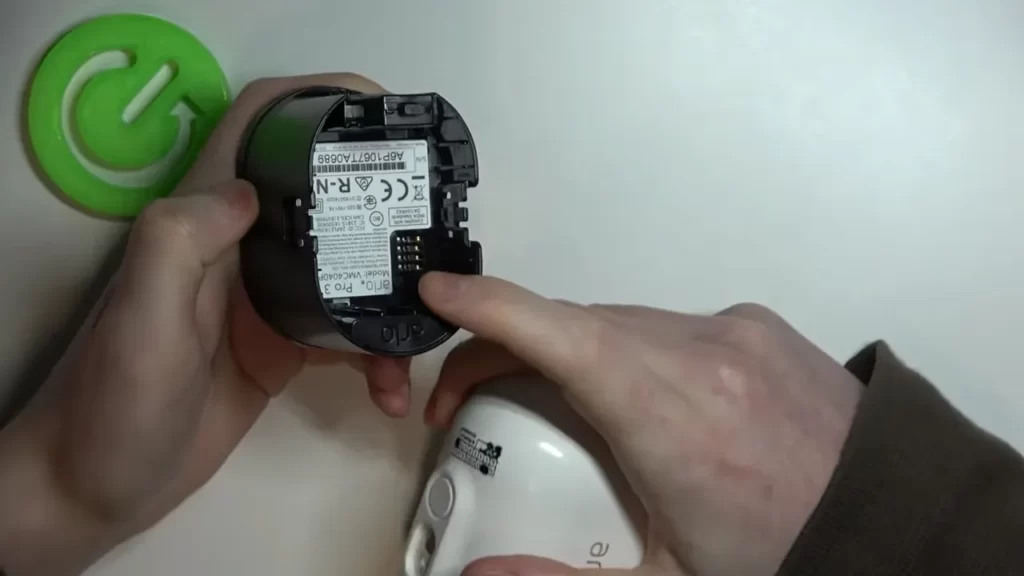
- Locate the battery compartment on the back of the camera.
- Slide the latch or release button to open the compartment.
- Remove the old battery by gently pulling it out.
- Insert the new battery, ensuring it is securely in place.
- Close the battery compartment by sliding the latch or pressing the release button until it clicks into place.
- Finally, plug the camera back into its power source and turn it on.
Remember to dispose of the old battery properly and replace it with a compatible Arlo Pro 4 battery to ensure compatibility and optimal performance of your camera.
By following these maintenance and battery replacement steps, you can extend the lifespan of your Arlo Pro 4 camera and enjoy continuous surveillance without any interruptions.
Frequently Asked Questions On How To Install Battery In Arlo Pro 4
How Do You Put The Battery In The Arlo 4 Camera?
To put the battery in the Arlo 4 camera, follow these steps: Open the camera’s battery compartment, insert the battery correctly, ensuring the polarity matches, and close the compartment. Make sure the battery is securely inserted before operating the camera.
Does The Arlo Pro 4 Have A Removable Battery?
Yes, the Arlo Pro 4 does have a removable battery.
How Do I Change The Battery In My Arlo Pro 4Xl?
To change the battery in your Arlo Pro 4xl, follow these steps: 1. Locate the battery compartment on the back of the camera. 2. Open the compartment by sliding the latch or pressing the release button. 3. Remove the old battery from the compartment.
4. Insert a new, fully charged battery into the compartment. 5. Close the compartment and ensure it is securely latched.
Why Is My Arlo Pro 4 Battery Not Charging?
Arlo Pro 4 battery may not charge due to a faulty charger or cable, improper connection, or a drained battery. Check the charger and cable for any damage, ensure a secure connection, and try charging the battery from a different power source.
If the issue persists, contact Arlo support for assistance.
How Do I Install The Battery In Arlo Pro 4?
To install the battery in Arlo Pro 4, simply open the compartment on the bottom of the camera and insert the battery into its designated slot.
Conclusion
Installing the battery in the Arlo Pro 4 is a straightforward process that anyone can easily follow. By carefully following the steps mentioned in this guide, you can ensure a long-lasting and efficient battery life for your Arlo Pro 4 camera.
Remember to keep the camera charged and regularly check for any updates or maintenance required. With a properly installed battery, you can enjoy uninterrupted surveillance and peace of mind knowing that your property is well-protected.