To install cabinet door knobs, simply mark the desired location, drill a hole, insert the screw, and tighten it with a screwdriver or drill. Installing cabinet door knobs is a simple and effective way to update the look of your cabinets.
Whether you’re remodeling your kitchen or just want to add a fresh touch, installing new knobs can make a big difference. In this guide, we will walk you through the step-by-step process of installing cabinet door knobs. By following these instructions, you’ll have your new knobs installed in no time.
So let’s get started!
What You’Ll Need To Get Started
Installing cabinet door knobs is a simple and effective way to update the look of your cabinets. With just a few tools and materials, you can give your cabinets a fresh new look in no time. Here’s what you’ll need to get started:
Screwdriver
A screwdriver is an essential tool for installing cabinet door knobs. It allows you to easily remove the existing screws and attach the new knobs securely. Make sure you have a screwdriver that is the right size for the screws on your cabinet doors. It’s a good idea to have both a flat-head and a Phillips-head screwdriver on hand, as some knobs may require different types of screws.
Cabinet door knobs
The most important item you’ll need for this project is, of course, the cabinet door knobs themselves. There are countless options available, so you can choose knobs that match your personal style and complement the overall design of your cabinets. Before purchasing the knobs, consider the size, shape, and finish that will best suit your cabinets.
Measuring tape
To ensure that your cabinet door knobs are installed in the right position, you’ll need a measuring tape. This will help you determine the exact placement for each knob, so they look symmetrical and aligned. Measure the distance from the edge of the door to where you want the center of the knob to be. Taking accurate measurements will ensure that all your knobs are consistently installed.
Once you have these tools and materials ready, you’re all set to start installing your cabinet door knobs!
Measuring And Marking The Placement For Your Knobs
Assessing the cabinet door surface area
Before you can begin installing cabinet door knobs, it’s important to assess the surface area of the cabinet door. Take a moment to closely examine the door to identify any irregularities or unevenness that may affect the placement of the knobs. You’ll want a smooth and level surface to ensure the knobs sit properly and function correctly.
Identifying the desired height and location for knobs
Once you’ve assessed the surface area, it’s time to determine the height and location of the knobs. Consider the overall design of the cabinet and the functionality you desire. Are you looking for a traditional or modern look? Do you want the knobs centered vertically or horizontally? Take into account the size of the cabinet door and the amount of space available. Additionally, consider the ergonomic factors, such as the ease of reaching the knobs from a standing position. By identifying the desired height and location, you can achieve a cohesive and functional cabinet design.
Making precise measurements and markings
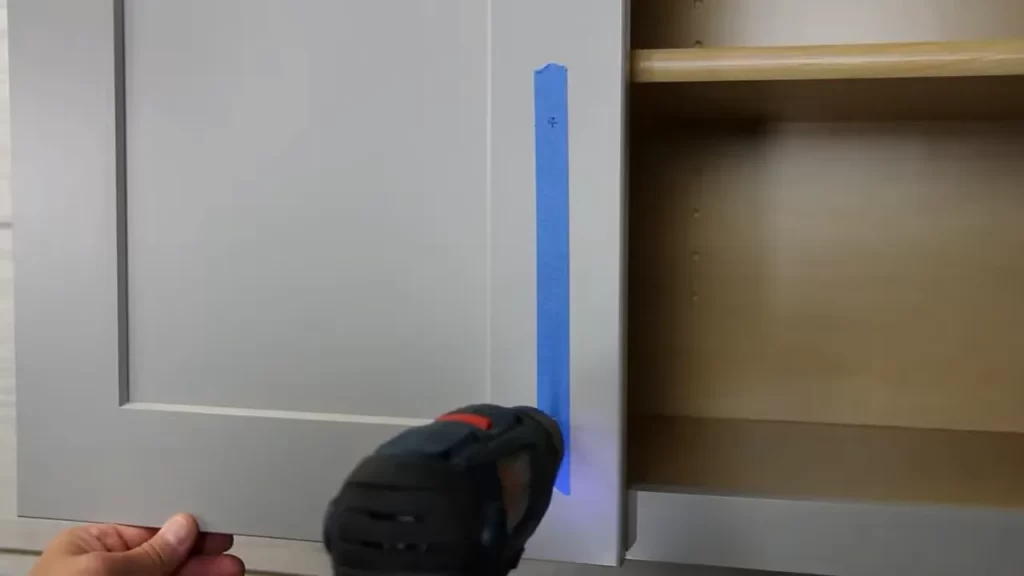
Now that you have identified the desired height and location for the knobs, it’s time to make precise measurements and markings. Using a tape measure, measure the distance from the top and bottom of the cabinet door to determine the vertical placement of the knobs. Ensure the measurements are accurate and consistent to achieve a symmetrical look. You can mark the measurements using a pencil or painter’s tape.
Next, determine the horizontal placement of the knobs. You can choose to center them horizontally or place them slightly off-center for a more unique look. Measure the distance between the edges of the door or use a level to ensure they are aligned properly. Again, mark the measurements with a pencil or painter’s tape.
By making precise measurements and markings, you’ll ensure that each knob is mounted in the exact location you desire. This level of attention to detail will result in a professional and polished finish for your cabinets.
Ensuring A Smooth Installation Process
Installing cabinet door knobs can be a simple and rewarding DIY project that can instantly update the look of your kitchen or bathroom cabinets. However, to ensure a smooth installation process, there are a few important steps that need to be followed. By taking the time to properly remove any existing hardware or residue, fill any holes or gaps on the door surface, and sand the door for a clean and even finish, you can achieve professional-looking results.
Removing any existing hardware or residue
Before installing new cabinet door knobs, it is crucial to remove any existing hardware or residue. This will not only give you a clean surface to work with but also prevent any interference with the installation of the new knobs. Here’s how to do it:
- Carefully unscrew and remove the current knobs or handles using a screwdriver or drill. Make sure to keep all the screws in a safe place to avoid misplacing them.
- Inspect the door surface for any sticky residue or adhesive from the previous hardware. Use a mild adhesive remover and a soft cloth to gently wipe away any residue. Be cautious not to damage the door surface in the process.
Filling any holes or gaps on the door surface
After removing the old hardware, you may notice holes or gaps on the door surface. These imperfections should be filled to ensure a smooth and professional-looking finish. Follow these steps to fill any holes or gaps:
- Choose a wood filler that matches the color of your cabinet doors. This will ensure a seamless and cohesive look.
- Using a putty knife or a small craft spatula, apply the wood filler to the holes or gaps on the door surface. Make sure to fill them completely, leveling the filler with the surface of the door.
- Allow the wood filler to dry completely according to the manufacturer’s instructions.
- Once the filler is dry, lightly sand the area with fine-grit sandpaper to smooth out any rough edges.
Sanding the door for a clean and even finish
Before installing the new cabinet door knobs, it’s important to sand the door for a clean and even finish. This step ensures that the surface is smooth and free from imperfections. Here’s how to do it:
- Start by removing the cabinet doors and placing them on a flat and stable surface. This will allow you to sand them more effectively.
- Using a fine-grit sandpaper, gently sand the entire surface of the door, following the natural grain of the wood. Pay extra attention to the areas where you have filled holes or gaps, making sure they are smooth and flush with the rest of the surface.
- After sanding, wipe away any dust or debris with a clean cloth to ensure a clean and smooth surface ready for installation.
By following these steps and ensuring a smooth installation process, you can achieve professional and seamless results when installing cabinet door knobs. Remember to take your time and pay attention to detail to ensure the best outcome for your cabinets.
Attaching The Knobs To The Door
Now that you have positioned and marked the ideal spot for your cabinet door knobs, it’s time to attach them securely. This step will ensure that your cabinets not only look great but are also functional. Following the correct installation process will help you achieve the desired outcome. Let’s dive into the details of how to properly attach cabinet door knobs.
Positioning the knob on the marked spot
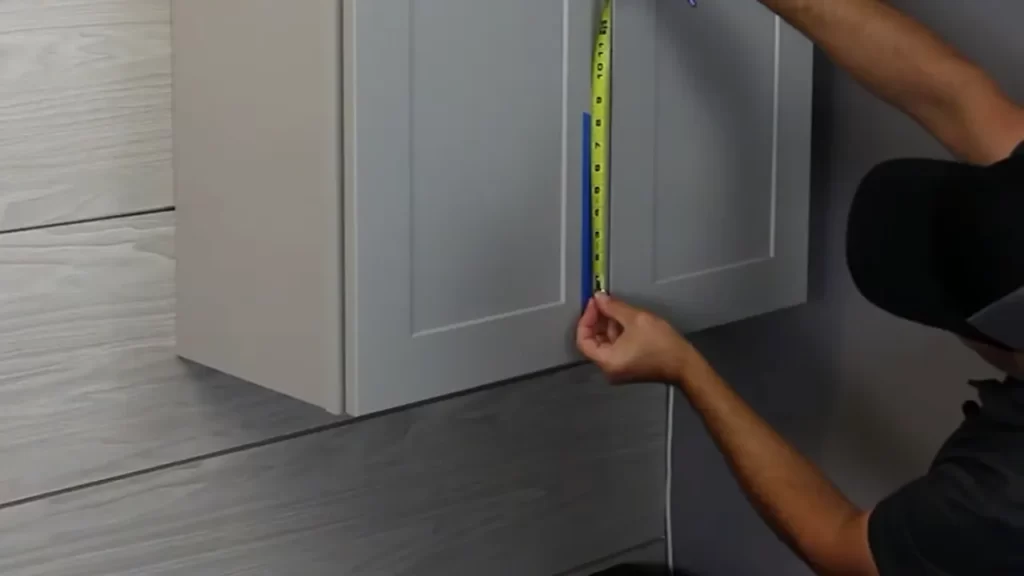
Start by aligning the cabinet door knob with the marked spot on the front surface of the door. Use a ruler or measuring tape to ensure that the knob is positioned centrally and at the right height. This will guarantee an aesthetically pleasing result and convenient access to the cabinet.
Securing the knob with screws
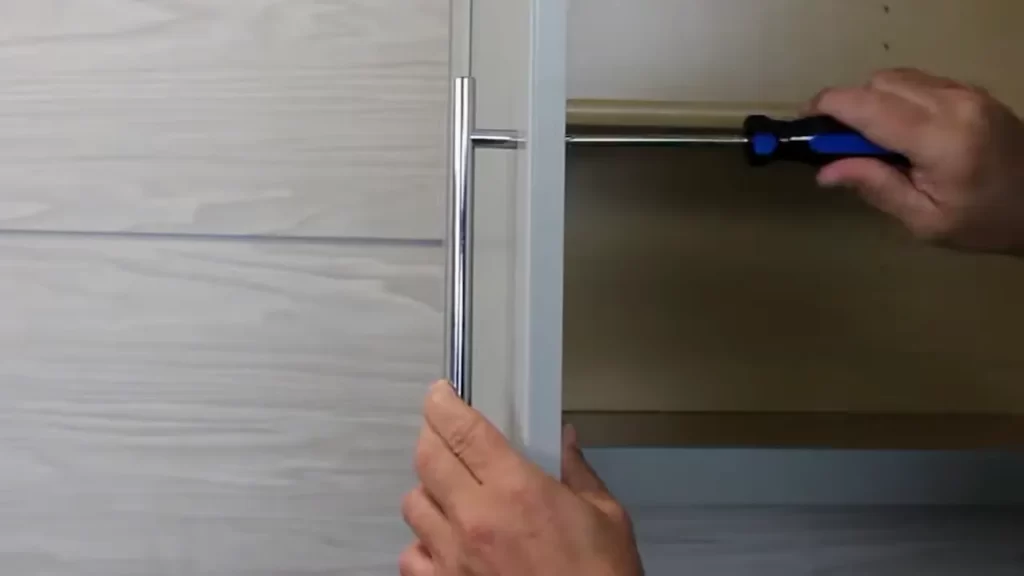
Once you have positioned the knob correctly, take one of the provided screws and insert it through the hole in the knob from the back side. Carefully align the screw with the hole on the door and start tightening it using a screwdriver. Repeat the process with the remaining screws, making sure to secure the knob firmly but not over-tightening to avoid damaging the door or the knob itself.
Checking for proper alignment and tightness
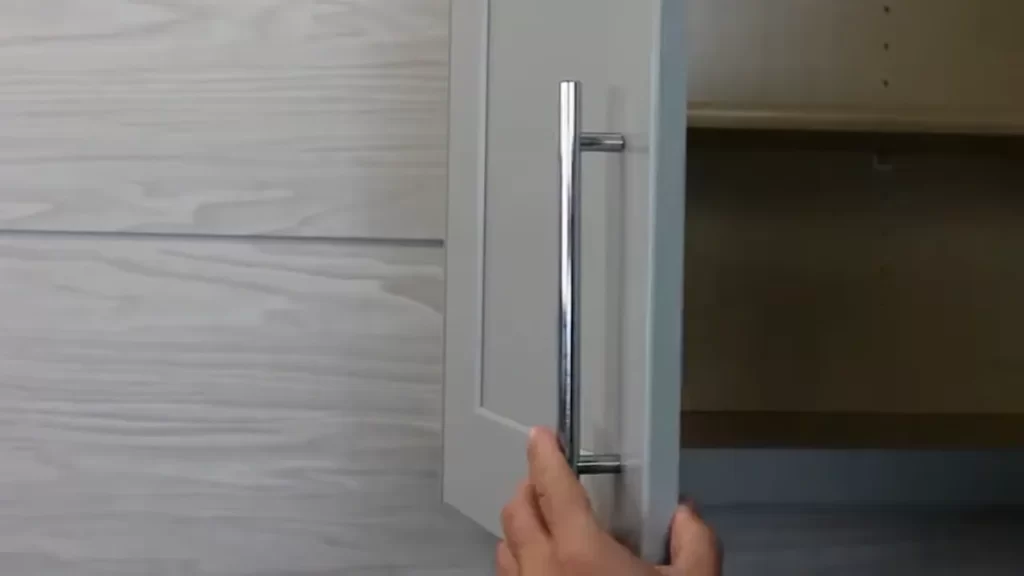
After attaching all the knobs, it’s essential to double-check their alignment and tightness. Give each knob a gentle twist to ensure there is no wobbling or loose fitting. The knobs should feel secure and stable when used. Additionally, visually inspect the alignment of all the knobs, making sure they are evenly spaced and aligned with each other for a cohesive look.
Properly attaching cabinet door knobs is a crucial step in the overall cabinet installation process. Follow the steps outlined above, and you’ll not only achieve a professional-looking result but also ensure that your cabinets are functional and convenient to use.
Checking The Functionality Of The Installed Knobs
Testing the knob’s movement and grip
Once you have successfully installed the cabinet door knobs, it is important to check their functionality to ensure they are working properly. By testing the movement and grip of the knobs, you can make sure they are easy to use and provide a secure grip.
1. Testing the movement
To test the movement of the installed knobs, gently try turning them in both directions. The knobs should rotate smoothly without any resistance. If you experience any difficulty in turning or if the knobs feel wobbly, it may indicate an issue with the installation.
In such cases, it is recommended to carefully examine the installation and make any necessary adjustments to ensure the knobs move freely. This may involve tightening or loosening the screws that secure the knobs to the cabinet doors.
2. Checking the grip
To check the grip of the knobs, grasp them firmly and give them a few gentle tugs. The knobs should feel secure and not come loose from the cabinet doors. If you notice any movement or if the knobs feel loose, it is important to address the issue promptly to prevent potential accidents or damage to the cabinetry.
In case the grip is not satisfactory, you can adjust the tightness of the knobs to ensure they are securely attached. This can be done by tightening the screws slightly until the knobs feel snug.
However, be cautious not to overtighten the screws, as this can cause damage to the knobs or strip the screw holes in the cabinet doors. It is best to find the right balance between a secure grip and avoiding excessive force.
Conclusion
By testing the movement and grip of the installed cabinet door knobs, you can ensure they are functioning properly and provide a secure and convenient way to open and close your cabinets.
Examine the knobs for any issues while turning and pulling them, and make necessary adjustments to ensure optimal functionality. Remember to exercise caution when tightening the screws, finding the right balance between a secure grip and avoiding excessive force.
With this final step, your cabinet door knobs installation process is complete, and you can now enjoy the enhanced functionality and aesthetic appeal they bring to your cabinets.
Additional Advice For A Successful Installation Process
When it comes to cabinet door knobs, the installation process plays a crucial role in both the functionality and aesthetics of your cabinets. In addition to the basic steps of mounting the knobs, there are some additional factors to consider for a successful installation. Under this subheading, we will discuss choosing the right knob style and finish, ensuring uniformity in placement for multiple doors, and maintaining the knobs for long-lasting performance.
Choosing the Right Knob Style and Finish
Before you start the installation process, it’s important to choose the right knob style and finish that complements your cabinets and overall interior design. A vast variety of knob styles and finishes are available in the market, ranging from classic to contemporary, antique to modern. Consider the following factors when making your choice:
- Material: Knobs can be made of different materials such as metal, glass, ceramic, or wood. Choose a material that not only matches your cabinet style but also offers durability.
- Design: Consider the overall theme of your kitchen or furniture. Opt for a design that harmonizes with your existing hardware, whether it’s decorative or minimalist.
- Finish: Knobs come in various finishes like brushed nickel, chrome, brass, or oil-rubbed bronze. Select a finish that complements the color scheme of your cabinets and adds an elegant touch to the overall look.
Ensuring Uniformity in Placement for Multiple Doors
If you have multiple cabinet doors, maintaining uniformity in knob placement is crucial for a cohesive and polished appearance. Here’s a simple guide to achieve consistency:
- Measure: Start by measuring the distance from the top or bottom edge of the door to the center of the existing knob hole if there is one. Use this measurement as a reference for the placement of new knobs.
- Mark and Align: Using a measuring tape or ruler, mark the reference measurement on each door where you want the knobs to be placed. Ensure the marks are aligned horizontally or vertically for a professional look.
- Double-Check: Before drilling the holes, double-check the accuracy of the markings. Measure the distances between the marks to ensure consistency across all doors.
- Drill and Install: With the proper measurements and markings in place, drill the holes for the knobs using a drill bit that matches the knob’s screw size. Finally, install the knobs securely using the provided screws.
Maintaining the Knobs for Long-lasting Performance
Once your knobs are installed, it’s important to maintain them properly to ensure their long-lasting performance. Here are a few tips for maintaining your cabinet door knobs:
- Regular Cleaning: Wipe the knobs with a soft cloth or sponge regularly to remove dirt, dust, and fingerprints. Avoid using abrasive cleaners or harsh chemicals that may damage the finish.
- Tightening Loose Knobs: Over time, knobs can become loose due to regular usage. Periodically check the screws and tighten them if necessary to keep the knobs securely in place.
- Avoid Excessive Force: Be gentle when opening or closing cabinet doors to prevent unnecessary strain on the knobs. Excessive force can loosen or break the knobs, leading to potential damage.
- Replace Damaged Knobs: If a knob is damaged beyond repair, don’t hesitate to replace it promptly. A damaged or broken knob not only affects the functionality but also detracts from the overall appearance of your cabinets.
By following these additional tips, you can ensure a successful installation process for your cabinet door knobs. Remember to choose the right style and finish, maintain uniformity in placement for multiple doors, and take proper care of the knobs for their long-lasting performance.
Frequently Asked Questions Of How To Install Cabinet Door Knobs
How Do You Attach Kitchen Cabinet Knobs?
To attach kitchen cabinet knobs, follow these simple steps: 1. Determine the knob’s position on the cabinet door or drawer. 2. Mark the spot and drill a hole of the appropriate size. 3. Insert the screw through the back of the knob into the hole.
4. Tighten the screw until the knob is secure. 5. Repeat the process for other knobs.
What Is The Proper Placement For Cabinet Knobs?
Proper placement for cabinet knobs should be aligned horizontally and centered vertically on the cabinet door or drawer front. This ensures a balanced and aesthetically pleasing look.
How Do You Install Cabinet Hardware Knobs?
To install cabinet hardware knobs, follow these steps: 1. Measure and mark the proper placement for the knobs on the cabinet doors. 2. Use a drill to create pilot holes at the marked spots. 3. Insert the screws into the back of the knobs.
4. Align the knobs with the pilot holes and tighten the screws. 5. Test the knobs to ensure they are securely fastened. Remember to use the correct tools and take your time for a successful installation.
What Is The Rule Of Thumb For Cabinet Pulls?
The rule of thumb for cabinet pulls is to place them in a way that is visually appealing and functional. Generally, it is recommended to position them in the upper third of the cabinet door or drawer front. However, it ultimately depends on personal preference and the specific design of the cabinets.
Conclusion
To sum it up, installing cabinet door knobs doesn’t have to be a daunting task. With the right tools and a step-by-step approach, anyone can successfully complete this project. By following the tips and instructions provided in this blog post, you’ll be able to enhance the aesthetic appeal and functionality of your cabinets effortlessly.
So go ahead and get started on transforming your cabinets with beautiful and functional door knobs today!