To install closet sliding doors, start by measuring the opening, purchasing the appropriate materials, and following the manufacturer’s instructions. Then, remove the existing doors, attach the tracks to the top and bottom of the doorframe, and hang the doors onto the tracks.
Adjust the doors as needed to ensure smooth operation.
Attaching The Tracks And Bottom Guides
Once you have chosen the perfect sliding doors for your closet, it’s time to install them. Attaching the tracks and bottom guides is an integral step in the installation process. This step ensures that your sliding doors glide smoothly along the tracks and stay in place. Below, we will guide you through the process of marking the position of the tracks and bottom guides, as well as securing them to the floor and ceiling.
Marking the Position of the Tracks and Bottom Guides
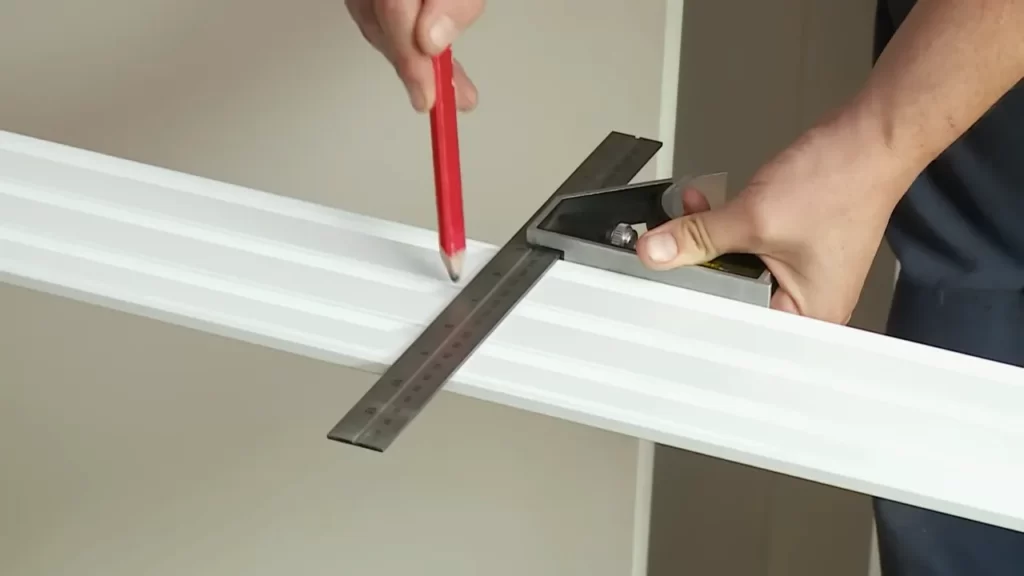
The first step in attaching the tracks and bottom guides is marking their position. This will ensure that your sliding doors are properly aligned and function correctly. Use a tape measure to determine the desired height of the tracks and bottom guides. Measure from the floor up to the desired height, and mark it with a pencil on the wall or door jamb.
Next, measure the width of the closet opening. Divide the width in half to determine the center point. Once you have found the center point, use a level to draw a straight vertical line from the floor to the ceiling. This line will serve as a guide for attaching the tracks and bottom guides.
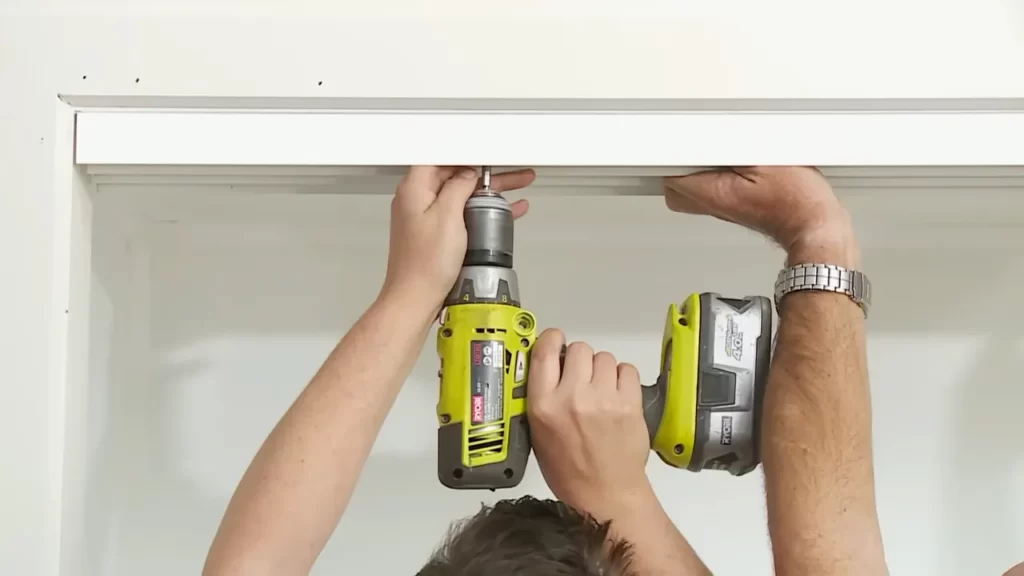
Securing the Tracks and Bottom Guides to the Floor and Ceiling
Now that you have marked the position of the tracks and bottom guides, it’s time to secure them to the floor and ceiling. Start by aligning the track with the vertical line you drew earlier. Ensure that the track is level by using a spirit level. Once the track is level, use screws or nails to secure it to the floor and ceiling.
Next, align the bottom guide with the track. Ensure that the guide is centered and level. Once you have aligned it correctly, secure it to the floor with screws or adhesives. The bottom guide will keep your sliding doors in place and prevent them from swaying.
It is important to double-check that both the tracks and bottom guides are level and securely attached. This will ensure smooth operation and prevent any future issues with your sliding doors.
Hanging The Sliding Doors
After preparing the doors for installation and installing the rollers, you are now ready to hang the sliding doors on the tracks. This step is crucial to ensure smooth and easy opening and closing of the closet doors. Follow the steps below to hang the sliding doors properly:
Preparing the Doors for Hanging
Before you can hang the sliding doors on the tracks, it is important to prepare the doors for installation. Here’s how you can do it:
- Start by laying the doors flat on a clean and padded surface to prevent any scratches or damages.
- Next, attach the door handles or knobs according to the manufacturer’s instructions. Make sure to position them at a comfortable height for easy access.
- Check each door for any dust or debris and wipe them clean using a microfiber cloth or a gentle cleaning solution.
- Inspect the doors for any damages or defects. If you notice any, contact the manufacturer for assistance or consider replacing the doors.
Installing the Rollers on the Top of the Doors
The next step is to install the rollers on the top of the sliding doors. This will allow them to glide smoothly along the tracks. Follow these steps:
- Place the rollers on the top edge of each door, making sure they are evenly spaced.
- Secure the rollers in place by screwing them into the pre-drilled holes on the doors. Use the screws provided with the roller kit or ones recommended by the manufacturer.
- Double-check that the rollers are securely attached and can move freely without any obstructions.
Hanging the Doors on the Tracks

Now it’s time to hang the doors on the tracks. Follow these steps carefully:
- Lift the first door and tilt it slightly at an angle to align the rollers with the corresponding tracks.
- Gently lower the door onto the track, ensuring that the rollers are properly inserted into the track groove.
- Repeat the same process for the second door, making sure it is aligned with the opposite track.
- Once both doors are hanging on the tracks, test their movement by sliding them back and forth. Make any necessary adjustments to ensure smooth operation.
- Finally, tighten any loose screws or brackets to secure the doors in place.
With the doors properly hung and secured, you can now enjoy the convenience and aesthetic appeal of your new closet sliding doors. Remember to follow the manufacturer’s instructions and take proper safety precautions during the installation process.
Adjusting And Fine-Tuning The Sliding Doors
Once you have successfully installed the closet sliding doors, it’s important to ensure that they are properly aligned and that they glide smoothly along the tracks. This step is crucial for the doors to function optimally and provide convenient access to your closet. In this section, we will guide you through the process of adjusting and fine-tuning your sliding doors to achieve a perfect fit.
Checking the Alignment of the Doors
Before making any adjustments, it’s essential to check if the sliding doors are properly aligned. Misalignment can create obstacles and prevent smooth motion. Here’s a simple step-by-step process to check the alignment:
- Stand in the center of the closet and visually inspect the doors. Look for any obvious gaps or misalignment between the doors and the surrounding frame.
- Open and close the doors a few times to see if they roll smoothly along the tracks. Pay close attention to any friction or resistance while sliding.
- Inspect the top and bottom tracks for any dirt, debris, or obstructions. Clear any such obstacles that might hinder the doors’ movement.
- Using a level, check if the doors are plumb vertically and level horizontally. If you notice any discrepancies, proceed to the next step to make the necessary adjustments.
Ensuring Smooth Sliding Motion
Now that you have checked the alignment, it’s time to focus on ensuring a smooth sliding motion. Follow these tips to optimize the gliding process:
- Apply a silicone-based lubricant to the tracks to reduce friction. This will make the sliding motion smoother and more effortless.
- Check the rollers or wheels attached to the bottom of the doors. If they appear worn out or damaged, consider replacing them to improve the doors’ performance.
- If you notice any significant resistance while sliding, lift the door slightly to release tension from the wheels. This can help alleviate any sticking or dragging issues.
Making Adjustments as Needed
If the initial inspection revealed misalignment or uneven sliding motion, you can make adjustments to rectify the problems. Here’s what you need to do:
- Locate the adjustment screws or knobs, usually found at the top or bottom of the doors.
- Turn the screws or knobs in small increments, checking the alignment and sliding motion after each adjustment.
- Continue making slight adjustments until the doors are aligned vertically and slide smoothly along the tracks without any resistance or rubbing against the frame.
- Take your time and be patient with these adjustments, as it may require multiple attempts to achieve the desired results.
By carefully following these steps and making the necessary adjustments, you can ensure that your closet sliding doors function flawlessly and add a touch of elegance to your space. Don’t hesitate to invest the time and effort to fine-tune the doors, as it will make your daily routine more convenient and enjoyable.
Installing Any Additional Hardware
Adding Door Handles or Pulls
One of the final steps in installing closet sliding doors is adding the door handles or pulls. This not only completes the overall look of the doors but also provides a convenient way to open and close them. When choosing handles or pulls, consider the design and style that complements your closet doors and the overall aesthetic of your room. Here’s a step-by-step guide on how to add door handles or pulls:
- Start by measuring and marking the desired height of your handles or pulls on the doors. Make sure to have consistent measurements on each door for a symmetrical look.
- Using a tape measure and level, ensure that the marks are evenly spaced and aligned. This will help you create a professional and visually pleasing installation.
- Next, drill pilot holes on the marked spots. The size of the holes will depend on the screws that came with your handles or pulls, so make sure to check the packaging for the recommended drill bit size.
- Once the pilot holes are drilled, attach the handles or pulls to the doors using the provided screws. Use a screwdriver or power drill to tighten them securely. Make sure the handles or pulls are aligned straight and level with the doors.
- Step back and admire your newly installed handles or pulls! They add both functionality and style to your closet sliding doors.
Attaching Bumpers or Soft-Close Mechanisms
For added convenience and to prevent noisy slamming, attaching bumpers or soft-close mechanisms to your closet sliding doors is a worthwhile investment. These mechanisms provide a smooth and controlled closing motion, extending the lifespan of your doors. Follow these steps to attach bumpers or soft-close mechanisms:
- First, determine the ideal placement for the bumpers or mechanisms. Typically, they should be installed on the top and bottom tracks of the doors.
- Measure and mark the positions of the bumpers or mechanisms on the tracks using a tape measure and level. It’s important to have consistent measurements on both tracks for balanced operation.
- Using a screwdriver or power drill, attach the bumpers or mechanisms according to the manufacturer’s instructions. Ensure they are firmly attached and secured to the tracks.
- Test the bumpers or mechanisms by opening and closing the closet sliding doors. They should provide a smooth and silent closing motion.
- Enjoy the benefits of a quieter and more durable closet sliding door system with the added bumpers or soft-close mechanisms.
Frequently Asked Questions Of How To Install Closet Sliding Doors
Are Sliding Closet Doors Easy To Install?
Yes, sliding closet doors are easy to install. They require minimal effort and can be easily assembled and fitted into place. The simple design and installation process make them a convenient choice for homeowners.
Do You Have To Install Bottom Track For Sliding Closet Doors?
No, it is not necessary to install a bottom track for sliding closet doors.
How Do You Put A Sliding Door Back On Its Track?
To put a sliding door back on its track: 1. Remove any obstructions or debris on the track. 2. Lift the door bottom slightly and align it with the track. 3. Slowly lower the top of the door into the upper track.
4. Gently slide the door back and forth to ensure it moves smoothly. 5. Make any necessary adjustments to ensure proper alignment.
How Do You Install A Sliding Closet Door Bottom Guide?
To install a sliding closet door bottom guide, follow these steps: 1. Measure and mark the desired location for the guide on the floor. 2. Attach the guide using screws or adhesive, ensuring it is level and centered. 3. Test the door to ensure smooth sliding along the guide.
4. Make any necessary adjustments to the guide’s position. 5. Secure the guide in place and enjoy your properly installed sliding closet door.
What Are Closet Sliding Doors?
Closet sliding doors are space-saving doors that slide along a track, allowing easy access to the contents of your closet.
Why Should I Install Closet Sliding Doors?
Installing closet sliding doors not only enhances the aesthetics of your space but also optimizes functionality by maximizing your closet’s available space.
Conclusion
Installing closet sliding doors is a simple and cost-effective way to enhance the functionality and aesthetics of your space. By following the step-by-step instructions outlined in this blog post, you can easily transform your closet into a more organized and visually appealing area.
With just a few tools and materials, you can enjoy the convenience and style that sliding doors bring to your home. So, why wait? Get started on your closet renovation project today and experience the benefits for yourself.