o install a door handle with a lock, first, remove the existing handle and latch. Then, align the new handle and lock mechanism and secure them in place using screws and a screwdriver.
Installing a door handle with a lock can provide enhanced security and convenience to your home. Whether you are replacing an old handle or installing a new one, the process can be straightforward if you follow a few steps. By removing the existing handle and latch, you create space for the new one.
Then, align the new handle and lock mechanism and secure them using screws and a screwdriver. In just a few simple steps, you can have a new door handle with a lock installed and enhance the security of your space.
Factors To Consider When Selecting A Door Handle
Choosing the right door handle for your home is an important decision. Not only does it play a crucial role in the overall aesthetic appeal of your door, but it also contributes to the security and functionality of your home. With so many options on the market, it can be overwhelming to make a decision. To help you make an informed choice, here are some key factors to consider when selecting a door handle:
Material and Durability
The material of the door handle is one of the first factors to consider. It not only affects the appearance of the handle but also its durability and longevity. There are various materials commonly used for door handles, each with its own unique properties.
One popular material choice is stainless steel. It offers a sleek and modern look that complements any type of door. Stainless steel handles are not only durable but also resistant to rust and corrosion, making them perfect for high-moisture areas like bathrooms and exterior doors.
For a more traditional look and feel, brass handles are a great option. Brass is known for its classic elegance and timeless appeal. It does require regular maintenance to prevent tarnishing, but it can add a touch of sophistication to your doors.
If you prefer a more budget-friendly option, plastic or faux metal handles can be a good choice. While they may not offer the same level of durability as stainless steel or brass, they can still provide a functional and stylish solution for your doors.
Design and Style
The design and style of the door handle should also align with the overall aesthetic of your home. Whether you have a traditional or modern interior, there are plenty of options to choose from.
Consider the shape of the handle. It should be comfortable to grip and operate. Some handles have a curved or ergonomic design, while others have a straight and minimalist look.
The finish of the handle is another important aspect of its design. It can enhance the overall appearance of your door and complement the other hardware in your home. Popular finishes include polished chrome, brushed nickel, and oil-rubbed bronze.
Furthermore, think about the backplate or rose that the handle attaches to. It should be compatible with the existing holes on your door and provide a seamless fit.
Security Features
When it comes to the safety of your home, the door handle is a crucial element. A handle with proper security features can provide an extra layer of protection against intruders.
Look for handles with built-in lock mechanisms. These can range from simple key-operated locks to more advanced options like keypad or fingerprint-based locks. It’s important to choose a lock that suits your specific security needs and preferences.
Additionally, consider handles with reinforced construction and solid cores. These features ensure that the handle is sturdy and resistant to tampering or forced entry.
In conclusion, when selecting a door handle, it’s essential to consider the material and durability, design and style, as well as security features. By carefully assessing these factors, you can choose a handle that not only enhances the overall look of your door but also provides the functionality and security you require.
Measuring The Door For Proper Handle Fit
Before you embark on the exciting task of installing a new door handle with lock, it is vital to ensure that you measure your door correctly. This will help you determine the right size and type of handle that will fit snugly and function properly on your door. In this article, we will outline two key measurements you need to take into account: the backset measurement and the door thickness.
Determining the Backset Measurement
The first step in measuring your door for the handle fit is determining the backset measurement. The backset refers to the distance from the edge of the door to the center of the bore hole for the handle latch. This measurement is crucial because it determines whether your door handle will align perfectly with the strike plate and allow smooth operation.
To determine the backset measurement, follow these simple steps:
- Close the door and stand on the side where the handle will be installed.
- Using a tape measure, measure the distance from the edge of the door to the center of the bore hole. Make sure to measure from the side of the door where the latch is located.
- Write down the measurement in inches or millimeters, depending on your preference.
Measuring the Door Thickness
The second measurement you need to take into consideration is the door thickness. This measurement is crucial because it determines the length of the door handle spindle or the part of the handle that extends through the door and connects the handles on both sides.
To measure the door thickness correctly, follow these steps:
- Using a tape measure, measure the thickness of the door from one face to the opposite face. This measurement should be taken at the location where the handle will be installed.
- Write down the measurement in inches or millimeters, depending on your preference.
By accurately measuring the backset and door thickness, you will be well-equipped to choose the perfect door handle with lock that fits your door like a glove. With these measurements in hand, you can confidently move on to the next steps of installation, knowing that your new handle will not only enhance the aesthetics of your door but also provide the security you desire.
Tools Required For Installing A Door Handle With Lock
When it comes to installing a door handle with a lock, having the right tools is essential. With the proper equipment at hand, the installation process becomes much smoother and more efficient. In this section, we will discuss the various tools that you will need to successfully install a door handle with a lock.
Screwdriver
A screwdriver is one of the most basic tools required for installing a door handle with a lock. It is used to tighten or loosen screws and bolts. When purchasing a screwdriver, make sure to choose the appropriate size and type for your project. For installing a door handle with a lock, a flathead or Phillips screwdriver is typically sufficient.
Measuring Tape
Another essential tool for installing a door handle with a lock is a measuring tape. Before you can begin the installation process, you need to measure the door accurately. This ensures that the door handle and lock are aligned properly. Use the measuring tape to measure the distance between the existing holes or determine the ideal placement for new holes.
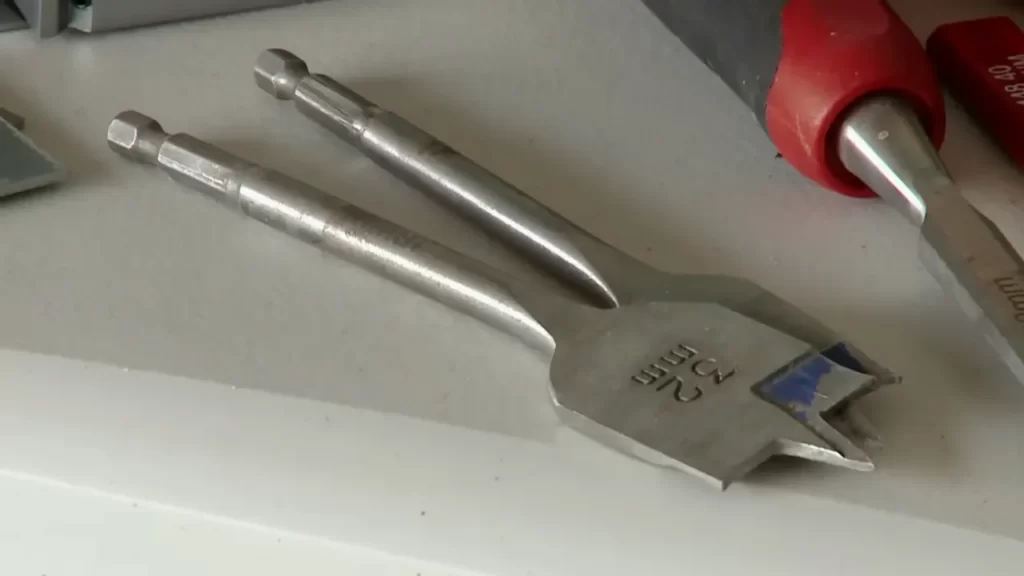
Drill
A drill is a must-have tool for installing a door handle with a lock, especially if you need to create new holes. Select a drill with the appropriate size and power for your specific needs. A cordless drill offers flexibility and ease of use. Make sure to choose the correct drill bit size for the screws provided with the door handle and lock.
Materials Needed For Installing A Door Handle With Lock
Installing a door handle with a lock is a straightforward task that can enhance the security and functionality of your doors. To ensure a successful installation, it is important to gather the necessary materials beforehand. This section will outline the materials required for installing a door handle with lock.
Door Handle with Lock Set
The central component of the installation process is the door handle with a lock set. This set includes the handle, lock mechanism, and any accompanying accessories. When selecting a door handle with a lock set, consider the style and design that best suits your door. Additionally, ensure that the lock set is compatible with the door’s thickness.
Screws and Fasteners
Screws and fasteners are essential for securely attaching the door handle with lock set to the door. When purchasing screws and fasteners, it is crucial to choose the correct size and type for the specific handle and door you are working with. Using screws that are too short or too long can compromise the structural integrity of the handle and lock set.
To install the door handle with lock set, you may need the following screws and fasteners:
| Screw Type | Description |
|---|---|
| Machine Screws | Used to secure the handle to the door. |
| Wood Screws | Used to attach the strike plate and other accessories to the door jamb or frame. |
Strike Plate
The strike plate is a vital component that ensures the door lock engages securely with the door frame. It is installed on the door frame in alignment with the door handle’s latch bolt. When the door is closed, the latch bolt slides into the strike plate, keeping the door locked.
When choosing a strike plate, ensure that it is compatible with your specific door handle and lock set. It should align perfectly with the latch bolt and provide ample support for the door’s locking mechanism.
By gathering the necessary materials mentioned above, you will be well-prepared to install a door handle with a lock. Ensuring you have the correct door handle with lock set, screws and fasteners, and a suitable strike plate will make the installation process smooth and successful.
Preparing The Door
Before installing a new door handle with a lock, it’s important to properly prepare the door. This involves removing the old door handle and patching or filling any previous holes. By following these steps, you can ensure a smooth and secure installation.
Removing the Old Door Handle
The first step in preparing a door for a new handle with a lock is to remove the old one. This can be done by following these simple instructions:
- Examine the door handle and locate the screws that hold it in place. These screws are usually found on the interior side of the door.
- Using a screwdriver, carefully unscrew and remove these screws.
- Once the screws are removed, gently pull the old door handle away from the door.
- Ensure that any remaining hardware, such as a latch or strike plate, is also removed.
By taking care during this process, you can avoid any damage to the door and make way for the new handle.
Patching or Filling Previous Holes
After removing the old door handle, it’s common to find holes or indentations in the door where the hardware used to be. These holes need to be patched or filled to ensure a smooth and aesthetically pleasing surface for the new handle. Here’s how you can do it:
| Materials | Tools |
|---|---|
| Wood filler, epoxy, or puttySanding block or sandpaperPaint or stain (if necessary) | Putty knifePainter’s tapePaintbrush |
- Use a putty knife to apply the wood filler, epoxy, or putty to the holes in the door. Make sure to fill the holes completely, allowing the material to slightly overfill.
- Smooth the filled areas with a putty knife, removing any excess material.
- Allow the filler to dry as per the manufacturer’s instructions.
- Once dry, use a sanding block or sandpaper to gently sand the filled areas until they are smooth and flush with the surrounding surface of the door.
- If necessary, apply a coat of paint or stain to match the color of the door.
By patching or filling previous holes in the door, you can achieve a professional-looking outcome and ensure a secure installation of the new door handle with a lock.
Installing The Latch Mechanism
Once you have successfully marked and drilled holes for the door handle, the next step is to install the latch mechanism. This part of the installation process is crucial as it ensures the door handle functions properly and securely.
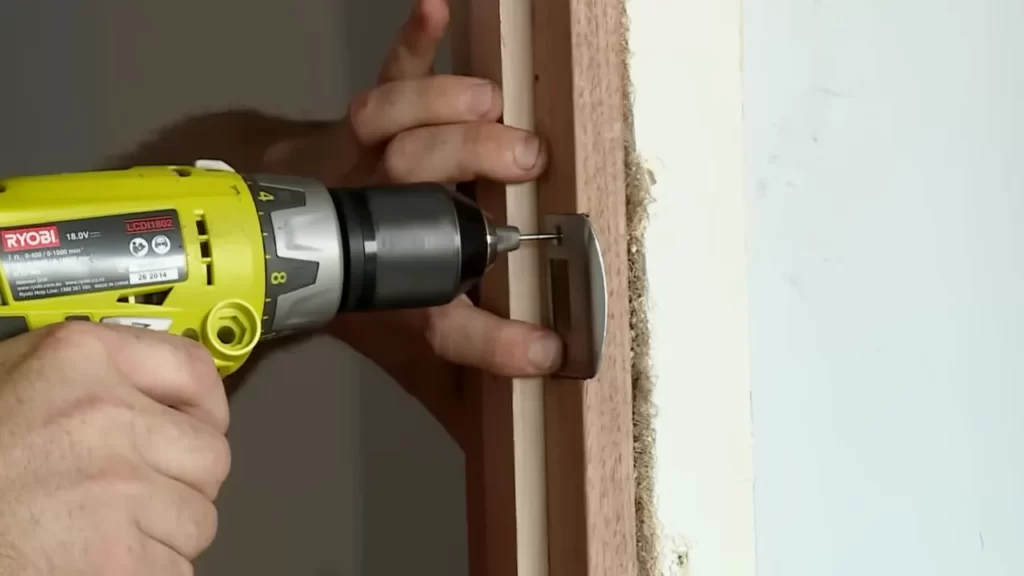
Marking and Drilling Holes for the Latch
The first step in installing the latch mechanism is to mark and drill holes where the latch will be placed. To do this, follow the steps below:
- Start by positioning the latch plate on the door edge, lining it up with the center of the existing hole.
- Using a pencil or a marker, mark the outline of the latch plate onto the door.
- Next, use a combination square to draw horizontal and vertical lines within the outlined shape. These lines will help guide the drilling process.
- Using an appropriately sized drill bit, carefully drill holes within the marked area. Take caution not to drill too deep to prevent damage to the door.
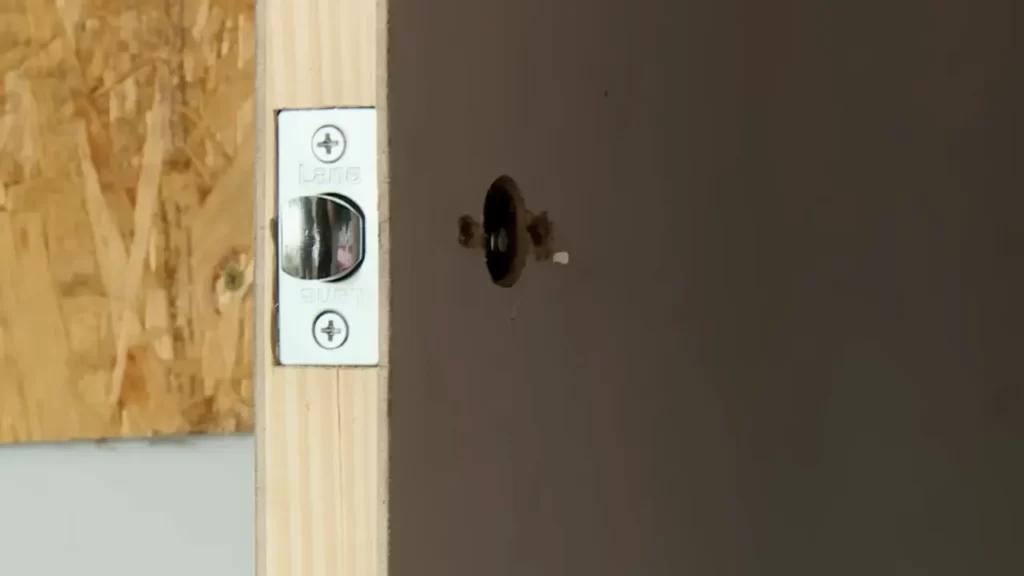
Aligning and Installing the Latch
Once the holes have been drilled, it’s time to align and install the latch. Follow the steps below:
- Insert the latch into the hole, ensuring that the beveled side is facing the door jamb.
- Hold the latch firmly in place and use a screwdriver to secure it by tightening the screws provided.
- Make sure the latch moves smoothly and securely.
- Test the latch by closing the door and checking if it latches properly.
By following these steps, you can successfully install the latch mechanism for your door handle with a lock. Remember to take your time, follow the instructions provided by the manufacturer, and ensure that the latch is properly aligned and secured for optimal functionality and security.
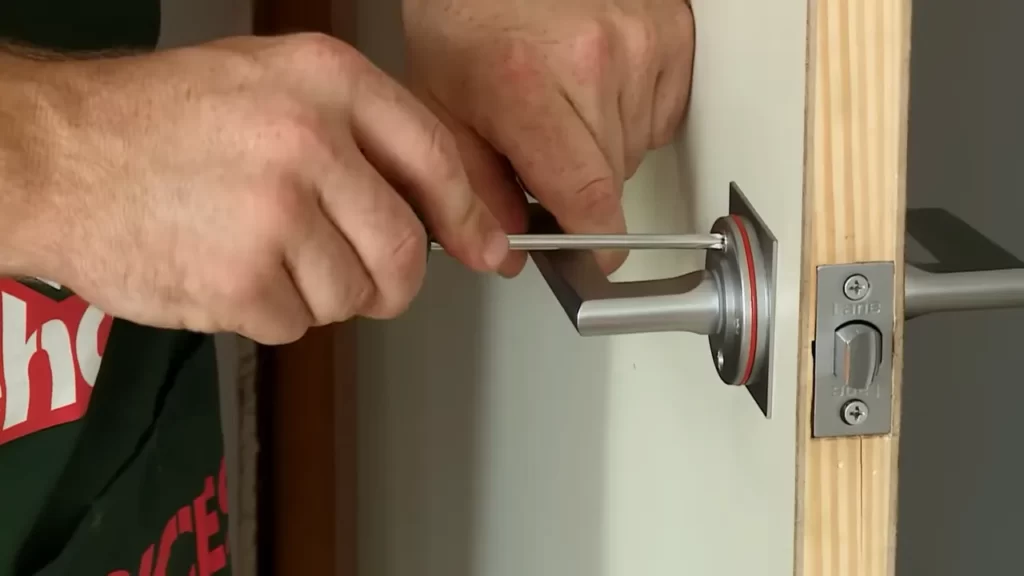
Attaching The Door Handle
Now that you have chosen the perfect door handle with a lock to enhance the security and style of your door, it’s time to attach it properly to ensure it functions smoothly. Attaching the door handle may seem like a daunting task, but with the right guidance, you can easily accomplish this installation process. In this section, we will discuss the necessary steps to position the handle on the door and secure it firmly with screws.
Positioning the Handle on the Door
The first step in attaching a door handle with a lock is to correctly position it on the door. Follow these simple steps to ensure proper positioning:
- Start by examining the door handle and identifying the two main components: the outer handle and the inner mechanism.
- Determine the desired height for your door handle. Keep in mind factors such as convenience and accessibility when deciding the height. A general rule of thumb is to place the handle at a comfortable height for most individuals.
- Using a tape measure or ruler, measure the distance from the bottom edge of the door to the desired height for your handle.
- Take into account any pre-existing holes or markings on the door that may guide you in proper alignment. If there are no markings, use a pencil or tape to create temporary guidelines for accurate placement.
- Align the outer handle with the guidelines, ensuring it is centered and level. Carefully mark the locations of the screw holes on the door using a pencil or marker.
- Repeat the alignment process for the inner mechanism of the handle on the opposite side of the door, ensuring it aligns with the outer handle and marking the screw hole locations.
Securing the Handle with Screws
Once the door handle is properly positioned on the door, the next step is to secure it firmly using screws. Follow these steps to ensure a secure and durable installation:
- Before attaching the door handle, make sure the screws provided with the handle are of the appropriate size and type for your door.
- Insert the screws into the marked holes on the door, starting with the outer handle. Use a screwdriver or drill to firmly tighten the screws, ensuring the outer handle is secure and doesn’t wobble.
- Repeat the same process for the inner mechanism of the handle, tightening the screws to firmly secure it to the door.
- With both the outer handle and inner mechanism securely fastened, test the functionality of the door handle by turning it and checking if the lock mechanism engages smoothly.
- If the handle feels loose or wobbly, recheck the tightness of the screws and adjust them if necessary. It’s crucial to have a securely attached handle for optimal performance and safety.
Congratulations! You have successfully positioned and attached your new door handle with a lock. Make sure to double-check the alignment, security, and functionality before completing the installation process. Now, you can enjoy the enhanced security and aesthetics that your new door handle provides.
Installing The Strike Plate And Deadbolt (If Applicable)
When it comes to installing a door handle with a lock, one crucial step is installing the strike plate and deadbolt, if applicable. The strike plate is the metal plate attached to the door frame that the lock bolt slides into when the door is closed. The deadbolt, on the other hand, is an additional lock that provides extra security and is often used in conjunction with the handle lock. Here’s a step-by-step guide on how to install the strike plate and deadbolt for your door handle.
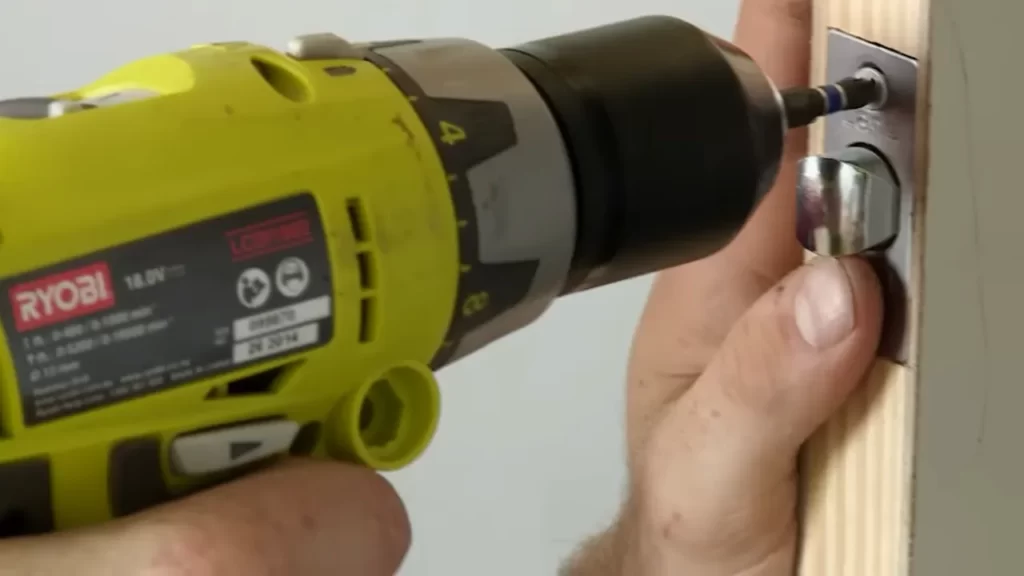
Marking and Drilling Holes for the Strike Plate
To install the strike plate, start by determining the appropriate height for the strike plate on the door jamb. Use a tape measure to measure the distance from the top of the handle plate to the center of the doorknob hole.
Next, mark the height on the door jamb with a pencil. Measure the thickness of the strike plate and mark the width of the plate on the door jamb as well. Use a chisel or a utility knife to create an indentation for the strike plate. This will help prevent the wood from splintering when you drill the holes.
Now, align the strike plate with the markings and hold it tightly against the door jamb. With a pencil, mark the positions of the screw holes on the door jamb through the holes on the strike plate.
Finally, use a drill with an appropriate size drill bit to drill the screw holes on the door jamb at the marked positions. Make sure to drill straight and deep enough for the screws to fit securely.
Attaching and Aligning the Strike Plate
Once the holes are drilled, it’s time to attach and align the strike plate. Place the strike plate against the door jamb, lining up the screw holes with the drilled holes.
Insert the screws into the holes and tighten them using a screwdriver or a drill. Make sure not to overtighten the screws, as this could cause the strike plate to become misaligned.
To check the alignment of the strike plate, close the door and test the latch. If the latch slides smoothly into the strike plate without any resistance, it is aligned correctly. However, if there is resistance or the latch doesn’t fully extend, adjust the strike plate accordingly. You can do this by loosening the screws slightly and repositioning the strike plate until the latch operates smoothly.
Installing the Deadbolt (if applicable)
If you have a deadbolt to install along with the door handle lock, you’ll follow a similar process. Firstly, determine the appropriate height for the deadbolt on the door. Measure the distance from the top of the handle plate to the center of the deadbolt hole.
Once you have the measurements, mark the height and width of the deadbolt plate on the door edge. Use a chisel or utility knife to create a recess for the deadbolt plate.
Align the deadbolt plate with the markings, ensuring the plate sits flush against the door edge. Mark the positions of the screw holes through the plate holes.
Using a drill and an appropriate size drill bit, drill the screw holes on the door edge at the marked positions. Ensure the holes are deep enough for the screws to fit securely.
Next, place the deadbolt into the hole on the door edge, aligning the plate with the holes. Insert the screws into the holes and tighten them using a screwdriver or a drill.
To test the deadbolt, try locking and unlocking the mechanism with a key. Ensure the deadbolt slides smoothly without any resistance or sticking.
And there you have it – you have successfully installed the strike plate and deadbolt (if applicable) for your door handle with a lock. Enjoy the added security and peace of mind that comes with a properly installed lock!
Testing And Adjusting The Door Handle
Testing and Adjusting the Door Handle
Once you have successfully installed the door handle with a lock, it’s important to test and adjust the handle to ensure smooth and proper functioning. This step is crucial to ensure the security and convenience of using the door handle.
Checking the Proper Functioning of the Handle
The first step in testing the door handle is to check its proper functioning. Here’s a step-by-step guide on how to do it:
- Open and close the door: Test the handle’s ability to open and close the door smoothly. Make sure there are no hitches or resistance while operating the handle.
- Lock and unlock the door: Put the handle in the locked position and try to unlock it using the key. Ensure that the lock mechanism engages and disengages smoothly without any sticking or jamming.
- Test the latch: Close the door and check if the latch fully secures the door in place. Try pushing or pulling the door to ensure that it’s properly latched and doesn’t easily give way.
Adjusting the Latch and Strike Plate as Needed
If you encounter any issues during the testing phase, you may need to adjust the latch and strike plate to ensure proper alignment. Here’s what you can do:
- Check the strike plate: The strike plate is the metal plate attached to the door frame that the latch secures into. Ensure that it is properly aligned and that the latch smoothly fits into it. If not, try loosening the screws of the strike plate and adjusting its position. Once aligned, tighten the screws.
- Adjust the latch: If the latch is not fully extending or retracting, it might require adjustment. Loosen the screws holding the latch in place and slightly adjust its position until it properly engages with the strike plate. Once adjusted, tighten the screws to secure the latch.
After making any adjustments, repeat the testing process to check if the handle functions smoothly. It’s important to make these adjustments carefully and ensure that the door handle is secure and aligned correctly. This will provide you with peace of mind knowing that your door handle with a lock is functioning optimally.
Finalizing The Installation
Now that you have successfully installed the door handle with lock, it’s time to finalize the process. This step is crucial as it ensures that the handle is securely in place and functioning properly. In this section, we will cover two important steps: tightening all screws and fasteners, and cleaning the door handle and lock.
Tightening All Screws and Fasteners
To ensure the durability and effectiveness of your door handle with lock, it is essential to tighten all screws and fasteners. Loose screws can cause the handle to become unstable and compromise its ability to function correctly. To tighten the screws, follow these simple steps:
- Step 1: Take a screwdriver that matches the size of the screws on your door handle and lock.
- Step 2: Begin by checking each screw for any looseness. If you find any screws that are not fully tightened, use the screwdriver to tighten them.
- Step 3: Ensure that all screws and fasteners are tight and secure by gently testing the handle’s stability. If you feel any wobbling or movement, tighten the necessary screws until the handle is firmly in place.
Cleaning the Door Handle and Lock
Regular cleaning is essential to maintain the appearance and functionality of your door handle with lock. Dust, dirt, and grime can accumulate over time, affecting the smooth operation of the lock mechanism. Follow these steps to clean your door handle and lock:
- Step 1: Start by using a soft cloth or sponge dipped in warm soapy water to gently wipe down the entire surface of the handle, paying close attention to any grooves or crevices.
- Step 2: For stubborn dirt or stains, a mild cleaning solution or metal polish can be used. Apply a small amount of the cleaning solution to a cloth and gently scrub the affected area until the dirt is removed.
- Step 3: Once the handle is clean, use a separate cloth dampened with clean water to wipe away any remaining soap or cleaning solution residue.
- Step 4: Finally, dry the door handle and lock thoroughly using a clean, lint-free cloth, ensuring no moisture is left behind.
Cleaning and maintaining your door handle with lock on a regular basis will not only keep it looking good but also ensure its longevity and smooth functioning. By following these simple steps, you can finalize the installation process and enjoy the security and convenience of your new door handle with lock.
Handle Not Aligning Properly
One of the common issues that homeowners face when installing a door handle with a lock is the handle not aligning properly. This can be both frustrating and inconvenient, as it can prevent the door from closing or locking correctly. Fortunately, there are simple steps you can take to adjust the mortise cutout, realign the latch and strike plate, and ensure the handle aligns properly. In this section, we will walk you through each step in detail.
Adjusting the Mortise Cutout
If the handle is not aligning properly, the first thing you should check is the mortise cutout, which is the recessed area on the door frame where the latch rests. Follow these steps to adjust the mortise cutout:
- Remove the door handle by unscrewing the screws on the interior side of the door.
- Inspect the mortise cutout to see if it aligns with the latch. If not, use a chisel to carefully remove small amounts of wood until the latch fits properly.
- Test the handle alignment by reinstalling the handle and trying to close the door. If the handle still doesn’t align correctly, continue to the next step.
Realigning the Latch and Strike Plate
If adjusting the mortise cutout doesn’t solve the issue, the next step is to realign the latch and strike plate. Follow these steps to ensure proper alignment:
- Remove the strike plate from the door frame by unscrewing the screws.
- Place a piece of masking tape on the edge of the strike plate to protect the door frame from scratches.
- Using a chisel, carefully widen the mortise on the strike plate to allow for slight adjustments. Take your time and make small adjustments until the latch fits properly.
- Reinstall the strike plate and test the handle alignment by closing and locking the door. If the handle still doesn’t align correctly, you may need to repeat the steps or consult a professional.
By following these steps, you can easily adjust the mortise cutout and realign the latch and strike plate to ensure that your door handle with a lock aligns properly. Remember, small adjustments and patience are key to resolving this common issue.
Difficulty Turning The Lock Or Handle
Experiencing a difficulty in turning your door handle or lock can be frustrating, especially when you’re in a rush or have your hands full. This common issue can hinder your daily activities and may even compromise the security of your home or office. However, before you consider replacing the entire lock or handle system, there are a few simple steps you can take to troubleshoot and resolve the problem.
Lubricating the Lock Mechanism
One of the first things you should check when faced with a lock or handle that has become difficult to turn is its level of lubrication. Over time, built-up dirt, debris, or rust can hinder the smooth operation of the lock mechanism. By lubricating the lock, you can often restore its functionality and eliminate the resistance.
Here’s a step-by-step guide to lubricating the lock mechanism:
- Start by gathering the necessary materials, such as a graphite lubricant or a silicone-based lubricant. These types of lubricants are ideal for locks as they don’t attract dirt or gum up the mechanism.
- Insert the key into the lock and slowly turn it back and forth a few times. This helps distribute the lubricant throughout the inner components of the lock.
- Apply a small amount of lubricant directly into the keyhole to ensure all internal parts are coated.
- Use a clean, dry cloth to wipe away any excess lubricant.
- Test the lock by inserting the key and turning it to ensure smooth operation.
Checking for Misaligned Components
If lubricating the lock mechanism doesn’t solve the problem, the next step is to check for any misaligned components. Over time, hinges, screws, or other hardware may become loose, causing the lock or handle to operate erratically or not turn smoothly.
Follow these steps to identify misaligned components:
- Inspect the door handle and lock for any visible signs of misalignment. Look for gaps, loose screws, or any of the components that are not properly aligned.
- Tighten any loose screws or hinges using a screwdriver, ensuring that all components are secured in place.
- If the misalignment is severe or the lock mechanism is damaged, it may be necessary to replace the entire unit for optimal performance.
By following these troubleshooting steps, you can often resolve the issue of a difficult-to-turn door lock or handle. However, if the problem persists, it is recommended to consult with a professional locksmith to assess the situation and provide appropriate solutions.
Loose Or Wobbly Door Handle
Having a loose or wobbly door handle not only compromises the security of your home but can also be quite frustrating. Fortunately, tightening the handle’s mounting screws and evaluating the handle’s design and quality can help resolve this issue.
Tightening the Handle’s Mounting Screws
One common reason for a loose or wobbly door handle is that the mounting screws may have become loose over time. To address this, follow these simple steps:
- Start by locating the mounting screws on your door handle. Usually, these screws can be found on the interior side of the door.
- Using a screwdriver, tighten the mounting screws by turning them clockwise. Be careful not to overtighten, as this may strip the screws or damage the door handle.
- Test the door handle to ensure it no longer wobbles or feels loose. If the handle is still not secure, proceed to the next step.
Evaluating the Handle’s Design and Quality
If tightening the mounting screws does not resolve the issue, it may be necessary to evaluate the design and quality of the door handle itself. Here are a few factors to consider:
| Factor | Possible Cause | Solution |
|---|---|---|
| Loose or weak internal components | The handle’s internal components may have become worn or damaged. | Replace the door handle with a new one of higher quality. |
| Poor installation | The door handle may not have been installed correctly initially. | Reinstall the handle, ensuring it is aligned properly and securely fastened. |
| Defective handle design | The handle’s design may inherently cause it to become loose or wobbly. | Consider replacing the handle with a different design or style. |
By carefully evaluating the door handle’s design and quality, you can identify any underlying issues that may be causing the looseness or wobbliness. Addressing these issues promptly will help restore the functionality and security of your door handle.
Door Not Latching Properly
One common issue that homeowners face is a door that does not latch properly. This can be frustrating and inconvenient, as it compromises security and privacy. Fortunately, there are a few easy steps you can take to fix this problem and ensure that your door latches securely. In this article, we will discuss two effective methods for resolving this issue: adjusting the latch’s position or depth and replacing the strike plate. Let’s dive into each of these methods in detail.
1. Adjusting the Latch’s Position or Depth
If your door is not latching properly, one potential cause could be an improperly positioned or too shallow latch. To adjust the latch’s position or depth, follow these steps:
- Remove the doorknob or handle by unscrewing the screws holding it in place.
- Locate the latch plate on the edge of the door and loosen the screws securing it.
- Using a screwdriver, adjust the position or depth of the latch by moving it up, down, or inwards, depending on the specific issue you are facing. If the latch is too shallow, you will need to extend it further into the door frame.
- Once you have made the necessary adjustments, tighten the screws on the latch plate to secure it in its new position.
- Reattach the doorknob or handle to complete the process.
By adjusting the latch’s position or depth, you can ensure that it properly engages with the strike plate, allowing the door to latch securely.
2. Replacing the Strike Plate
If adjusting the latch does not resolve the issue, the problem may lie with the strike plate. Over time, the strike plate can become worn or misaligned, preventing the door from latching correctly. Follow these steps to replace the strike plate:
- Remove the strike plate by unscrewing the screws holding it in place.
- Take note of the position of the old strike plate and align the new strike plate accordingly.
- Secure the new strike plate in place by tightening the screws.
Replacing a worn or misaligned strike plate can often solve the problem of a door not latching properly.
By following these simple steps, you can fix the issue of a door not latching properly and ensure that your door provides the security and functionality you need. Whether it’s adjusting the latch’s position or depth or replacing the strike plate, these methods can help you achieve a secure and properly functioning door.
Frequently Asked Questions On How To Install Door Handle With Lock
How Do You Install A New Door Handle Lock?
To install a new door handle lock, follow these steps: 1. Remove the old lock by unscrewing it. 2. Place the new lock in the same position and screw it in securely. 3. Ensure the lock is aligned properly with the latch mechanism.
4. Test the lock to ensure it functions correctly by turning the knob and locking it. 5. Make any necessary adjustments to ensure smooth operation.
Is It Easy To Change A Door Handle With Lock?
Changing a door handle with a lock is relatively easy. You can replace it by following basic steps, such as removing screws, detaching the old handle, and then installing the new one. Ensure you choose a compatible replacement and follow the instructions provided.
How Do You Replace A Door Handle And Latch?
To replace a door handle and latch, follow these steps: 1. Remove the screws holding the old handle and latch in place. 2. Take off the old handle and latch from the door. 3. Install the new latch first, aligning it with the existing hole.
4. Attach the new handle, tightening the screws securely. 5. Test the new handle and latch to ensure it works properly.
How Do You Install Rim Lock Door Knobs?
To install rim lock door knobs, follow these simple steps: 1. Begin by removing any existing doorknob or lock. 2. Place the rim lock on the door with the keyhole facing outward. 3. Align the lock with the existing doorknob holes or mark new holes if necessary.
4. Secure the rim lock in place using screws. 5. Attach the doorknob on the other side of the door and ensure it functions properly.
How To Install A Door Handle With Lock?
To install a door handle with a lock, start by measuring the door thickness and drilling the appropriate holes. Then, insert the latch and screw the handle into place.
What Tools Do I Need To Install A Door Handle With Lock?
To install a door handle with a lock, you will need a tape measure, a drill, a hole saw, a screwdriver, and screws.
Conclusion
To sum up, installing a door handle with a lock doesn’t have to be a daunting task. By following the step-by-step guide provided in this blog post, you can confidently tackle this project. Remember to choose the appropriate tools and hardware, and take your time to ensure a secure and functional installation.
With a little patience and careful attention to detail, you can enjoy the added security and convenience of a door handle with a lock. Start enhancing your home’s safety today!