To install a doorbell transformer, first, turn off the power supply. Then, mount the transformer on a junction box and connect the wires securely.
Installing a doorbell transformer is an essential step in ensuring that your doorbell operates efficiently. Whether you are replacing an old transformer or setting up a new one, this guide will walk you through the installation process. By following a few simple steps, you can successfully install the transformer and have your doorbell working properly in no time.
This guide will provide you with clear instructions, making the installation process quick and hassle-free. So, let’s dive in and learn how to install a doorbell transformer!
Choosing The Right Doorbell Transformer
When it comes to installing a doorbell transformer, choosing the right one is crucial for the smooth operation of your doorbell system. A doorbell transformer is responsible for converting the high voltage supply from your home’s electrical system into a lower voltage suitable for your doorbell to operate. In this section, we will discuss the importance of a doorbell transformer, determining the voltage requirement for your doorbell system, and selecting the appropriate doorbell transformer for your needs.
Understanding the Importance of a Doorbell Transformer
A doorbell transformer is a vital component of your doorbell system. It acts as a power supply, ensuring that the electrical current provided to your doorbell is at the correct voltage. Without a proper doorbell transformer, your doorbell may not function correctly or at all. An inadequate transformer can cause issues such as low volume, buzzing sounds, or even complete failure of your doorbell. Therefore, it is crucial to understand the importance of selecting the right doorbell transformer for your specific needs.
Determining the Voltage Requirement for Your Doorbell System
Before selecting a doorbell transformer, it is essential to determine the voltage requirement for your doorbell system. Most residential doorbell systems operate on low voltage, typically ranging from 8 to 24 volts. To find out the voltage your doorbell system requires, you can check the specifications of your existing doorbell or consult the manufacturer’s documentation. It is crucial to note that using a transformer with a voltage rating that is too high or too low can lead to malfunction or damage to your doorbell system.
Selecting the Appropriate Doorbell Transformer for Your Needs
Once you have determined the voltage requirement for your doorbell system, you can select the appropriate doorbell transformer. When selecting a transformer, consider the following factors:
- Compatible Voltage: Choose a transformer that matches or closely matches the voltage requirement of your doorbell system.
- Power Rating: Ensure that the transformer has an adequate power rating to handle the load of your doorbell system.
- Wiring Compatibility: Check the wiring compatibility of the transformer with your existing doorbell system. It should have the necessary terminals or connectors for easy installation.
- Size and Mounting Options: Consider the physical size and mounting options of the transformer to ensure it fits your installation requirements.
By considering these factors, you can select a doorbell transformer that not only meets the voltage requirement of your doorbell system but also ensures a reliable and efficient operation.
In conclusion, choosing the right doorbell transformer is crucial for the proper functioning of your doorbell system. Understanding the importance of a doorbell transformer, determining the voltage requirement, and selecting an appropriate transformer based on compatibility and power rating are essential steps in the installation process. By following these guidelines, you can ensure a successful doorbell transformer installation, resulting in a reliable and functional doorbell system for your home.
Gathering The Necessary Tools And Materials
Gathering the necessary tools and materials is the first step to successfully installing a doorbell transformer. By ensuring you have everything you need before you begin, you can streamline the installation process and avoid any unnecessary delays. In this section, we will cover the essential tools and required materials for doorbell transformer installation, as well as how to prepare your workspace for a smooth installation.
Essential Tools for Doorbell Transformer Installation
- Screwdriver (Phillips or flathead, depending on the screws used)
- Wire stripper
- Wire cutter
- Electrical tape
- Hammer
- Drill (if needed for mounting the transformer)
- Measuring tape
- Pencil or marker
These tools are essential for removing and installing the doorbell transformer. Make sure you have them handy before you start the installation process.
Required Materials for the Installation Process
- Doorbell transformer
- Low voltage wire
- Wire connectors
- Mounting screws
- An electrical junction box (if needed for mounting)
The doorbell transformer is the main component of the installation process. It converts the high voltage power from your home’s electrical system into the low voltage power required to operate the doorbell. In addition, you will need low voltage wire to connect the transformer to the doorbell chime and push button. Wire connectors will be used to secure the connections. If you need to mount the transformer, you may also require an electrical junction box and mounting screws.
Preparing the Workspace for a Smooth Installation
Before you begin the installation, it’s important to prepare your workspace to ensure a smooth and efficient process. Here are a few steps to follow:
- Clear the area around the doorbell chime and transformer, removing any obstructions that could interfere with the installation process.
- Ensure that the power supply to the doorbell system is turned off. This will prevent any accidental electrical shocks during the installation.
- If needed, use a stud finder to locate a secure spot for mounting the transformer.
- Measure the distance between the transformer, doorbell chime, and push button to determine the length of wire you will need.
- Once you have gathered all the necessary tools and materials and prepared your workspace, you are ready to proceed with the doorbell transformer installation.
With the essential tools and required materials in hand, and the workspace prepared for a smooth installation, you are now equipped to install the doorbell transformer with confidence. In the next section, we will guide you through the installation process step by step.
Step-By-Step Installation Process
Installing a doorbell transformer may seem like a daunting task, but with a step-by-step approach, it can be accomplished easily. In this guide, we will walk you through the process of installing a doorbell transformer from start to finish. By following these steps carefully, you’ll have your new doorbell transformer up and running in no time!
Turning Off the Power Supply to Ensure Safety
Before starting the installation process, it is crucial to prioritize your safety. To do so, you must turn off the power supply to the area where the old transformer is located. This ensures that you won’t risk getting an electric shock during the installation process.
Here’s what you need to do:
- Locate the circuit breaker panel in your home.
- Identify the specific breaker that controls the power to the doorbell transformer.
- Flip the corresponding breaker switch to the off position.
By following these steps and turning off the power supply, you can perform the installation process safely.
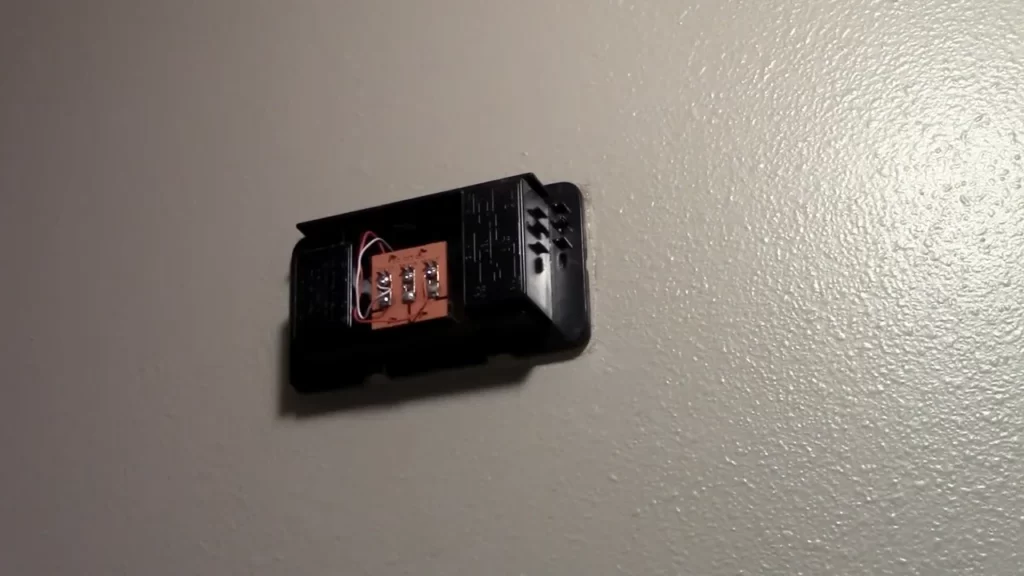
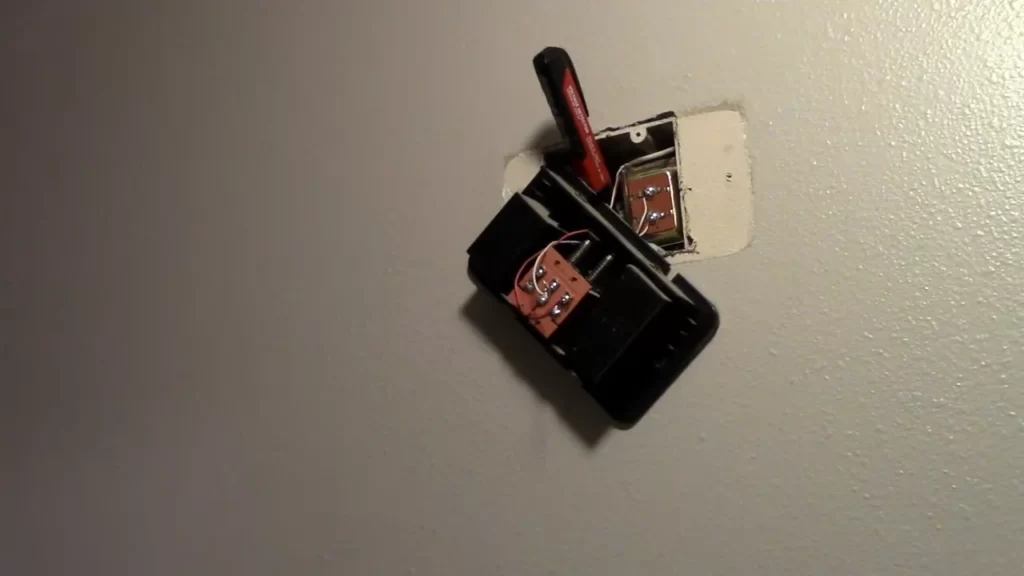
Locating and Disconnecting the Old Transformer
Once you have ensured your safety, you can proceed to locate and disconnect the old transformer. This step involves identifying the current location of the old transformer and disconnecting its wires.
Here’s how you do it:
- Look for the old transformer by following the doorbell wiring from the doorbell chime.
- Once you locate the old transformer, carefully disconnect the wires connected to it.
- Ensure that the wires are not touching any metal surfaces to avoid any electrical hazards.
By successfully locating and disconnecting the old transformer, you’re one step closer to installing the new one.
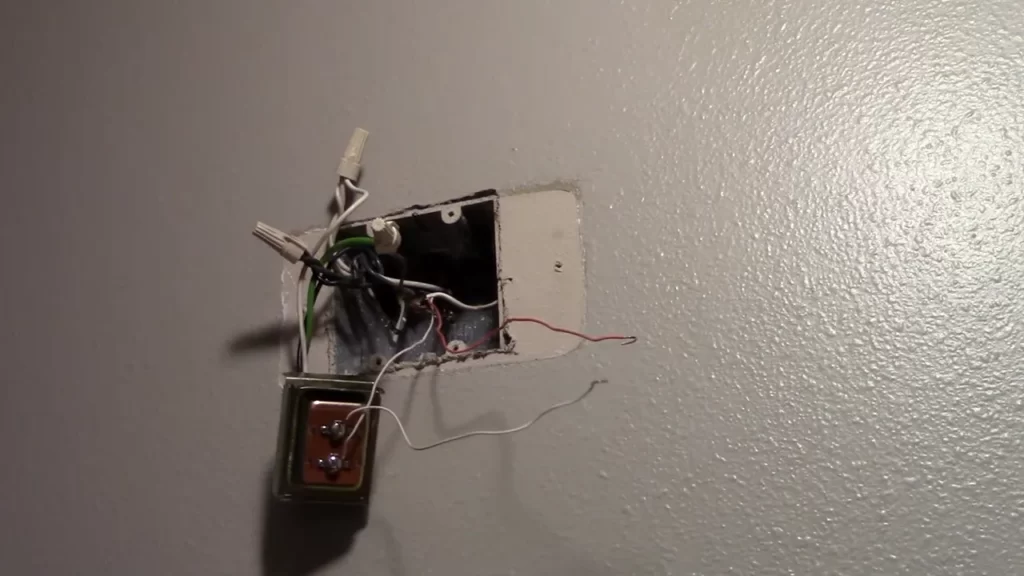
Mounting the New Transformer in the Desired Location
Now that the old transformer is disconnected, you can proceed to mount the new transformer in the desired location. This step involves choosing a suitable location and securing the new transformer in place.
Follow these steps to accomplish this:
- Choose a location near an electrical outlet for easy accessibility.
- Using screws or mounting brackets, secure the new transformer to a wall or electrical junction box. Ensure it is firmly fixed.
Following these steps will allow you to mount the new transformer securely.
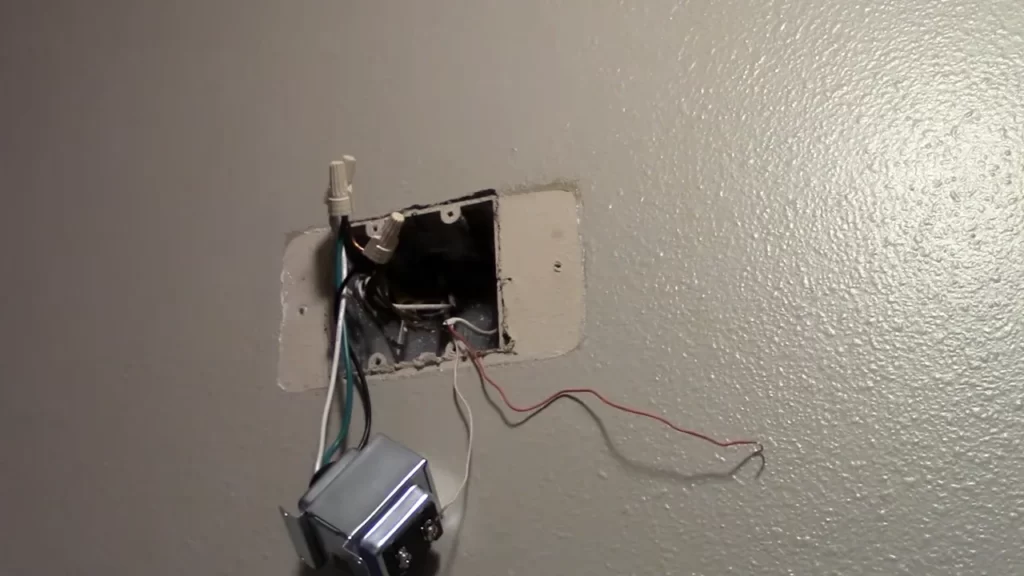
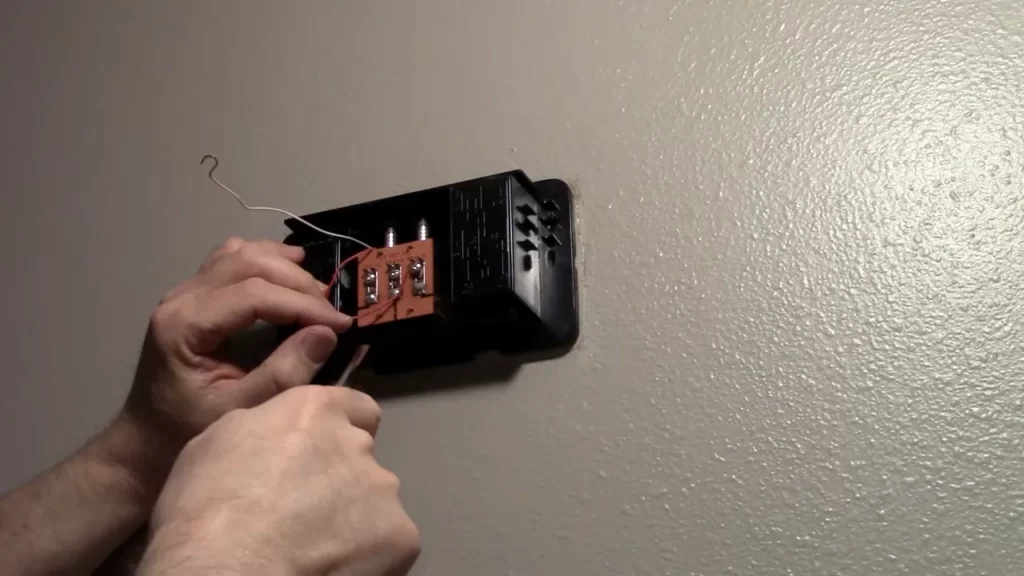
Connecting the Wires to the Transformer
Once the new transformer is mounted, you can proceed to connect the wires to it. This step involves ensuring the correct wiring connections to enable proper functionality of the doorbell system.
Here are the steps to connect the wires:
- Identify the wires coming from the doorbell chime and the doorbell button.
- Connect the wires securely to their corresponding terminals on the new transformer.
- Double-check all the connections to ensure they are tight and secure.
By connecting the wires correctly, you are setting the stage for your doorbell system to function properly.
Testing the Doorbell System to Ensure Proper Functionality
Now that the installation process is complete, it’s time to test the doorbell system to confirm everything is working as expected. This step involves checking whether the doorbell chime rings when the doorbell button is pressed.
Follow these steps to test the doorbell system:
- Turn the power supply to the doorbell system back on by flipping the breaker switch to the on position.
- Press the doorbell button to check if the doorbell chime rings.
- If the doorbell chime rings successfully, your installation process is complete.
By following these steps and testing the doorbell system, you can ensure that everything is functioning correctly and enjoy the convenience of a fully operating doorbell system.
With the step-by-step installation process outlined above, you can confidently tackle the installation of a new doorbell transformer. Remember to prioritize safety by turning off the power supply and carefully following all steps to ensure a successful installation. By doing so, you’ll have a functioning doorbell system in your home in no time!
Troubleshooting Common Issues
While installing a doorbell transformer may seem like a straightforward task, occasionally there may be some issues that require troubleshooting. In this section, we will discuss common problems that you may encounter during the installation process and provide solutions to help you overcome them. By identifying and resolving wiring problems, addressing transformer overload or incompatibility, troubleshooting ringing or buzzing noises, and solving intermittent power supply issues, you’ll be able to ensure a successful installation of your doorbell transformer.
Identifying and Resolving Wiring Problems
Proper wiring is crucial for the efficient functioning of your doorbell transformer. One common issue you might encounter is incorrect wiring, which can lead to a variety of problems. To identify and resolve these wiring problems, follow these steps:
- Check that all wires are securely connected to their respective terminals. Loose connections may result in intermittent power supply or no power at all.
- Inspect the wires for any signs of damage, such as fraying or exposed copper. If you find any damaged wires, they will need to be replaced.
- Ensure that the wires are correctly connected to the transformer and the doorbell chime. Refer to the manufacturer’s instructions for the correct wiring configuration.
Addressing Transformer Overload or Incompatibility
Another common issue that you may encounter is transformer overload or incompatibility. This can occur if the doorbell transformer you have installed is not compatible with the voltage requirements of your doorbell system. To address this issue and prevent any potential damage, follow these steps:
- Check the voltage rating of your existing doorbell system and compare it to the voltage output of the transformer. If they do not match, you will need to replace the transformer with a compatible one.
- If the transformer is overloaded due to multiple devices drawing power from it, consider installing an additional transformer to distribute the load evenly.
Troubleshooting Ringing or Buzzing Noises
Ringing or buzzing noises can be quite bothersome when it comes to your doorbell system. Thankfully, there are steps you can take to troubleshoot and eliminate these noises:
- Check the wiring connections to ensure they are secure and properly insulated. Loose or exposed wires can create unwanted noises.
- Inspect the doorbell chime for any loose components or damaged wires that may be causing the noise.
- If the noise persists, consider replacing the doorbell chime with a higher-quality model that is designed to minimize noise.
Solving Intermittent Power Supply Issues
If your doorbell system experiences intermittent power supply, it can be frustrating for both you and your visitors. To solve this issue and ensure consistent power supply to your doorbell, follow these steps:
- Check the wiring connections to ensure they are secure and properly insulated. Loose or damaged wires can lead to intermittent power supply.
- Inspect the transformer to ensure it is functioning correctly and delivering a consistent power output. If the transformer is faulty, it will need to be replaced.
- If the power supply issues persist, consider installing a dedicated circuit for your doorbell system to eliminate any potential electrical interference.
Enhancing The Doorbell System
When it comes to creating a welcoming entryway, a reliable and functional doorbell system is a must. However, simply installing a basic doorbell transformer may not be enough to fully optimize your doorbell system. In this article, we’ll explore various ways to enhance your doorbell system, from installing a wireless doorbell receiver to upgrading doorbell chimes for better sound quality, and even integrating smart home features. Let’s dive in and discover how you can take your doorbell system to the next level.
Installing a Wireless Doorbell Receiver
Are you tired of being confined to a specific area of your home just to hear when someone rings your doorbell? Install a wireless doorbell receiver and free yourself from this limitation. A wireless doorbell receiver allows you to hear the doorbell chime from anywhere in your home, giving you the flexibility and convenience to answer the door no matter where you are.
Installing a wireless doorbell receiver is a straightforward process. Here’s how you can do it:
- Find a suitable location for the wireless receiver within the range of your doorbell’s transmitter.
- Connect the receiver to a power source using the included power adapter.
- Synchronize the wireless receiver with your doorbell system according to the manufacturer’s instructions.
With a wireless doorbell receiver installed, you can now enjoy the freedom of moving around your home while still staying connected to your doorbell system.
Upgrading Doorbell Chimes for Better Sound Quality
If you find that the sound quality of your doorbell chimes is lacking, it may be time to upgrade to better-quality chimes. Upgrading your doorbell chimes can make a significant difference in how well you can hear the doorbell throughout your home.
To upgrade your doorbell chimes, follow these steps:
- Purchase a set of doorbell chimes that offer superior sound quality.
- Remove the existing chimes by disconnecting the wires attached to them.
- Mount the new chimes in the desired location, ensuring they are securely installed.
- Connect the wires from the doorbell transformer to the new chimes, following the manufacturer’s instructions.
By upgrading your doorbell chimes, you can enjoy a clear and pleasant sound whenever someone rings your doorbell.
Integrating Smart Home Features with the Doorbell System
Make your doorbell system even more intelligent by integrating smart home features. With smart home integration, you can receive notifications on your smartphone when someone rings your doorbell, even if you’re away from home. Additionally, you can connect your doorbell system to other smart home devices, allowing for seamless automation and control.
To integrate smart home features with your doorbell system, follow these steps:
- Choose a smart doorbell that supports the features you desire, such as motion detection or video recording.
- Install the smart doorbell according to the manufacturer’s instructions.
- Download the accompanying mobile app and follow the setup process to connect the doorbell to your smartphone and other smart home devices.
With smart home integration, your doorbell system becomes a hub for convenience and security, providing you with enhanced control and peace of mind.
In conclusion, by installing a wireless doorbell receiver, upgrading doorbell chimes for better sound quality, and integrating smart home features, you can greatly enhance your doorbell system. These simple steps will not only improve convenience and functionality but also add a touch of modernity to your entryway. Don’t settle for a basic doorbell system – upgrade it and experience the benefits for yourself.
Regular Maintenance And Inspection
Regular maintenance and inspection of your doorbell transformer is essential to ensure its optimal performance. By conducting regular checks and taking necessary steps to maintain its components, you can enjoy a smoothly functioning doorbell system for years to come. In this section, we will explore some important aspects of doorbell transformer maintenance and inspection.
Cleaning the Doorbell Components for Optimal Performance
One of the key maintenance tasks for your doorbell system is cleaning its components. Over time, dust, dirt, and debris can accumulate on the doorbell button, transformer, and wires, affecting its performance. To ensure optimal functioning, follow these steps to clean your doorbell components:
- Start by disconnecting the power to the doorbell system. This can be done by switching off the circuit breaker that supplies power to the transformer.
- Gently remove the doorbell button from the wall or surface it is mounted on. You can use a screwdriver to carefully unscrew any screws holding it in place.
- Once the button is removed, clean it using a soft cloth or sponge and a mild detergent solution. Be careful not to use excessive water or liquid that can damage the electrical components.
- Next, inspect the wires connected to the doorbell button. Look for any signs of damage or fraying. If you notice any issues, consider replacing the wires to ensure a secure connection.
- Now, clean the transformer by wiping it with a soft cloth to remove any dust or debris. Avoid using harsh chemicals or abrasive cleaners that could damage the transformer.
- After cleaning the components, allow them to dry completely before reinstalling the doorbell button and restoring the power.
Checking for Loose Connections and Corrosion
Loose connections and corrosion can hinder the performance of your doorbell system. Therefore, it is crucial to periodically check for any loose connections and signs of corrosion. Here’s what you need to do:
- Start by inspecting the wiring connections at the doorbell button and the transformer. Ensure that all connections are tight and secure.
- If you notice any loose connections, use a screwdriver to tighten them gently. Avoid applying excessive force, as it may damage the components or wiring.
- Next, look for signs of corrosion on the wiring. Corrosion can weaken the connections and lead to poor performance. If you spot any corrosion, carefully remove it using a wire brush or sandpaper.
- After removing the corrosion, clean the affected area with a mild detergent solution and a cloth.
- Finally, inspect the wiring for any damage or wear. If you find any issues, such as exposed wires or insulation damage, it is advisable to replace the affected section to ensure safety and proper functionality.
Replacing the Doorbell Transformer as Needed
If you have followed the maintenance steps mentioned above and still experience problems with your doorbell system, it might be necessary to replace the doorbell transformer. Over time, transformers can wear out or become faulty, leading to issues with power supply and doorbell operation. Here’s how to determine if you need to replace the transformer:
If you notice any of the following signs, it is a good indication that the transformer needs replacing:
- Frequent doorbell malfunctions or intermittent operation
- Inconsistent power supply, resulting in weak or no sound
- Overheating or unusual noises coming from the transformer
- Visible damage or signs of burning on the transformer
If you encounter any of these issues, it is recommended to consult a professional electrician for assistance. They will be able to assess the situation and replace the doorbell transformer efficiently and safely.
Regular maintenance and inspection are vital for the longevity and performance of your doorbell transformer. By following these steps, you can ensure that your doorbell system functions optimally, providing a reliable way to receive visitors and enhance the security of your home.
Frequently Asked Questions On How To Install Doorbell Transformer
Do You Need An Electrician To Install A Doorbell Transformer?
No, you don’t need an electrician to install a doorbell transformer. It’s a simple task that you can do yourself.
How Do You Connect A Doorbell To A Transformer?
To connect a doorbell to a transformer, follow these steps: 1. Locate the transformer, usually near the electrical panel. 2. Turn off the power to the doorbell circuit. 3. Connect the doorbell wires to the transformer terminals, matching the colors.
4. Turn the power back on and test the doorbell.
Where Do You Install Doorbell Transformer?
Install the doorbell transformer near the electrical panel, as close as possible to the doorbell location. Avoid installing in humid or inaccessible areas. Ensure proper grounding and use the appropriate size for your doorbell system. Hiring a professional electrician is recommended for safe installation.
Is It Hard To Install A Doorbell Transformer?
Installing a doorbell transformer is not a difficult task. It can be done easily without any complications. Simply follow the provided instructions, and you’ll have your doorbell transformer installed in no time.
Conclusion
Installing a doorbell transformer is a simple and important task for ensuring the proper functioning of your doorbell system. By following the step-by-step instructions provided in this guide, you can easily complete the installation process without any hassle. Remember to always prioritize your safety and follow the manufacturer’s guidelines.
So go ahead and install your doorbell transformer, and enjoy the convenience and security it brings to your home.