o install drawer slides in an existing cabinet, you need to remove the old slides, measure and mark the placement of the new slides, and then attach them using screws. Make sure to align the slides properly and test the smooth movement of the drawer before fully securing them.
Understanding Drawer Slides
Different types of drawer slides
When it comes to installing drawer slides in existing cabinets, it is crucial to understand the different types of drawer slides and choose the right one for your specific needs. There are several types of drawer slides available in the market, including:
- Side-mount drawer slides – These slides are mounted on the sides of the drawer and cabinet and are one of the most commonly used types of drawer slides. They are relatively easy to install, provide good weight-bearing capabilities, and offer smooth operation.
- Undermount drawer slides – As the name suggests, undermount drawer slides are mounted beneath the drawer, hidden from view when the drawer is open. These slides offer a clean and sleek appearance to cabinets but require careful alignment during installation.
- Center-mount drawer slides – Center-mount drawer slides are mounted on the center bottom of the drawer and provide an alternative option for installing drawer slides. They are often used in antique furniture restoration or when side-mounted or undermount slides are not feasible.
- European drawer slides – European drawer slides, also known as concealed drawer slides, are commonly used in modern cabinets and offer full extension and soft-closing features. These slides are often more expensive but provide a high level of functionality and durability.
How drawer slides work
Drawer slides are mechanical devices that allow drawers to slide in and out of cabinets smoothly. They consist of two main components: the drawer slide itself, which is mounted on the side or bottom of the drawer, and the cabinet slide, which is mounted inside the cabinet. The two slides are then interconnected, allowing the drawer to glide open and closed with ease.
The drawer slides typically have ball bearings or rollers that reduce friction and provide a smooth sliding motion. They also feature a locking mechanism that keeps the drawer securely closed when not in use.
Importance of choosing the right drawer slides
Choosing the right drawer slides is essential for ensuring the functionality and longevity of your cabinet drawers. Here’s why it matters:
- Smooth operation – Drawer slides that are the right fit for your cabinet will ensure smooth and effortless opening and closing of your drawers.
- Weight-bearing capacity – Different drawer slides have different weight capacities. Choosing slides that can adequately support the weight of your drawer contents is crucial to avoid sagging or damage.
- Durability – High-quality drawer slides are built to last and can withstand frequent use without wearing out. Investing in durable drawer slides will save you from the hassle of frequent repairs or replacements in the future.
- Functionality – Depending on your specific needs, you may want drawer slides that offer features such as full extension, soft-closing, or self-closing. Choosing the right slides will enable you to enjoy these added functionalities.
- Aesthetics – Drawer slides that are properly installed and suitable for your cabinet design will contribute to the overall aesthetic appeal of your space.
Now that we’ve covered the different types of drawer slides, how they work, and the importance of choosing the right ones, you’re ready to proceed with the installation process. Stay tuned for our upcoming blog post on step-by-step instructions on how to install drawer slides in existing cabinets!
Preparing The Cabinet
To ensure a smooth installation process, it is essential to properly prepare the cabinet before installing drawer slides. This involves assessing the cabinet structure and condition, measuring the dimensions for the drawer slides, and clearing out the existing drawers and contents.
Assessing the cabinet structure and condition
The first step in preparing the cabinet is to assess its structure and condition. This will help ensure that the cabinet is sturdy enough to support the weight of the drawers and slides, and that there are no existing issues that may hinder the installation process.
Inspect the cabinet for any signs of damage or wear, such as loose joints, cracks, or warping. Pay close attention to the areas where the drawer slides will be attached, as these need to be in good condition to securely hold the slides.
If you notice any structural issues or damage, it is important to address them before proceeding with the installation. Repair any loose joints or cracks, and make any necessary adjustments to ensure the cabinet is in a suitable condition for installing the drawer slides.
Measuring the dimensions for the drawer slides
Accurate measurements are crucial for a successful installation of drawer slides. Before you can purchase the appropriate slides, you need to measure the dimensions of your cabinet. This will ensure that the slides fit properly and operate smoothly.
Start by measuring the width of the cabinet opening. Use a tape measure to determine the distance between the inner edges of the cabinet walls. Record this measurement as it will be needed when selecting the correct size of drawer slides.
Next, measure the height of the cabinet opening. This measurement should be taken from the bottom of the cabinet to the top, where the drawer slides will be attached.
It is important to measure both the width and height of the cabinet accurately to ensure a precise fit for the drawer slides. Taking these measurements will help you select the appropriate size of slides for your cabinet.
Clearing out the existing drawers and contents
Before installing the new drawer slides, it is necessary to clear out any existing drawers and their contents. This will provide you with a clear workspace and prevent any obstructions or damage during the installation process.
Remove the drawers one by one, starting from the top. Take out any contents stored inside and set them aside in a safe place. Inspect the drawers for any signs of damage or wear, such as loose joints or broken parts. If necessary, make any repairs before proceeding.
Once all the drawers have been removed and cleared, carefully clean the inside of the cabinet to remove any dust or debris. A clean workspace will ensure a smooth and efficient installation of the drawer slides.
Choosing The Right Drawer Slides
When it comes to installing drawer slides in your existing cabinet, choosing the right ones can make all the difference. Drawer slides not only provide smooth and easy access to your drawer, but they also contribute to the overall functionality and durability of the cabinet. To ensure you select the most suitable drawer slides for your cabinet, there are a few key factors to consider.
Factors to consider when selecting drawer slides
Before diving into the technical details of weight capacity and extension types, it’s essential to keep a few factors in mind when choosing drawer slides for your existing cabinet:
- Cabinet material: Consider the type of material your cabinet is made of. Different materials may require specific kinds of drawer slides that can adequately support the weight and withstand the movement.
- Intended use: Determine how heavily you expect the drawer to be used. If you’re installing the drawer slide in a kitchen cabinet that will store heavy pots and pans, you’ll need sturdier slides with a higher weight capacity.
- Budget: Evaluate your budget constraints and find drawer slides that offer a balance between quality and affordability.
Understanding weight capacity and extension types
Weight capacity and extension types are two critical specifications to understand when selecting drawer slides:
| Weight Capacity | Extension Types |
|---|---|
| Drawer slides come with different weight capacities, typically ranging from 75 to 500 pounds.Ensure you choose slides that can comfortably support the weight of the drawer and its contents without strain or sagging. | Extension types refer to how far the drawer can extend from the cabinet.Common extension types include full extension, partial extension, and over-travel.Full extension slides provide access to the entire drawer, while partial extension slides allow only partial access.Over-travel slides allow the drawer to extend beyond the cabinet, providing maximum access. |
Matching drawer slides to cabinet dimensions
In addition to weight capacity and extension types, it’s crucial to ensure that the chosen drawer slides match your cabinet’s dimensions:
- Measure the cabinet’s width, height, and depth accurately.
- Select drawer slides with lengths that correspond to the drawer’s depth to achieve proper fit and functionality.
- Consider the clearance needed for the drawer slides to operate smoothly without interference from surrounding elements.
By carefully considering factors such as cabinet material, intended use, weight capacity, extension types, and dimensions, you can confidently choose the right drawer slides for your existing cabinet. Installing the correct drawer slides will not only guarantee smoother operation but also enhance the functionality and longevity of your cabinet.
Removing Old Drawer Slides
Methods for removing existing drawer slides
Before you can install new drawer slides in your existing cabinet, you need to properly remove the old ones. There are a few methods you can use to do this, depending on the type of drawer slides you have. Here are a few options to consider:
- Method 1: Unscrewing the slides
- Method 2: Removing nails or staples
- Method 3: Cutting the slides
Ensuring the cabinet is clean and free from debris
Once you have successfully removed the old drawer slides, it’s important to ensure that your cabinet is clean and free from any debris that could interfere with the installation of the new slides. Here are a few steps to follow:
- Remove any remaining screws, nails, or staples:
- Inspect for any damage:
- Clean the cabinet:
Repairing any damage caused by the previous slides
If you discovered any damage on the cabinet during your inspection, it’s essential to repair it before installing the new drawer slides. Here are a few steps to help you repair the damage:
- Fill any cracks or splinters:
- Smooth out rough surfaces:
- Apply a fresh coat of paint or finish:
Installing The New Drawer Slides
Installing new drawer slides in an existing cabinet can drastically improve the functionality and convenience of your drawers. Whether you’re looking to replace old, worn-out slides or add new ones to a cabinet without any, this step-by-step guide will walk you through the process. In this section, we will explore the different installation methods for various drawer slide types, provide you with detailed instructions on how to install the slides, and guide you on adjusting the slides for proper alignment and smooth operation.
Different installation methods for various drawer slide types
When it comes to drawer slides, there are different types available in the market. Each type has its own installation method that ensures the slides are secure and functional. Here are a few common types of drawer slides and their corresponding installation methods:
| Type of Drawer Slide | Installation Method |
|---|---|
| Side-Mount | You will need to attach the slides to the sides of the cabinet and the drawer. The slides should be positioned parallel to each other, ensuring they are level and aligned. |
| Under-Mount | These slides are installed underneath the drawer, allowing for a sleek and hidden appearance. The slides should be attached to the bottom of the drawer and the cabinet, ensuring they are level and aligned. |
| Center-Mount | This type of drawer slide is installed in the center of the drawer and the cabinet. You will need to attach the slides to the center of the drawer and the cabinet, ensuring they are level and aligned. |
Step-by-step instructions for installing the slides
Now that you’re familiar with the different installation methods for each type of drawer slide, let’s go through a step-by-step process of installing the slides:
- Remove the existing drawer from the cabinet to gain access to the old slides.
- Inspect the cabinet and drawer for any damages or obstructions that may hinder the installation process.
- Measure the length of the drawer and the inside of the cabinet to ensure that you purchase the correct size of drawer slides.
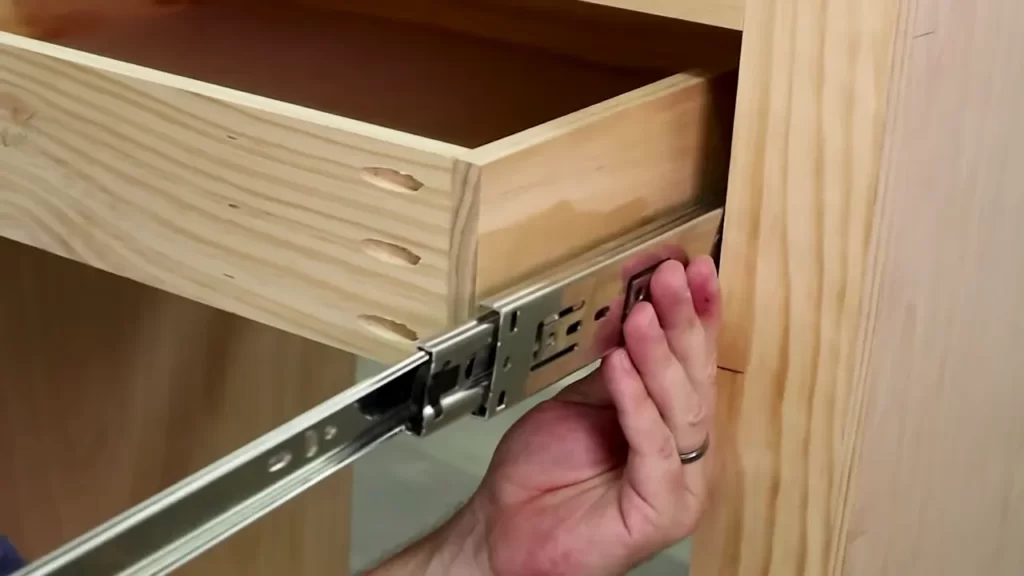
- Based on the chosen installation method and type of drawer slide, attach the slides to the sides, bottom or center of the drawer and the corresponding areas in the cabinet using screws.
- Ensure that the slides are level and aligned by using a spirit level and making necessary adjustments.
- Carefully slide the drawer back into the cabinet, making sure that the slides glide smoothly and the drawer sits securely in place.
- Test the drawer by opening and closing it multiple times to ensure it operates smoothly and without any obstructions.
Adjusting the slides for proper alignment and smooth operation
Once the new drawer slides are installed, it is important to adjust them for proper alignment and smooth operation. Here are a few steps to follow for adjusting the slides:
- If the drawer is misaligned, loosen the screws holding the slides in place and make necessary adjustments for proper alignment.
- If the slides feel sticky or the drawer doesn’t glide smoothly, apply a lubricant specifically designed for drawer slides to ensure smooth movement.
- Test the drawer again by opening and closing it to ensure that it operates smoothly and without any issues.
By following these installation and adjustment steps, you’ll have a well-functioning drawer with slides that enhance its efficiency and convenience. So go ahead and give your cabinets a much-needed upgrade!
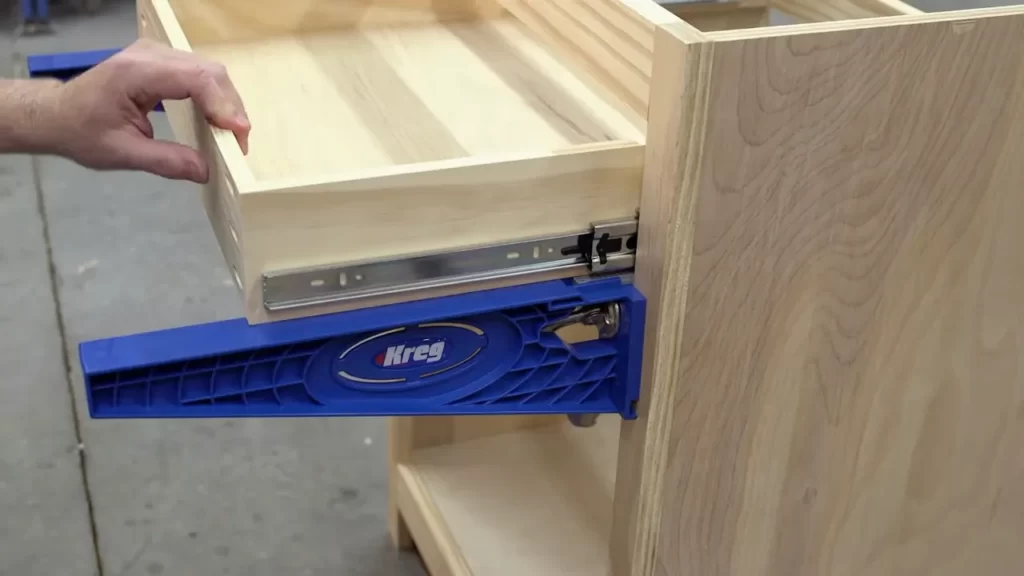
Mounting The Drawer Boxes To Slides
Attaching Drawer Boxes to the Slides
Once you have successfully installed the drawer slides in your existing cabinet, the next step is to mount the drawer boxes onto the slides. This is a crucial step as proper attachment ensures that your drawers slide smoothly and securely. Here’s how you can do it:
- Prepare the drawer boxes: Before attaching the drawer boxes to the slides, make sure they are properly built and assembled. Check for any loose parts or misalignments that could hinder the sliding motion.
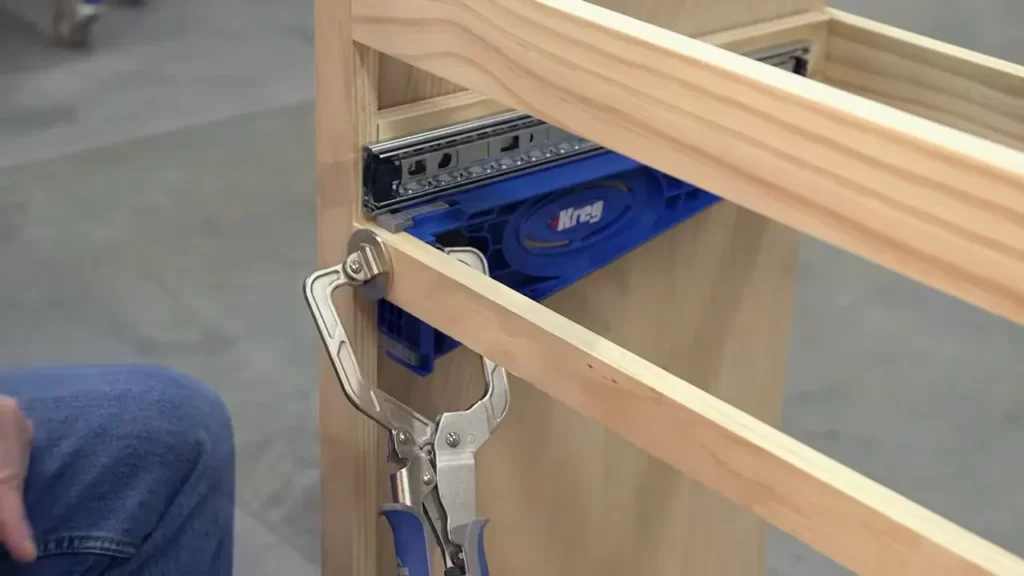
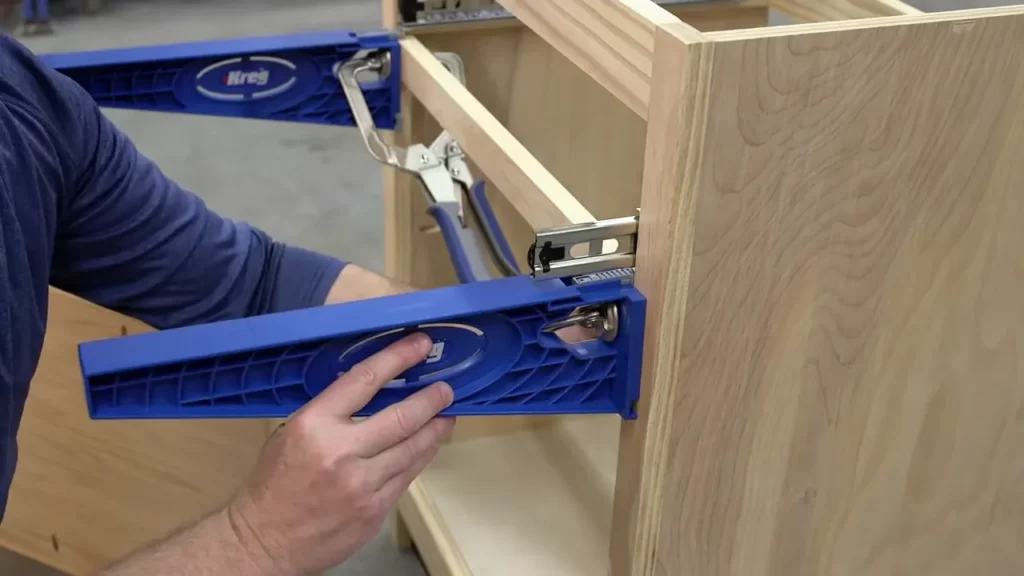
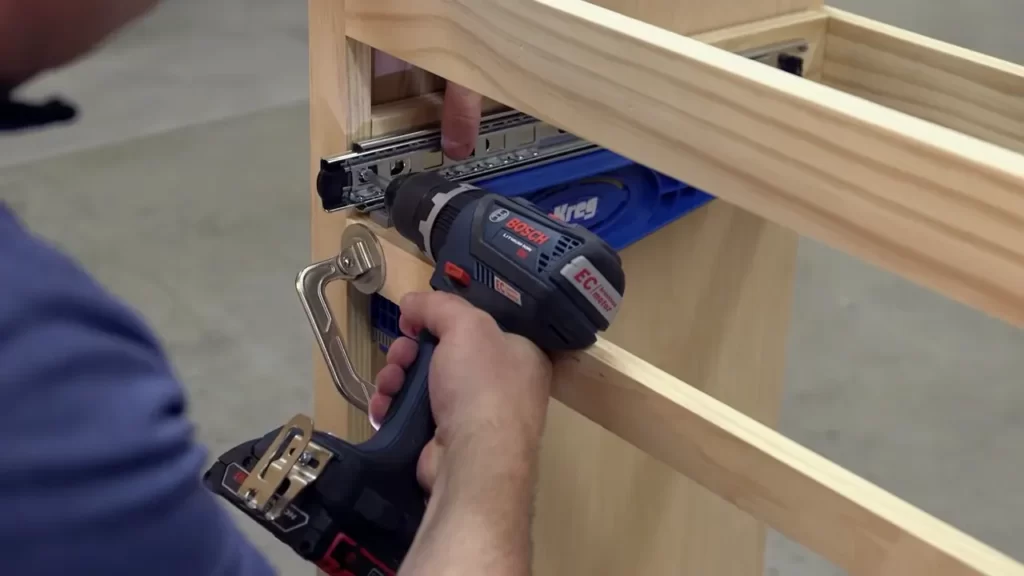
- Align the slides: Place the drawer slides within the cabinet, ensuring they are properly aligned. Use a ruler or measuring tape to ensure even spacing and alignment on both sides of the cabinet. This step is crucial for achieving smooth and effortless drawer operation.
- Secure the slides: Using screws provided with the drawer slides, attach them securely to the sides of the cabinet. Make sure to follow the manufacturer’s instructions for the specific model and type of slides you are using. Tighten the screws firmly, but be cautious not to overtighten as it may affect the sliding action.
- Insert the drawer box: With the slides securely mounted, carefully place the drawer box onto the slides. Ensure that the slides are fully engaged with the corresponding parts on the drawer box. Push the drawer all the way in to ensure a snug fit.
- Test the sliding motion: Once the drawer box is attached, test the sliding motion to ensure smooth movement. Open and close the drawer several times to verify that it operates effortlessly without sticking or wobbling. If you encounter any issues, double-check the alignment and attachment of the slides.
By following these steps, you will be able to successfully attach your drawer boxes to the slides, ensuring proper alignment and smooth movement. Proper installation is essential for maximizing the functionality and convenience of your cabinet drawers.
Adjusting the Height and Fit of the Drawers
To achieve optimal functionality and visual appeal, you may need to adjust the height and fit of your drawers. Depending on your specific cabinet and preferences, here are some steps you can follow:
- Measure and mark: Determine the desired height for your drawers and mark it on the cabinet sides. Use a level or straight edge to ensure accuracy.
- Remove the drawer box: Take out the drawer box from the slides to access the mounting hardware or brackets that secure it to the cabinet.
- Adjust the height: Loosen the mounting hardware or brackets and move the drawer box up or down to align with the marked height. Once in position, tighten the hardware or brackets securely.
- Check the fit: Slide the drawer box back onto the slides and test its fit within the cabinet. Ensure there is enough clearance on all sides to prevent rubbing or jamming.
- Make additional adjustments: If needed, repeat the above steps to fine-tune the height and fit of each drawer. Consistency is key to achieving a cohesive and visually appealing cabinet layout.
By following these steps, you can easily adjust the height and fit of your drawers to ensure they blend seamlessly into your cabinet and work smoothly. Taking the time to properly align and adjust the drawers will enhance both the functionality and aesthetics of your cabinet.
Testing And Fine-Tuning
Once you have successfully installed drawer slides in your existing cabinet, it’s time to move on to the crucial step of testing and fine-tuning. This stage ensures that your drawers operate smoothly, have sufficient weight capacity and extension, and are free from any potential issues. By thoroughly checking the functioning of your drawers, testing their weight capacity and extension, and making necessary adjustments or repairs, you can ensure that your newly installed drawer slides are up to the mark. Let’s explore each of these important steps in detail.
Checking the drawers for smooth operation
Begin by checking the smooth operation of your drawers to ensure that they glide effortlessly along the drawer slides. Open and close each drawer multiple times to gauge how smoothly they move. Pay close attention to any instances of sticking, grinding, or uneven movement. If any issues arise, there are a few possible causes:
- Dust or debris may have accumulated on the slides, hindering smooth movement. Wipe the slides thoroughly with a clean cloth to remove any such obstructions.
- The drawer slides may not be installed parallel to each other, causing misalignment. Check the positioning of the slides and make necessary adjustments using a screwdriver or drill.
- Inspect the drawer itself for any loose joints or misaligned components that could affect its movement. Tighten any loose screws and ensure all parts are properly aligned.
Testing weight capacity and extension
Next, it’s important to test the weight capacity and extension of your drawers. Place a reasonable amount of weight inside each drawer (similar to what you intend to store), ensuring it is evenly distributed. Slowly open and close the drawer to check if it can handle the weight without sagging or straining the slides. If you observe any issues, consider the following:
- The drawer slides may not be of sufficient weight capacity. In this case, consider replacing them with slides that can support the desired load.
- Inspect the construction of the drawer itself. Weak joints or thin materials can contribute to sagging or strain. Reinforce weak areas by adding additional support or replacing the drawer if necessary.
- If the drawer extends fully but feels stiff or resistant, lubricate the slides with a suitable lubricating agent to enhance smooth operation.
Making any necessary adjustments or repairs
Lastly, make any necessary adjustments or repairs to ensure optimal performance of your drawer slides. This may involve fine-tuning the alignment of the slides, replacing damaged or worn-out parts, or reinforcing weak joints in the drawer itself. Remember that each adjustment should be made carefully, taking into account the specific requirements of your cabinet and drawers. By addressing any potential issues immediately, you can avoid future problems and ensure the longevity of your newly installed drawer slides.
Tips And Tricks For Effortless Installation
Installing drawer slides in an existing cabinet can be a daunting task, but with the right tips and tricks, it can be an effortless process. In this section, we will explore some helpful strategies to make your installation go smoothly. From using lubricants for smoother sliding, to adding additional support or reinforcement, and troubleshooting common installation issues, these tips and tricks will ensure that your drawer slides are installed with ease.
Using lubricants for smoother sliding
One of the key factors in achieving a seamless installation is ensuring that your drawer slides move smoothly. To achieve this, consider using lubricants that can reduce friction and allow for effortless sliding. Applying a thin layer of lubricant, such as silicone spray or a dry lubricant like graphite, on the moving parts of the drawer slides can make a noticeable difference.
Adding additional support or reinforcement
Sometimes, the existing cabinet may not provide enough support for the drawer slides, leading to instability or difficulty in sliding the drawers. In such cases, it is advisable to add additional support or reinforcement to ensure a sturdy installation. You can achieve this by attaching wooden support pieces to the sides or bottom of the cabinet, or using brackets specifically designed for this purpose.
Troubleshooting common installation issues
Even with careful preparation, installation issues may still arise. To avoid frustration, it’s important to know how to troubleshoot common problems that may occur during the installation process. Here are a few common issues and their solutions:
- Drawer slides not aligning properly: Check if the slides are parallel and adjust them if needed. Make sure that both slides are securely attached to the cabinet.
- Drawer slides not sliding smoothly: Apply lubricants to reduce friction, as mentioned earlier. Ensure that there are no obstructions or debris in the tracks.
- Drawer slides not closing completely: Inspect if the slides are properly aligned and check for any misalignments or damaged parts. Adjust or replace the slides if necessary.
- Drawer slides sagging or wobbling: Add additional support or reinforcement to the cabinet, as discussed previously. Make sure that the slides are securely attached to the support pieces.
By following these tips and tricks, you’ll be able to install drawer slides in your existing cabinet effortlessly. Achieving smooth sliding drawers and ensuring a sturdy installation will not only make your cabinets more functional but also enhance the overall aesthetic appeal of your space.
Maintenance And Care
Proper maintenance is crucial for ensuring the smooth functioning and longevity of drawer slides in your existing cabinet. By following a routine maintenance schedule, you can minimize wear and tear, prolong the lifespan of the slides, and prevent any potential issues. In this section, we will discuss the key aspects of maintaining and caring for your drawer slides, including cleaning and lubrication and addressing any repairs or issues.
<h3>Proper maintenance to extend the lifespan of drawer slides</h3>
To extend the lifespan of your drawer slides and keep them operating smoothly, regular maintenance is essential. Here are some guidelines to help you properly maintain your drawer slides:
- Inspect the slides periodically to identify any signs of wear, damage, or misalignment.
- Tighten any loose screws or fasteners that may affect the stability of the slides.
- Ensure that the slides are properly aligned and adjusted to prevent unnecessary strain on the mechanism.
- Keep the slides free from dirt, debris, and other particles that can interfere with their movement.
<h3>Cleaning and lubricating the slides</h3>
Cleaning and lubricating the drawer slides are important steps in maintaining their optimal performance. Here’s how you can effectively clean and lubricate the slides:
- Start by removing the drawers to access the slide mechanism.
- Use a soft cloth or brush to gently remove any accumulated dust, dirt, or debris from the slides.
- Inspect the slides for any signs of rust or corrosion. If present, use a rust remover or fine-grit sandpaper to clean the affected areas.
- Apply a silicone-based lubricant or a recommended slide lubricant to the slides. Be sure to follow the manufacturer’s instructions for proper application.
- Slide the drawers back into place a few times to distribute the lubricant evenly.
<h3>Addressing any issues or repairs</h3>
Over time, you may encounter issues with your drawer slides that require attention or repairs. It’s important to address these problems promptly to prevent further damage. Here are some steps to help you address any issues or repairs with your drawer slides:
- Identify the problem, whether it’s a misalignment, loose connection, or damaged component.
- Tighten any loose screws or connections that may be causing instability.
- If the slides are misaligned, adjust them according to the manufacturer’s guidelines.
- If a component is damaged beyond repair, consider replacing it with a compatible part.
Frequently Asked Questions On How To Install Drawer Slides In Existing Cabinet
How Do You Install Drawer Slides On Old Drawers?
To install drawer slides on old drawers, assess the condition of the drawer and slides. Remove any existing slides and clean the drawer. Attach the new slides, aligning them with the drawer and cabinet. Secure them in place using screws or other appropriate fasteners.
Can You Add Drawers To Existing Cabinets?
Yes, it is possible to add drawers to existing cabinets. This can be done by measuring the cabinets, selecting the appropriate drawer size, and installing the drawer slides. It is a great way to increase storage and improve organization in your kitchen or any other room.
How Do You Install A Sliding Drawer In A Cabinet?
To install a sliding drawer in a cabinet, first, measure the space and select a compatible drawer kit. Next, remove the cabinet’s existing shelves and attach the drawer slides using screws. Then, attach the drawer sides to the slides and adjust for a snug fit.
Finally, secure the drawer front and test the smooth sliding motion.
What Is The Easiest Drawer Slide To Install?
The easiest drawer slide to install is the side mount drawer slide. With its simple design and easy installation process, it is perfect for DIY projects or beginners. Just attach the slides to the drawer and cabinet, and you’re good to go! No need for complex adjustments or special tools.
How Do I Measure For Drawer Slides?
To measure for drawer slides, first, remove the drawers from the cabinet. Then, measure the depth, width, and height of the cabinet. Subtract the thickness of the drawer slide from the cabinet measurements to determine the ideal slide length.
Conclusion
To conclude, installing drawer slides in an existing cabinet is a simple process that can greatly improve the functionality of your furniture. By following the step-by-step instructions provided in this blog post, you can effortlessly enhance the convenience and accessibility of your drawers.
Whether you are a DIY enthusiast or a beginner, this guide offers valuable insights and tips that will ensure a successful installation. Upgrade your cabinets today and enjoy the convenience of smoothly gliding drawers.