o install extension springs on a garage door, start by positioning the springs on the garage door tracks and secure them with the provided brackets. Then, attach the pulleys and cables to the springs and adjust the tension to ensure smooth operation.
Welcome to our guide on installing extension springs on a garage door. When it comes to garage door maintenance, proper installation of the springs is crucial for safe and functional operation. We will walk you through the steps to install extension springs on your garage door.
By following these simple instructions, you can ensure that your garage door operates smoothly and efficiently. So, let’s get started on the installation process.
Prepare The Necessary Tools And Materials
Before diving into the installation process, it is crucial to prepare the necessary tools and materials. Having everything ready before starting will make the whole process smoother and more efficient. In this section, we will provide you with a list of tools and materials you will need, as well as highlight the importance of having them prepared.
List of Tools and Materials Needed
In order to successfully install extension springs on your garage door, it is important to have the following tools and materials:
| Tools | Materials |
|---|---|
| Adjustable wrenchSafety glassesVise gripsMeasuring tapeSocket setHammerDrillNail punchHacksaw | Extension springsLadderSafety cablesSpray lubricantGarage door openerWinding barsMounting bracketsCable pulleys |
Importance of Having Everything Ready Before Starting the Installation Process
Having all the necessary tools and materials prepared before starting the installation process is vital for several reasons. Firstly, it ensures that you won’t waste any time searching for tools or running to the store in the middle of the installation. This allows you to stay focused and complete the task efficiently.
Additionally, having everything ready minimizes the risk of accidents or injuries. When you have everything in place, you won’t be tempted to use improper tools or makeshift substitutes, which can compromise your safety.
Furthermore, being prepared allows you to work at your own pace and avoid interruptions. You won’t have to pause the installation process to gather or purchase missing tools, which can be a frustrating experience.
By taking the time to prepare and gather all the necessary tools and materials beforehand, you set yourself up for a successful and stress-free installation process. So, make sure to double-check your tool kit and gather all the materials required before diving into installing extension springs on your garage door.
Understanding Extension Springs And Their Function
When it comes to the smooth functioning of a garage door, extension springs play a crucial role. These springs are responsible for counterbalancing the weight of the door and making it easier to open and close. Without extension springs, your garage door would be extremely heavy and nearly impossible to operate manually.
Explanation of what extension springs are
Extension springs are long, coiled springs that stretch and contract as the garage door is opened and closed. They are typically installed parallel to the horizontal tracks on either side of the door. When the door is closed, the extension springs are in their most relaxed state. As the door is opened, the springs stretch and store energy. This stored energy is then released when the door is closed, helping to lift the door back into place.
How they contribute to the smooth functioning of a garage door
Extension springs contribute to the smooth functioning of a garage door by providing the necessary force to counterbalance the weight of the door. When properly adjusted, the extension springs make it easy to open and close the door manually. They help to reduce the strain on the motor and other components of the garage door opener, prolonging their lifespan. Without extension springs, the garage door would be extremely heavy and difficult to open, posing a safety risk.
Importance of choosing the right extension springs for your garage door
Choosing the right extension springs for your garage door is of utmost importance. The size and weight of your door will determine the type and strength of springs needed. Installing springs that are too weak for your door can lead to excessive strain on the opener and require frequent adjustments. On the other hand, using springs that are too strong can cause the door to close with too much force, posing a safety risk. It is essential to consult a professional or refer to the manufacturer’s recommendations to ensure the proper extension springs are chosen for your garage door.
Ensuring Safety Measures Are In Place
When it comes to installing extension springs on a garage door, it is crucial to prioritize safety. Ensuring that proper safety measures are in place not only protects you and your helpers from potential accidents, but it also helps prevent damage to the garage door itself. By following the necessary safety precautions, using the right safety equipment, and paying attention to details, you can complete the installation process with peace of mind.
Importance of safety during the installation process
Safety should always be the top priority when working with garage door extension springs. These springs are tension-loaded and can exert a significant amount of force, making them potentially dangerous if mishandled. By understanding the importance of safety measures, you can minimize the risk of injuries and accidents during the installation process.
Necessary safety precautions to take before beginning the installation
Before you start installing extension springs on your garage door, it is essential to take certain safety precautions to ensure a secure working environment. These precautions include:
- Disconnecting the power: Always disconnect the power supply to the garage door opener to prevent any accidental activation of the door during the installation.
- Securing the door in the open position: Use clamps or locking pliers to secure the garage door in the open position. This prevents the door from unexpectedly closing while you are working on the springs.
- Gathering the right tools: Make sure you have all the necessary tools and equipment for the installation before you begin. This includes wrenches, pliers, safety goggles, work gloves, and a sturdy ladder.
- Clearing the area: Remove any objects or obstacles in the vicinity of the garage door that may interfere with your work. Keep the area clean and free from clutter.
Overview of safety equipment needed
Along with taking the necessary precautions, using the right safety equipment is crucial to ensure a safe installation process. The following safety equipment should be used:
| Safety Equipment | Purpose |
|---|---|
| Safety goggles | Protect your eyes from debris and potential spring-related accidents. |
| Work gloves | Provide hand protection and improve grip when working with tools. |
| Sturdy ladder | Allow safe access to the garage door springs. |
| Clamps or locking pliers | Safely secure the garage door in the open position to prevent accidental closing. |
By adhering to these safety measures and using the necessary equipment, you can minimize the risk of accidents and ensure a smooth and safe installation process. Remember to always follow manufacturer instructions, and if you are unsure or uncomfortable with any step, it is recommended to seek professional help.
Release Tension From The Old Springs
When it comes to installing extension springs on a garage door, one of the most crucial steps is releasing the tension from the old springs. This step is essential for both your safety and the successful installation of the new springs.
Detailed steps to safely release tension from the old extension springs
Releasing tension from the old extension springs involves several detailed steps to ensure a smooth and accident-free process:
- Start by gathering the necessary tools for the job, such as safety glasses, gloves, and a pair of winding bars.
- Carefully position a sturdy ladder underneath the garage door, ensuring it is stable and secure.
- Locate the winding cone at the end of the extension spring, which is usually attached to a central bracket or anchor.
- Insert the winding bar into one of the holes on the winding cone, making sure it fits securely.
- Using a slow and controlled motion, rotate the winding bar in the direction that will release the tension from the spring. Be cautious and make small turns to avoid any sudden spring unwinding.
- Continue rotating the winding bar until the tension in the spring is completely released. You may need to repeat this step for each side of the garage door if it is equipped with two extension springs.
- Once the tension is fully released, carefully remove the winding bar and proceed with removing the old extension springs.
Importance of caution to prevent accidents
It is crucial to approach the release of tension from the old extension springs with utmost caution. Failure to do so can result in serious injuries or accidents. Some key points to remember are:
- Always wear protective gear, such as safety glasses and gloves, to shield yourself from potential spring recoil or flying debris.
- Make sure the ladder you use is stable and properly positioned, reducing the risk of falls or accidents.
- Use the appropriate size and type of winding bar to ensure a secure grip and minimize the chances of slipping or losing control.
- Keep a firm and steady grip on the winding bar, maintaining control of the spring’s tension at all times.
- Take your time and make small, controlled turns when releasing the tension, avoiding sudden unwinding that can lead to accidents.
By following these safety measures and adhering to the step-by-step instructions for releasing tension from the old extension springs, you can ensure a safe and successful installation process for your garage door.
Removing The Old Extension Springs
Step-by-step instructions for removing the old extension springs
Removing the old extension springs from your garage door is an important step before installing new ones. Follow these step-by-step instructions to ensure a safe and successful removal process.
- Open the garage door fully to relieve tension on the springs.
- Use safety gloves and goggles to protect yourself from any potential accidents during the removal process.
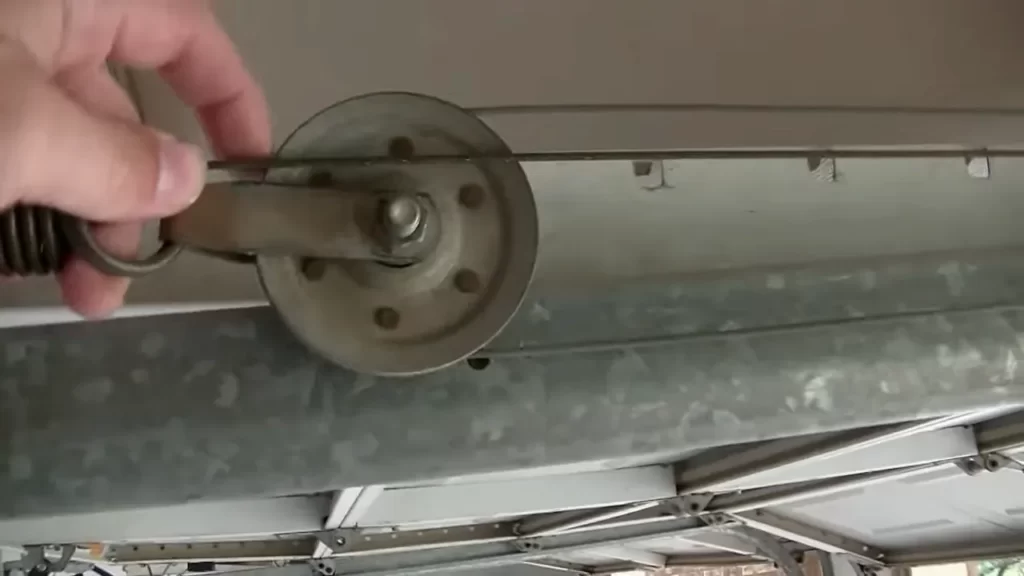
- Locate the extension springs on each side of the garage door. They are typically found above the horizontal tracks and are attached to pulleys and safety cables.
- With the appropriate tools, such as a ladder and socket wrench, disconnect the safety cables from the brackets.
- Next, disconnect the extension springs from the pulleys. You may need to use a pair of pliers or a pry bar to assist in releasing the tension.
- Once the springs are disconnected from the pulleys, carefully slide them out of the brackets. Be cautious as they can be under tension and potentially snap.
- Repeat the process for the extension spring on the opposite side of the garage door.
- Inspect the old extension springs for any signs of wear and tear or damage. If they appear to be in good condition, they can potentially be reused or kept as spares. However, it’s typically recommended to replace both extension springs at the same time for optimal performance.
Tips and tricks for making the process easier
To make the process of removing old extension springs on a garage door easier and more efficient, consider these helpful tips and tricks:
- Before starting, thoroughly read the manufacturer’s instructions specific to your garage door model.
- Wear protective gear, such as safety gloves and goggles, to prevent potential injuries during the removal process.
- Ensure you have the necessary tools readily available, including a ladder, socket wrench, pliers, and a pry bar.
- If the springs are difficult to disconnect, apply lubricant to the pulley system to facilitate smoother movement.
- Consider labeling or taking pictures of the disassembly process to ensure easy reinstallation of the new extension springs.
- If you’re unsure about tackling this task on your own, don’t hesitate to call a professional garage door technician for assistance.
Measuring And Installing New Extension Springs
When it comes to garage door maintenance and repairs, installing new extension springs can be a daunting task. However, with the right measurements and a proper understanding of the process, you can easily replace these essential components. In this guide, we will provide an explanation of how to measure for the new extension springs, offer tips for selecting the correct size and type, and provide step-by-step instructions for a successful installation. So, let’s get started!
Explanation of how to measure for the new extension springs
Before you begin the installation process, it’s crucial to measure your existing extension springs accurately. Follow these steps to ensure you get the correct measurements:
- Close the garage door completely to relieve any tension on the springs.
- Measure the length of each spring from the end of one hook to the end of the other, excluding the hooks themselves.
- If you have a dual spring system, measure the spring on the same side as the broken or worn-out spring.
- To determine the weight of the door, measure the height of the door opening in feet and multiply it by the door’s weight per foot. Refer to the manufacturer’s guidelines or consult a professional to obtain this information.
- Record the measurements and weight of your garage door to ensure you purchase the correct size and type of extension springs.
Tips for selecting the correct size and type of extension springs
Choosing the right size and type of extension springs is essential for the smooth and safe operation of your garage door. Consider the following tips when making your selection:
- Determine your garage door’s weight range based on the measurements you took earlier. Look for extension springs that can support this weight.
- Check the door manufacturer’s manual or consult a professional to identify the appropriate spring size, type, and wire gauge for your specific door model.
- If you’re unsure about the weight or spring type, it’s best to seek advice from a qualified garage door technician who can recommend the right springs for your door.
- When purchasing extension springs, opt for high-quality springs from reputable manufacturers to ensure longevity and safe operation of your garage door system.
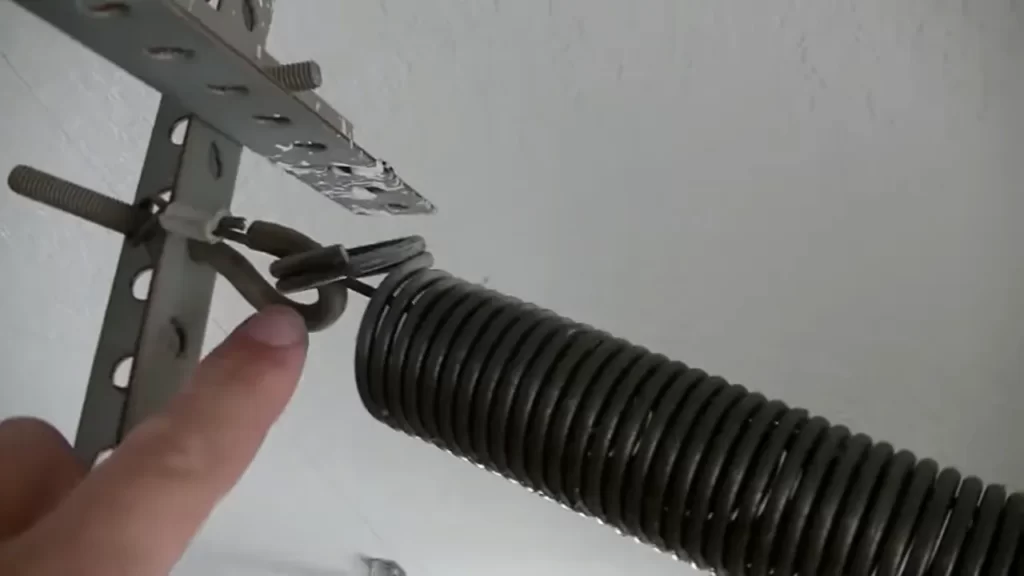
Step-by-step instructions for installing the new extension springs
Now that you have the correct measurements and have selected the appropriate extension springs, it’s time to install them. Follow these step-by-step instructions for a successful installation:
- Gather the necessary tools and equipment, including a ladder, safety glasses, gloves, and the new extension springs.
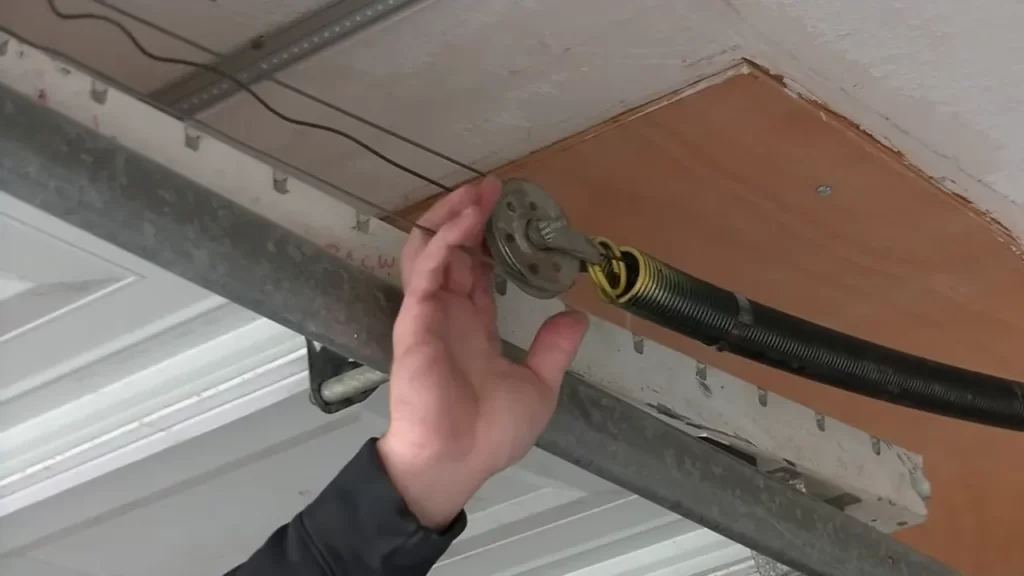
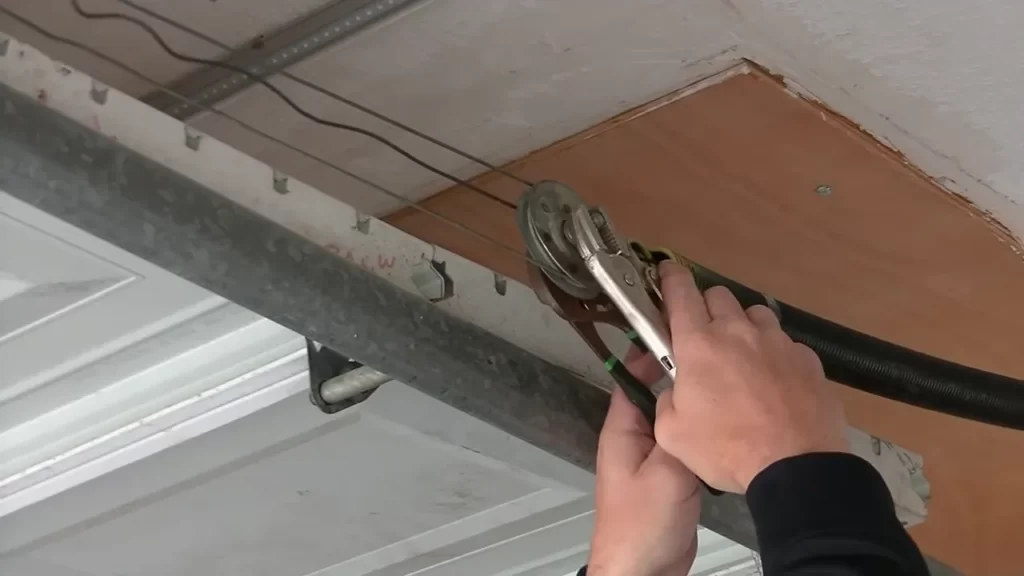
- Carefully disconnect the existing springs from the track hanger and the pulleys. Remember to always exercise caution as the springs are under tension and can cause injury.
- Attach the new extension springs to the track hanger, ensuring they are properly aligned and secure.
- Thread the cables through the extension spring pulleys and attach them to the bottom brackets, making sure they are taut but not overly tightened.
- Test the functionality of the springs by slowly opening and closing the garage door. Make any necessary adjustments to ensure the door operates smoothly.
- Double-check that all bolts and fasteners are tightened securely and ensure there is no excessive tension on the extension springs.
- Finally, perform a thorough inspection to ensure all components are properly installed and in good working condition before using the garage door.
By following these guidelines, you can confidently measure and install new extension springs on your garage door. However, if you encounter any difficulties or lack the necessary skills, it’s recommended to consult a professional garage door technician for assistance. Remember to prioritize safety at all times during the installation process.
Adjusting The Tension And Balance Of The Garage Door
Your garage door is not only an important part of your home’s security, but it also adds to the overall curb appeal. To ensure that your garage door operates smoothly and lasts for years to come, it is essential to properly adjust the tension and balance. This ensures that the door opens and closes effortlessly, preventing any potential damage or accidents.
Importance of properly adjusting the tension and balance
Properly adjusting the tension and balance of your garage door is crucial for several reasons. First and foremost, it ensures your safety and the safety of others. A door that is not properly balanced can become unstable and may unexpectedly fall, causing serious injuries or property damage.
Additionally, adjusting the tension and balance of your garage door can extend its lifespan. When the door is properly balanced, the springs and other components experience less strain and wear, reducing the likelihood of costly repairs or premature replacement.
How to determine the correct tension for your garage door
Determining the correct tension for your garage door requires careful observation and testing. The ideal tension will depend on the weight of your specific garage door, which can vary based on its size and materials used.
To determine the correct tension, follow these steps:
- Start with the door closed and disconnected from the opener mechanism.
- Manually lift the door about halfway open and release it. Observe how the door moves and listen for any unusual noises.
- If the door stays in place and doesn’t move, the tension needs to be increased. If the door quickly slams shut or shoots up, the tension needs to be decreased.
- Make small adjustments to the tension gradually, testing the door after each adjustment until you achieve smooth and controlled movement.
Step-by-step instructions for adjusting the tension and balance
Once you have determined the correct tension for your garage door, follow these step-by-step instructions to adjust the tension and balance:
- Securely close the garage door.
- Locate the adjustment brackets on both sides of the garage door near the bottom.
- Using a wrench or pliers, turn the nuts on the adjustment brackets clockwise to increase tension or counterclockwise to decrease tension. Make small adjustments, no more than one quarter turn at a time, to avoid over-tightening or loosening the springs.
- Test the door after each adjustment by lifting it manually to ensure smooth and balanced movement.
- Repeat the adjustment process if necessary until the door operates effortlessly and stays in the desired position when opened halfway.
Remember, if you encounter any difficulties or are unsure about adjusting the tension and balance of your garage door, it is always best to consult a professional technician for assistance.
By taking the time to properly adjust the tension and balance of your garage door, you can ensure its longevity, enhance its safety, and enjoy smooth and efficient operation for years to come.
Testing And Fine-Tuning The Garage Door
Testing and fine-tuning your garage door is a crucial step after successfully installing extension springs. It ensures the door operates smoothly, maintains proper balance, and provides long-lasting performance. By following a few simple steps, you can ensure your door is functioning correctly and make any necessary adjustments. In this section, we will discuss the importance of testing the garage door after installation, how to check for smooth operation and proper balance, and offer tips for making adjustments if necessary.
Importance of testing the garage door after installation
Testing the garage door after installation is essential to ensure that everything is functioning as it should. It allows you to identify any potential issues or malfunctions early on, which can prevent accidents or costly repairs in the future. Testing the garage door also helps you achieve optimal performance and smooth operation, providing convenience and peace of mind.
How to check for smooth operation and proper balance
Checking for smooth operation and proper balance is a critical aspect of testing your garage door. Here are a few steps to help you evaluate these factors:
- Open the garage door using the opener or manual operation and observe its movement. Make sure it opens and closes smoothly without any jerking, sticking, or unusual noises.
- Pay attention to the door’s balance by partially opening it and releasing it. An accurately balanced door should remain in place at the point where it is left without rising or falling.
- Test the door’s balance further by manually raising it to the halfway point. If it stays in that position without falling or rising, it indicates a properly balanced door.
If you notice any issues during these checks, it may indicate an imbalance or alignment problem that needs to be addressed. It is recommended to consult a professional technician to make the necessary adjustments for optimal performance.
Tips for making adjustments if necessary
If adjustments are needed, it is essential to take the following tips into consideration:
- Identify the specific issue: Determine whether the problem lies with the torsion springs, extension springs, cables, tracks, or other components.
- Consult the manufacturer’s guide: Refer to the manufacturer’s installation guide for specific instructions on making adjustments or seek professional assistance.
- Make gradual adjustments: When making adjustments, do so gradually and in small increments. This will allow for better control and prevent potential damage.
- Test after each adjustment: After making any adjustments, test the door’s operation to evaluate its performance. Continue fine-tuning until you achieve the desired smoothness and balance.
By following these tips and properly testing your garage door, you can ensure optimal performance, longevity, and safety.
Maintaining And Regularly Inspecting Extension Springs
Importance of regular maintenance and inspection
Regular maintenance and inspection of extension springs are crucial to ensure the proper functioning and longevity of your garage door. Extension springs are responsible for counterbalancing the weight of the door, making it easier to open and close. Over time, these springs can wear out or become damaged, posing a safety risk and potentially causing the door to malfunction. By conducting regular maintenance and inspection, you can identify any issues early on and take the necessary steps to resolve them, preventing costly repairs or accidents.
Recommended maintenance tasks to prolong the lifespan of the extension springs
To prolong the lifespan of your extension springs and keep them in optimal condition, it is important to perform regular maintenance tasks. Here are a few recommended tasks to include in your maintenance routine:
- Tighten and inspect the mounting hardware: Check for loose bolts or screws and tighten them if necessary. Loose hardware can put additional stress on the springs and pulleys, leading to premature wear and potential failure.
- Lubricate the springs and pulleys: Apply a silicone-based lubricant to the extension springs and pulleys to reduce friction and prevent unnecessary wear. Be sure to wipe off any excess lubricant to avoid accumulation of dirt or debris.
- Clean and inspect the springs: Remove any dirt, dust, or debris that may have accumulated on the springs. Inspect them for signs of wear, such as cracks or gaps between coils. If you notice any damage, it may be necessary to replace the springs.
Signs of wear or damage to watch for and when to replace them
Even with regular maintenance, extension springs can eventually wear out or become damaged due to normal wear and tear. It is important to be aware of the signs that indicate it’s time to replace them:
- Visible signs of wear: Inspect the springs regularly for any noticeable signs of wear, such as rust, corrosion, or gaps between coils. These signs indicate that the springs have weakened and may not be able to properly support the weight of the garage door.
- Uneven door operation: If you notice that your garage door is not opening or closing smoothly or if it becomes uneven while in operation, it may be a sign of worn-out or damaged extension springs.
- Excessive noise: Pay attention to any unusual or excessive noise coming from the springs when operating the garage door. Squeaking, creaking, or popping sounds can indicate that the springs are worn out and need to be replaced.
In conclusion, regular maintenance and inspection of extension springs are essential for the proper functioning of your garage door and to ensure the safety of your home. By following the recommended maintenance tasks and keeping an eye out for signs of wear or damage, you can prolong the lifespan of your extension springs and address any issues before they become major problems.
Frequently Asked Questions On How To Install Extension Springs On A Garage Door
How Do You Attach Extension Springs?
To attach extension springs, follow these steps: 1. Begin by determining the attachment points on both the spring and the object it will be attached to. 2. Ensure that the attachment points are secure and capable of handling the spring’s tension.
3. Carefully hook one end of the spring onto the designated attachment point. 4. Stretch the spring to attach the other end to its corresponding point. 5. Double-check that both ends are securely attached before using the spring.
How Do You Balance A Garage Door With Extension Springs?
To balance a garage door with extension springs, follow these steps: 1. Close the door and disconnect the opener. 2. Raise the door halfway and mark the spot. 3. Adjust the tension in the springs by loosening or tightening the bolts or nuts.
4. Test the balance by lifting the door manually. 5. Repeat the process until the door is balanced and stays in position at the halfway mark.
How Do You Size A Garage Door Extension Spring?
To size a garage door extension spring, measure the door’s height, track radius, and weight of the door. Use these measurements to determine the correct size and weight rating for the spring.
Can I Put Longer Torsion Springs On My Garage Door?
Yes, it is possible to put longer torsion springs on your garage door. However, it is important to note that changing the length of the torsion springs can affect the balance and operation of the door. It is recommended to consult a professional garage door technician for proper evaluation and installation to ensure safety and functionality.
How Do Extension Springs Work On A Garage Door?
Extension springs work by storing and releasing tension to help counterbalance the weight of the garage door as it opens and closes.
What Are The Signs That My Garage Door Extension Springs Need Replacing?
Signs that your extension springs need replacing include the garage door not closing properly, sagging, or making loud noises during operation.
Conclusion
Installing extension springs on a garage door is a crucial task for ensuring smooth and effective operation. By following the steps outlined in this guide, you can confidently tackle this DIY project. Remember to prioritize safety, use the right tools, and carefully follow the manufacturer’s instructions.
With proper installation, your garage door will function optimally, providing convenience and security for your home. Don’t hesitate to seek professional help if needed. Happy garage door spring installation!