o install garage door panels, start by positioning the bottom panel in the doorway, then secure it with nails or screws. Next, attach the hinge and roller brackets to the top panel, followed by installing the brackets and tracks for the middle panels.
Finally, connect the sections together and secure them in place. This process requires careful alignment and attention to detail. Now, let’s dive into a comprehensive guide on how to install garage door panels effectively. We will cover each step in detail, ensuring you have all the information you need to successfully complete this project.
Step 1: Prepare The Garage Door Panels
Before you can begin installing your new garage door panels, it’s crucial to adequately prepare the area and gather all the necessary tools and materials. This will ensure that the installation process goes smoothly and efficiently. Follow these steps to get your garage door ready for the installation process.
Ensure all tools and materials are ready
To begin, double-check that you have all the tools and materials required for installing the new garage door panels. Having everything prepared beforehand will save you time and prevent any unnecessary interruptions during the installation process. Here’s a list of the essential tools and materials you’ll need:
- Screwdriver
- Hammer
- Pliers
- Measuring tape
- Level
- Power drill
- Replacement panels
- Screws and nails
- Weatherstripping
- Protective gloves
Make sure you have each item on the list readily available. This will enable you to work efficiently and complete the installation without any unnecessary delays.
Remove any existing panels if necessary
If you’re replacing an old garage door panel, you’ll need to remove it before proceeding with the installation. This step is crucial to ensure that your new panels fit seamlessly into place. Here’s a step-by-step guide for removing the existing panels:
- Disconnect the garage door opener from the power source.
- Locate the hinges connecting the panel to the door.
- Using a screwdriver or power drill, remove the screws or bolts securing the hinges in place.
- Once the hinges are detached, carefully lift the panel upward to release it from the track.
- Repeat the process for each panel you need to remove.
Be cautious while removing the panels to avoid any damage to yourself or the garage door itself. It’s always a good idea to wear protective gloves during this process. By ensuring that all tools and materials are readily available and removing any existing panels as necessary, you’ll be well-prepared to begin the installation of your new garage door panels. Stay tuned for the next step in the process – measuring and aligning the new panels for a perfect fit.
Getting The Right Tools For The Job
Before embarking on any DIY project, it’s important to ensure you have all the necessary tools at your disposal. Installing garage door panels is no different — having the right tools can make the process much smoother and ensure a successful installation.
List of tools needed for installation
Here is a comprehensive list of the tools you will typically need to install garage door panels:
- Tape measure
- Power drill
- Screwdriver (both flathead and Phillips)
- Adjustable wrench
- C-clamps
- Pliers
- Level
- Hammer
- Safety glasses
- Gloves
- Allen wrench set
- Step ladder
These tools are essential for ensuring a smooth and efficient installation process. Having them readily available will save you time and frustration as you work through the steps.
Common tools that are typically required
In addition to the specific tools mentioned above, there are a few more common items you may need during the installation process:
- Screws and fasteners
- Garage door track system
- Bottom rubber gasket
- Weatherstripping
It’s important to check the instructions provided by the manufacturer to ensure you have all the necessary parts and materials specific to your garage door model.
By having all the right tools on hand, you can save yourself from unnecessary trips to the hardware store and accomplish the installation with ease. So, double-check your toolbox and gather all the necessary items before you dive into installing your garage door panels.
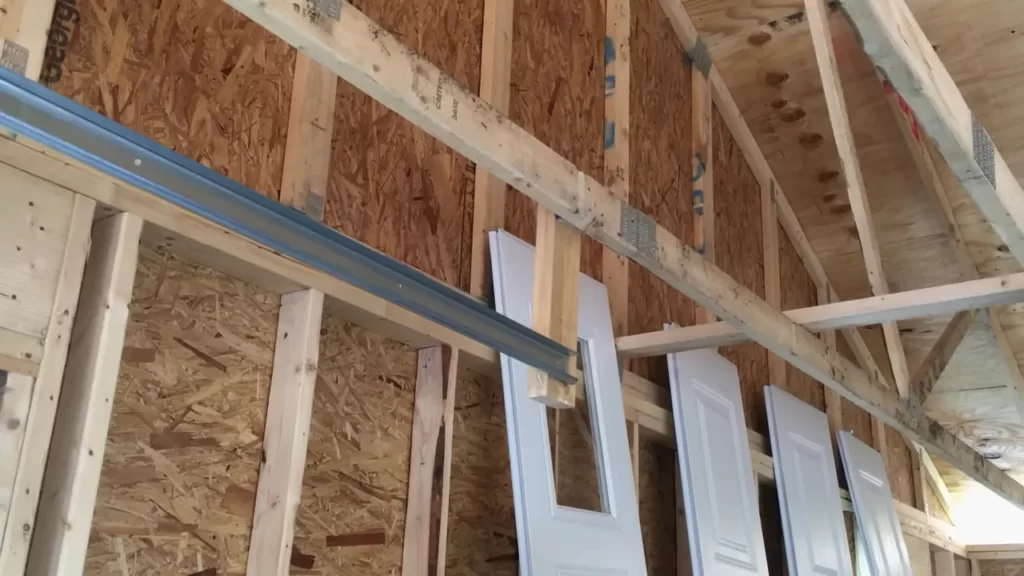
Clearing The Area For Installation
Before you start installing garage door panels, it is crucial to clear the area and create a safe and clutter-free workspace. This ensures that the installation process is smooth and hassle-free, and most importantly, safe for you and your tools. In this section, we will discuss how to create a safe workspace and remove any obstacles or debris from the area.
Creating a safe and clutter-free workspace
To create a safe workspace, allocate enough space around the garage door where you can move freely without any hindrance. Remove any potential hazards that might cause accidents or injuries, such as sharp objects, gardening tools, or loose clutter. It is also a good idea to protect the floor by laying down cardboard or a drop cloth to prevent any damage from tools or falling debris.
Removing any obstacles or debris from the area
To ensure smooth installation, it’s important to remove any obstacles or debris from the area. Start by clearing the immediate vicinity of the garage door, removing any objects that might obstruct your movement or impact the installation process. Pay close attention to items such as bicycles, garden hoses, or storage boxes that might be in the way.
Additionally, carefully inspect the garage door tracks and panels for any signs of debris or dirt buildup. Use a broom or a vacuum cleaner to remove any loose dirt, leaves, or spider webs that might affect the smooth operation of the door. This step also ensures that the panels fit securely without any obstructions.
Quick tips for clearing the area:
- Remove any tools or equipment that are not related to the installation process.
- Keep a clear path to the garage door, ensuring easy access to the panels.
- Securely store any loose items or belongings that might get in the way.
- Inspect the area for potential hazards such as electrical wires or water pipes.
- Double-check that all electrical power to the garage door opener is turned off before starting the installation process.
By creating a safe and clutter-free workspace and removing any obstacles or debris from the area, you can ensure a smooth and efficient installation process for your garage door panels.
Step 2: Measure And Mark
Before installing garage door panels, it is essential to take accurate measurements and mark the positions for installation. This not only ensures a smooth installation process but also helps achieve a perfectly aligned and functional garage door. In Step 2, you will need to measure the dimensions of the door opening and carefully mark the positions for panel installation.
Measure the dimensions of the door opening
The first step in measuring your garage door opening is to measure its width. Using a tape measure, measure the width at the widest point of the opening. Ensure that you measure from the inside of the trim, as this will give you the accurate width of the opening. Record this measurement as it will be crucial for choosing the correct size of door panels.
Next, measure the height of the opening. Start at the floor and measure up to the underside of the header, again from the inside of the trim. Be sure to measure at the highest point of the opening, as garage floors can sometimes slope. Record this measurement as it will also be crucial for selecting the appropriate panel size.
| Opening Dimension | Measurement |
|---|---|
| Width | XYZ inches |
| Height | XYZ inches |
Marking the positions for panel installation
Once you have measured the dimensions of the door opening, you need to mark the positions for panel installation. This step ensures that the panels are evenly spaced and aligned for smooth operation. Follow these steps to mark the positions:
- Start by marking the center of the door opening horizontally. Measure half of the width of the opening from one side and make a mark. Repeat the process from the other side. The point where the two marks intersect is the center.
- Now, mark the positions for the first and last panel. Measure the width of one panel and divide the total width of the opening by the width of the panel. This will give you the number of panels required.
- Divide the width of the opening by the number of panels to determine the space between each panel.
- Starting from the center, measure and mark the position for the first panel on each side, taking into account the spacing calculated in the previous step.
- Repeat this process to mark the positions for all the panels, ensuring they are evenly spaced and aligned.
By taking accurate measurements and marking the positions correctly, you will lay a solid foundation for a successful garage door panel installation. In the next step, we will discuss how to prepare the panels for installation.
Measuring The Dimensions Accurately
Tips and Techniques for Accurate Measurements
When it comes to installing garage door panels, measuring the dimensions accurately is crucial for a successful installation. Taking proper measurements ensures that the panels fit perfectly, resulting in a smooth and functional garage door. To help you achieve accurate measurements, here are some essential tips and techniques to keep in mind:
- Use a Measuring Tape: Before you start measuring, make sure you have a reliable measuring tape handy. A tape measure with clear markings and a sturdy construction will provide accurate readings.
- Measure Twice: Double-checking your measurements is an essential technique that can save you from costly mistakes. Measure the width, height, and thickness of each panel at least twice to ensure consistency and accuracy.
- Take Precise Measurements: When measuring the width of the panels, measure from the inside edge of one side to the inside edge of the opposite side. For the height, measure from the top of the panel to the bottom, excluding any bottom spacing needed for clearance.
- Account for Clearances: Keep in mind that garage door panels require additional space for clearance during operation. Measure and include the necessary clearance distances in your calculations to ensure the panels fit properly without any obstructions.
- Account for Overlap: In cases where the panels overlap when closed, it’s essential to account for the necessary overlap. Measure and include the overlap distance to prevent gaps or misaligned panels.
Common Mistakes to Avoid While Measuring
Accurate measurements are crucial, but they can be easily compromised by common mistakes. Be mindful of these errors and take measures to avoid them:
- Guessing Measurements: Relying on guesswork is a recipe for disaster. Always use a measuring tape and avoid estimating dimensions.
- Ignoring Clearances: Neglecting to factor in the clearances required for the panels can lead to a tight fit, hindering the smooth operation of the garage door.
- Forgetting to Account for Overlap: Forgetting to include the necessary overlap distance can result in panels that don’t align correctly when the door is closed.
- Skipping Double-Checking: Even a minor measurement error can ruin the entire installation process. Take the extra time to double-check your measurements before proceeding.
- Ignoring Thickness Variation: Not accounting for variations in panel thickness can result in uneven gaps between panels, affecting the overall aesthetics and functionality of the garage door.
By following these tips and avoiding common mistakes, you can ensure that your measurements are accurate and your garage door panels fit seamlessly. Taking the time to measure correctly will save you from unnecessary headaches and make the installation process smoother and more successful.
Marking The Positions Correctly
Properly marking the positions of each garage door panel is crucial for a successful installation. This step ensures that the panels are aligned accurately, resulting in a smoothly functioning garage door. In this guide, we will discuss some essential guidelines to help you mark the position of each panel correctly.
Guidelines for marking the position of each panel
- First, ensure you have all the necessary tools and equipment handy for the installation process. These may include a measuring tape, pencil or marker, level, and a ladder.
- Begin by determining the desired height of your garage door. Measure the height of the opening, and mark the desired position for the top of the first panel.
- Next, measure and mark the positions for the bottom of the first panel and the top of the second panel. It is important to maintain equal spacing between each panel for a symmetrical look.
- Continue this process for all the remaining panels, ensuring proper alignment and positioning at each step. Double-check your measurements to avoid any errors.
- It is advisable to use a level to ensure that the marks are perfectly horizontal. This step is crucial for the smooth operation of your garage door.
If you are unsure about the accuracy of your marks, it’s always a good idea to seek assistance from a professional installer who can guide you through the process. Taking the time to properly mark the positions of the panels will result in a neatly installed garage door that functions flawlessly.All information and opinions presented in this blog post are for informational purposes only and should not be taken as professional advice. Always consult with a qualified professional for proper installation and safety guidelines.
Step 3: Install The Garage Door Panels
Congratulations! You’re now ready to install the garage door panels, the crucial step that brings your garage door to life. This process requires precision and attention to detail to ensure a seamless and secure fit. In this step-by-step guide, we’ll take you through the process of installing each panel correctly, from the bottom to the top. Follow along to transform your garage into a functional and stylish space.
Start with the bottom panel and work your way up
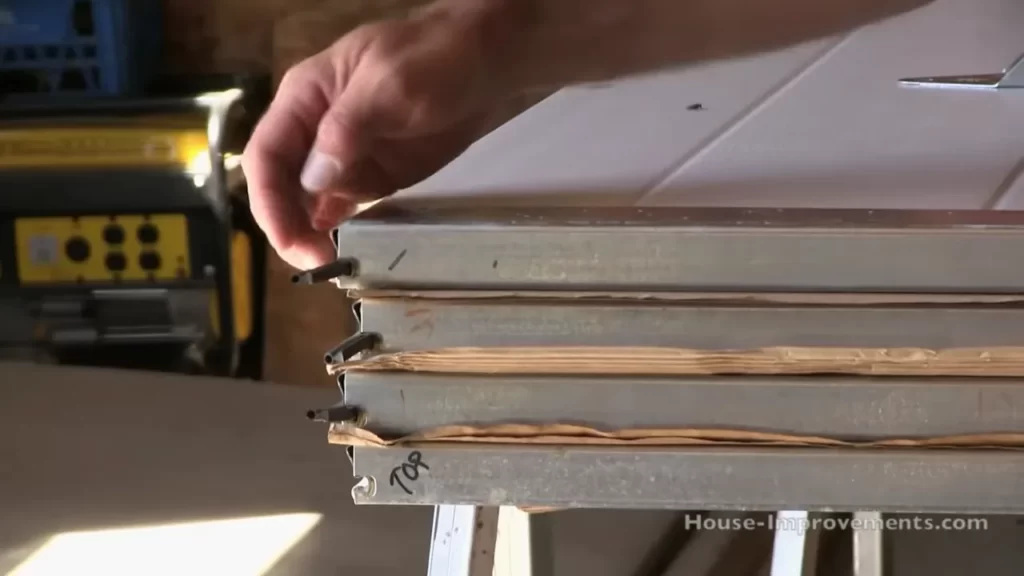
To begin the installation process, start with the bottom panel of your garage door. This panel serves as the foundation for the rest of the door, providing stability and support. Position the bottom panel in place, ensuring that it is aligned with the track and firmly seated on the door frame. Once the bottom panel is securely in place, it’s time to work your way up. Place the next panel on top of the bottom one, making sure it overlaps the previous panel. This ensures a tight and secure fit, minimizing any gaps or potential weaknesses. Repeat this process for each subsequent panel until you reach the top.
Securely fasten each panel to the door frame
With each panel in position, it’s essential to securely fasten them to the door frame. This step guarantees that your garage door functions properly and stays in place day after day. Take the time to carefully align each panel, making sure it is perfectly centered and level. Using the appropriate fasteners for your specific garage door model, secure each panel to the door frame. This ensures that the panels are tightly attached and won’t shift or come loose over time. Be diligent in checking the manufacturer’s guidelines for the correct type and size of fasteners to use. After securing the panels, verify that they move smoothly along the track without any obstructions or resistance. A well-installed garage door should open and close effortlessly, ensuring convenience and ease-of-use for you and your family. Installing garage door panels is a crucial step in the overall process. By following these steps and paying attention to detail, you’ll have a properly installed garage door that not only enhances the curb appeal of your home but also provides security and functionality. With your new garage door panels securely in place, you can enjoy the convenience and peace of mind of a well-functioning garage.
Installing The Bottom Panel
When it comes to installing your garage door panels, it’s important to take a methodical approach to ensure a successful and secure installation. One of the key steps in this process is installing the bottom panel, which forms the foundation for the rest of the door. In this guide, we’ll walk you through the necessary steps to position and secure the bottom panel in the correct place, ensuring a sturdy and functional garage door.
Positioning the Bottom Panel in the Correct Place
The first step in installing the bottom panel is positioning it correctly. This involves aligning the panel with the bottom edge of the door opening and ensuring it is centered within the opening. To do this, follow these steps:
- Measure the width of the door opening and divide that measurement by two to determine the center point.
- Use a level to ensure the bottom panel is positioned horizontally and adjust as needed.
- Ensure there is a small gap between the panel and the floor to allow for smooth operation of the door.
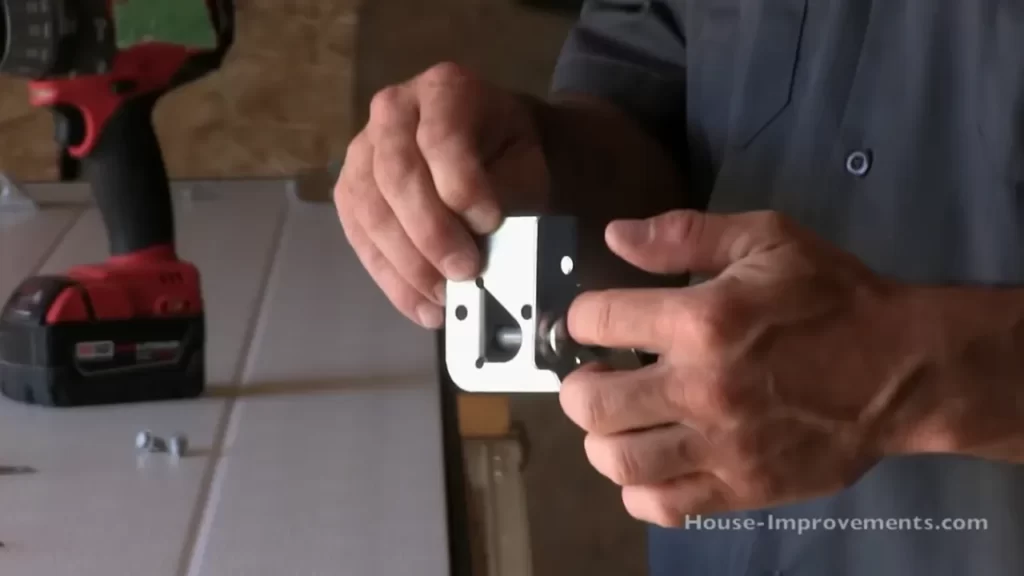
Securing the Panel Using the Appropriate Fasteners
Once the bottom panel is properly positioned, it’s time to secure it in place using the appropriate fasteners. This will ensure the panel remains stable and secure, with no risk of shifting or falling out of place. Follow these steps to secure the panel:
- Gently lift the panel and hold it in place.
- Insert the appropriate fasteners, such as screws or nails, through the pre-drilled holes in the panel.
- Secure the fasteners tightly, but be careful not to overtighten as this may damage the panel or affect its functionality.
- Repeat this process for all the pre-drilled holes in the bottom panel, ensuring it is securely fastened.
Note: It’s important to refer to the manufacturer’s instructions for your specific garage door model to ensure you are using the correct type and size of fasteners.
By following these steps to position and secure the bottom panel of your garage door, you can ensure a successful installation that provides a sturdy foundation for the rest of the door. Remember to take your time and double-check your work to guarantee a safe and functional garage door that will stand the test of time.
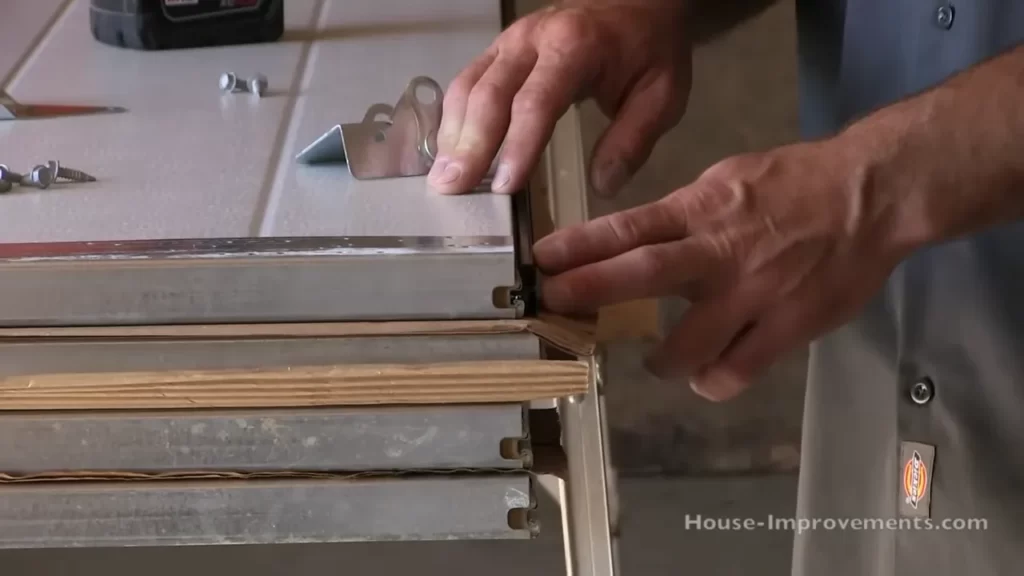
Attaching The Remaining Panels
Now that you have successfully installed the first garage door panel, it’s time to move on to attaching the remaining panels. This step-by-step guide will ensure a smooth installation process and a sturdy garage door.
Aligning each panel with the previous one
The key to a seamless garage door installation is proper alignment of each panel with the previous one. To ensure a balanced and professional look, follow these simple steps:
- Begin by positioning the second panel next to the already installed panel.
- Make sure the vertical tracks are level and plumb.
- Align the bottom of the new panel with the top of the previous panel, ensuring a snug fit.
- Check for any gaps or misalignments and make necessary adjustments.
- Use a level to ensure the panel is straight both horizontally and vertically.
| Important Note: |
|---|
| It’s crucial to carefully align each panel to avoid future issues, such as the door not closing properly or gaps that compromise the security of your garage. |
Connecting the panels securely
Once you have aligned each panel correctly, the next step is to connect them securely. Follow these tips to ensure a strong and reliable connection:
- Insert the hinge provided into the pre-drilled holes on the edge of the panels.
- Tighten the nuts and bolts that secure the hinge, ensuring they are suitably tightened but not overly tightened, to allow for smooth movement.
- Repeat this process for each hinge along the panels.
- Inspect the connection points and make any necessary adjustments to ensure the panels are securely attached.
Remember, a strong connection between the panels is essential for the overall functionality and safety of your garage door.
Congratulations! You have successfully attached the remaining panels of your garage door. In the next section, we’ll cover the final steps to complete the installation process and have your new garage door fully operational.
Checking For Proper Alignment And Fit
When it comes to installing garage door panels, checking for proper alignment and fit is crucial. Ensuring that the panels are level and aligned correctly will not only improve the functionality and durability of your garage door but also enhance its overall aesthetic appeal. In this section, we will discuss two key factors to consider when checking for alignment and fit: ensuring the panels are level and aligned correctly, and making any necessary adjustments for a perfect fit.
Ensuring the panels are level and aligned correctly
Before starting the installation process, it’s important to ensure that the panels are level and aligned correctly. This step is critical because misalignment can cause the door to operate improperly and even lead to potential safety hazards. Here are a few steps to ensure proper alignment:
- Start by measuring the height and width of each panel to verify if they are uniform.
- Using a level, check if the panels are plumb vertically and level horizontally.
- If needed, use shims or adjustments to properly align the panels.
By taking the time to ensure that the panels are level and aligned correctly, you can avoid issues such as the door jamming, scraping against the floor, or uneven closing.
Making any necessary adjustments for a perfect fit
Every garage is unique, and it’s essential to make any necessary adjustments to ensure a perfect fit of the door panels. Here are some steps to follow:
- Inspect each panel carefully, checking for any gaps or areas that require adjustment.
- If there are gaps between the panels, use weatherstripping or rubber seals to create a tight seal and prevent drafts.
- Make sure the panels fit securely in the tracks and rollers, ensuring smooth operation.
- If necessary, adjust the track brackets to properly align the panels and provide a secure fit.
| Tip: | It’s always advisable to refer to the manufacturer’s installation instructions for specific guidance on making adjustments. |
|---|
Making these necessary adjustments will not only ensure a proper fit but also promote energy efficiency, noise reduction, and enhanced security for your garage.
In conclusion, checking for proper alignment and fit is a critical step when installing garage door panels. By ensuring the panels are level and aligned correctly and making any necessary adjustments for a perfect fit, you can improve the functionality, durability, and aesthetic appeal of your garage door.
Step 4: Test The Garage Door
Once you have successfully installed the garage door panels and made the necessary adjustments, it’s time to test the door’s operation and functionality. Testing the garage door is an essential step to ensure that everything is working properly and to make any final adjustments if necessary.
Test the door’s operation and functionality
Testing the operation and functionality of your garage door will give you peace of mind that everything is working as it should. Follow these steps to test your garage door:
- Stand a safe distance away from the door and press the wall button or remote control to open the door.
- Observe the movement of the door as it opens. It should move smoothly and steadily without any jerking or hesitations.
- Listen for any unusual noises or grinding sounds that could indicate a problem with the door’s mechanism.
- If the door opens completely, press the wall button or remote control to close the door.
- Again, observe the movement of the door as it closes. It should move smoothly and align properly with the ground.
- Pay attention to the door’s overall balance and alignment. A well-balanced door will open and close effortlessly and remain level when fully opened.
- Test the safety features of your garage door, such as the garage door opener’s auto-reverse function. Place a roll of paper towels or a similar object on the ground under the door’s path, then close the door. The door should automatically reverse its direction and open back up when it detects an obstruction.
If you notice any issues during the testing process, it’s important to address them promptly. Incorrectly installed garage door panels or misaligned tracks can lead to safety hazards and potential damage to the door itself. Make any final adjustments as needed, ensuring that the door operates smoothly and safely.
By following these steps and thoroughly testing your garage door, you can ensure that your installation is successful and that your door will function properly for years to come.
Testing The Door’S Movement
How to Install Garage Door Panels
One crucial step in the process of installing garage door panels is testing the door’s movement. This step ensures that the door opens and closes smoothly without any issues. By following the steps below, you can ensure that your garage door functions properly and provides you with the convenience and security you desire.
Checking if the door opens and closes smoothly
After installing the garage door panels, it is essential to test if the door opens and closes smoothly. This step is crucial to ensure the proper functioning of your garage door. Follow these steps to perform this test:
- 1. With the door fully closed, examine how smooth the initial lift is. A properly balanced door should lift smoothly and effortlessly.
- 2. Slowly open the door manually and pay close attention to any grinding, scraping, or popping sounds. These noises suggest that there may be an alignment issue or that the door needs lubrication.
- 3. When the door is halfway open, release it gently. The door should stay in place without moving up or down. If it moves on its own, it might indicate that the door isn’t properly balanced.
- 4. With the door fully open, examine the balance once again. It should remain steady and not drift up or down.
- 5. Close the door and observe how smoothly it closes. It should lower evenly without jerking or stopping abruptly.
By checking if the door opens and closes smoothly, you can identify any possible issues in the door’s movement. Addressing these issues promptly will help in avoiding any potential inconvenience or safety hazards.
Ensuring there are no issues with the door’s movement
Aside from checking the smoothness of the door’s movement, it is essential to ensure that there are no other issues present. Here are some additional steps to consider during the testing phase:
- Inspect the tracks and rollers for any signs of damage or misalignment. Adjust or replace them if necessary to ensure proper movement.
- Check the tension of the springs and cables. Springs that are too loose or too tight can affect the door’s movement and should be adjusted accordingly.
- Apply lubrication to the moving parts of the door, such as the hinges, rollers, and tracks. Lubricating these components regularly will promote smooth and quiet operation.
By conducting a thorough test and addressing any issues with the door’s movement, you can ensure that your garage door functions optimally. Regular maintenance and testing will help prolong the lifespan of your garage door and provide peace of mind for years to come.
Adjusting The Door’S Balance And Tension
Adjusting the door’s balance and tension is a crucial step in installing garage door panels. To ensure optimal performance and functionality, it is essential to properly balance the door and adjust the tension of the springs if needed. This step-by-step guide will walk you through the process, ensuring a smooth and hassle-free installation.
Balancing the door for optimal performance
Properly balancing the garage door is vital for its performance and longevity. An unbalanced door can cause unnecessary strain on the opener and other components, leading to malfunctions and potential damage. Here’s how you can balance the door effectively: 1. Disconnect the opener: Before you begin balancing the door, make sure to disconnect the opener from the power source to prevent any accidental mishaps. 2. Identify the balance point: With the door in a closed position, manually lift it about halfway. Release your grip and observe how the door reacts. If it stays in position, it is likely well-balanced. However, if it starts to rise or fall, it indicates that adjustments are required. 3. Adjust the tension: To balance the door, locate the torsion springs, usually situated above the door. These springs are responsible for counteracting the weight of the door and ensuring smooth operation. Using a winding bar, gradually adjust the tension by turning the spring in small increments. Keep testing the door’s balance until it remains stable at the halfway position. 4. Test the balance: Once you have made adjustments to the torsion springs, test the door’s balance by manually opening and closing it several times. The door should move smoothly without any significant resistance or bouncing.
Adjusting the tension of the springs if needed
Depending on the weight and size of your garage door, you may need to adjust the tension of the springs to ensure optimal functionality. Follow these steps to adjust the tension: 1. Refer to the manufacturer’s guidelines: Different garage doors have varying spring tension requirements. Consult the installation manual or contact the manufacturer to determine the recommended tension range for your specific door. 2. Safety first: Before adjusting the springs, ensure you are wearing appropriate personal protective equipment, including gloves and safety glasses. 3. Identify the adjustment mechanism: There are different types of spring systems, such as extension springs and torsion springs. Identify the adjustment mechanism for your specific door. 4. Make precise adjustments: Using a wrench or winding bar, turn the adjustment bolts or cones in small increments to increase or decrease the tension. Be cautious and make gradual adjustments, checking the door’s balance periodically. 5. Test the tension: After each adjustment, test the door’s functionality by opening and closing it several times. The door should move smoothly without any strain or resistance. Remember, adjusting the tension of the springs can be dangerous if not done correctly. If you are unsure or uncomfortable with the process, it is best to seek professional assistance to avoid any accidents or damage to the door or yourself. By carefully balancing the door and adjusting the tension of the springs, you can ensure optimal performance and longevity of your newly installed garage door panels. Taking the time to perform these adjustments correctly will result in a smoothly functioning door that provides security and convenience for years to come.
Step 5: Finalize The Installation
Inspect the door for any issues or defects
Before completing the installation of your garage door panels, it is crucial to carefully inspect the door for any issues or defects that may affect its functionality.
Take a close look at each panel to ensure there are no signs of damage, such as cracks, dents, or warping. If you notice any problems, it is important to address them before proceeding with the final step.
Inspect the hinges, rollers, and tracks to make sure they are in good condition and functioning properly. Check for any loose or missing screws or bolts and tighten or replace them as needed.
Clean up the workspace and organize tools
After successfully installing your garage door panels, it’s time to clean up the workspace and organize your tools properly. This will help ensure safety and efficiency for future maintenance or repairs.
Start by removing any debris or leftover materials from the installation process. Sweep or vacuum the area to keep it clean and tidy. This will prevent any potential hazards or obstructions that could interfere with the door’s operation.
Next, gather all the tools and equipment you used during the installation and put them back in their designated places. Proper organization will save you time and frustration when you need to work on your garage door in the future.
Consider using a toolbox or pegboard to keep your tools neatly arranged and easily accessible. Labeling or color-coding different tools or parts can also be helpful for quick identification.
In conclusion, the final step of the garage door panel installation process involves inspecting the door for any issues or defects, and cleaning up the workspace while organizing your tools. By following these steps, you will ensure the successful installation of your garage door panels and maintain a safe and efficient garage environment.
Inspecting The Door For Problems
Before you start installing new garage door panels, it is crucial to inspect the existing door for any problems or defects. This step is essential to ensure that your new panels will function properly and provide security for your garage. By conducting a thorough inspection, you can identify any damage or issues that need to be addressed before proceeding with the installation.
Checking for any damage or defects on the panels
Begin your inspection by carefully examining each panel of the garage door. Look for signs of wear, such as cracks, dents, or warping. These may indicate structural damage that could compromise the integrity of the door. Note any areas that require attention or potential issues that need to be addressed.
Fixing any issues before completing the installation
If you discover any damage or defects during your inspection, it is crucial to fix them before proceeding with the installation. Ignoring these problems can lead to further damage and may cause the new panels to not fit properly or function as intended. Depending on the severity of the damage, you may need to repair or replace individual panels or seek professional assistance.
Addressing these issues beforehand ensures that the door will be in optimal condition, providing smooth operation and long-lasting durability. By making any necessary repairs or adjustments, you can complete the installation with confidence, knowing that your new garage door panels will be installed on a sturdy and problem-free foundation.
Cleaning Up And Organizing
After successfully installing your new garage door panels, it’s time to clean up and organize the area for a neat and polished finish. This step is crucial to ensure that your garage not only looks good but also functions efficiently. By putting away tools and materials and tidying up the area, you can create a safe and organized space that will make future maintenance tasks a breeze.
Putting away tools and materials
Before you can fully enjoy your newly installed garage door panels, it’s important to put away any tools and materials used during the installation process. Leaving tools lying around not only creates a messy and cluttered environment, but it also poses a safety hazard. Ensure that all tools are properly cleaned, organized, and stored in their designated places. This will not only help you find them easily for future projects but also prevent any accidents or injuries caused by tripping over misplaced tools.
Tidying up the area for a neat finish
Now that the tools and materials are safely stowed away, it’s time to tidy up the area for a clean and polished finish. Start by removing any debris, such as leftover packaging materials or nails, from the garage floor. Sweep or vacuum the floor to remove dust and dirt, paying extra attention to corners and crevices.
If there are any stains on the garage floor, consider using an appropriate cleaner to get rid of them. Additionally, wipe down your newly installed garage door panels with a damp cloth to remove any smudges or fingerprints.
To further enhance the tidiness of your garage, consider organizing any shelving units or storage systems you have. Group similar items together and use labeled bins or containers to keep everything in its proper place. This will not only make it easier to locate items when you need them but also give your garage a neat and organized appearance.
By following these simple steps to clean up and organize your garage after installing new door panels, you can create a visually appealing and functional space. Keeping your garage tidy will not only make it easier to maintain but also provide a sense of satisfaction knowing that everything is in order. Now, sit back, relax, and enjoy your newly transformed garage!
Frequently Asked Questions Of How To Install Garage Door Panels
Can You Replace Garage Door Panels Yourself?
Yes, you can replace garage door panels yourself. However, it requires careful attention to detail and some necessary tools. It’s important to follow proper safety procedures and seek professional help if you are unsure or uncomfortable with the task.
What Is The Best Glue For Garage Door Panels?
The best glue for garage door panels is polyurethane adhesive. It provides a strong bond and is weather-resistant, making it ideal for outdoor use. It is important to follow the manufacturer’s instructions for proper application and allow sufficient drying time for optimal results.
What Holds Garage Door Panels Together?
Garage door panels are held together by hinges and brackets. These parts work together to connect the individual panels and allow them to move as the door opens and closes. The hinges and brackets ensure that the panels stay aligned and secure.
Can You Replace Just The Bottom Panel Of A Garage Door?
Yes, it is possible to replace just the bottom panel of a garage door.
How Much Do Garage Door Panels Cost?
Garage door panel costs can vary depending on factors such as material, size, and design. On average, prices range from $200 to $800 per panel.
Can I Install Garage Door Panels Myself?
Yes, you can install garage door panels yourself if you have the necessary tools, skills, and follow the manufacturer’s instructions carefully.
Conclusion
To sum up, installing garage door panels can be a straightforward process if you have the right tools and follow the correct steps. By carefully measuring and aligning the panels, securing them properly, and testing the door’s functionality, you can ensure a successful installation that enhances both the security and aesthetic appeal of your garage.
Remember, it’s always best to consult a professional if you encounter any difficulties during the process. Happy installing!