To install a Google Nest Outdoor Camera, simply mount it to a wall or eave using the included mounting plate and screws, connect it to your Wi-Fi network through the Nest app, and follow the on-screen instructions for setup. The Google Nest Outdoor Camera is a reliable and user-friendly security camera that allows you to monitor the exterior of your home or office.
With its easy installation process and seamless integration with the Nest app, you can have peace of mind knowing that your property is protected. Whether you are a homeowner looking to enhance your security measures or a business owner wanting to keep a closer eye on your premises, the Google Nest Outdoor Camera is a great choice.
We will walk you through the simple steps to install this camera and start monitoring your outdoor space in no time. (123 words)
Benefits Of Installing A Google Nest Outdoor Camera
Installing a Google Nest Outdoor Camera can greatly enhance the security of your home while providing you with peace of mind. This cutting-edge technology offers several benefits that will not only protect your property but also make it possible for you to monitor your outdoor areas with ease.
Enhance Home Security
One of the standout benefits of installing a Google Nest Outdoor Camera is enhanced home security. These cameras are equipped with advanced features such as high-definition video recording, night vision, and motion detection. The clear, crisp video quality ensures that you can clearly see any activity happening around your property, even in low-light or dark conditions.
With the ability to access live streaming and recorded footage from your smartphone or computer, you will be able to keep an eye on your home 24/7. This added layer of security can deter potential intruders and allow you to take immediate action if any suspicious activity is detected.
Deter Criminal Activity
The presence of a Google Nest Outdoor Camera alone can serve as a powerful deterrent for criminal activity. Criminals are less likely to target homes that have visible security cameras, as they prefer easy targets with minimal risk of getting caught.
The Google Nest Outdoor Camera not only captures high-resolution video, but it also includes a built-in microphone and speaker. This enables you to have real-time conversations with anyone within the camera’s range, even if you’re not physically present at home. By warning potential intruders that they are being watched and that their actions are being recorded, you increase the chances of them moving on to another target.
Monitor Outdoor Areas
Another significant benefit of installing a Google Nest Outdoor Camera is the ability to monitor your outdoor areas. Whether you want to keep an eye on your driveway, front porch, back yard, or any other area of concern, these cameras offer full coverage.
By setting up customized motion zones, you can receive alerts whenever someone enters a specific area. This is especially useful if you have package deliveries or pets that frequently venture outside. With the Google Nest Outdoor Camera, you can also access a continuously updated timeline of events, allowing you to review specific moments from the past.
Additionally, the Google Nest Outdoor Camera seamlessly integrates with other Google Nest devices, such as the Google Nest Hub Max. This allows you to conveniently view camera footage on a larger screen and access additional features like facial recognition.
All in all, the benefits of installing a Google Nest Outdoor Camera are clear. With enhanced home security, the ability to deter criminal activity, and the convenience of monitoring your outdoor areas, this smart device is a valuable addition to any home.
Preparing For Installation
Preparing for Installation Installing a Google Nest Outdoor Camera can greatly enhance the security and surveillance of your home. Before diving into the installation process, it’s crucial to adequately prepare. In this section, we will discuss three essential aspects to consider: gathering the required tools and equipment, choosing a suitable mounting location, and ensuring a stable Wi-Fi connection.
Gather Required Tools and Equipment
To begin the installation process, it’s important to gather all the necessary tools and equipment. This will save you time and hassle later on. Here’s a list of items you’ll need:
- Google Nest Outdoor Camera
- Mounting bracket and screws
- Drill and drill bits
- Screwdriver
- Ethernet cable (if a wired connection is preferred)
- Power drill or screwdriver
- Ladder (if required)
Make sure you have these items readily available before starting the installation process. This will ensure a smooth and efficient setup experience.
Choose Suitable Mounting Location
Selecting an appropriate mounting location is vital to maximize the effectiveness of your Google Nest Outdoor Camera. Here are some guidelines to help you choose the best spot:
- Assess the areas of your property that require surveillance, such as entry points, driveways, or garden areas.
- Look for a location that provides a clear line of sight and a wide field of view to capture important details.
- Ensure that the mounting location is within reach of an electrical outlet or consider using the optional outdoor power adapter.
- Consider factors like weather exposure and potential obstructions that may affect camera performance.
By carefully selecting a suitable mounting location, you’ll optimize the camera’s performance and enhance your overall home security.
Ensure a Stable Wi-Fi Connection
A stable and reliable Wi-Fi connection is crucial for the proper functioning of your Google Nest Outdoor Camera. Here are a few steps to ensure a seamless wireless experience:
- Check the strength of your Wi-Fi signal in the planned camera location. This can be done using a smartphone or Wi-Fi analyzer app.
- Consider installing a Wi-Fi range extender or repeater if the camera’s location is far from your router.
- Secure your Wi-Fi network with a strong password to prevent unauthorized access.
- Keep your router firmware up to date to address any potential connectivity issues.
By ensuring a stable Wi-Fi connection, you’ll minimize any disruptions in your surveillance and have peace of mind. In conclusion, preparing for the installation of your Google Nest Outdoor Camera is crucial for a successful setup. By gathering the required tools, choosing a suitable mounting location, and ensuring a stable Wi-Fi connection, you’ll be one step closer to enjoying enhanced security and peace of mind for your home.
Step 1: Unboxing The Google Nest Outdoor Camera
Welcome to the first step of installing your Google Nest Outdoor Camera! As with any new device, it is essential to begin by unboxing and familiarizing yourself with the camera components. This step will help you understand what’s included in the package and give you a clear idea of how to proceed with the installation process. So, let’s get started!
Check Package Contents
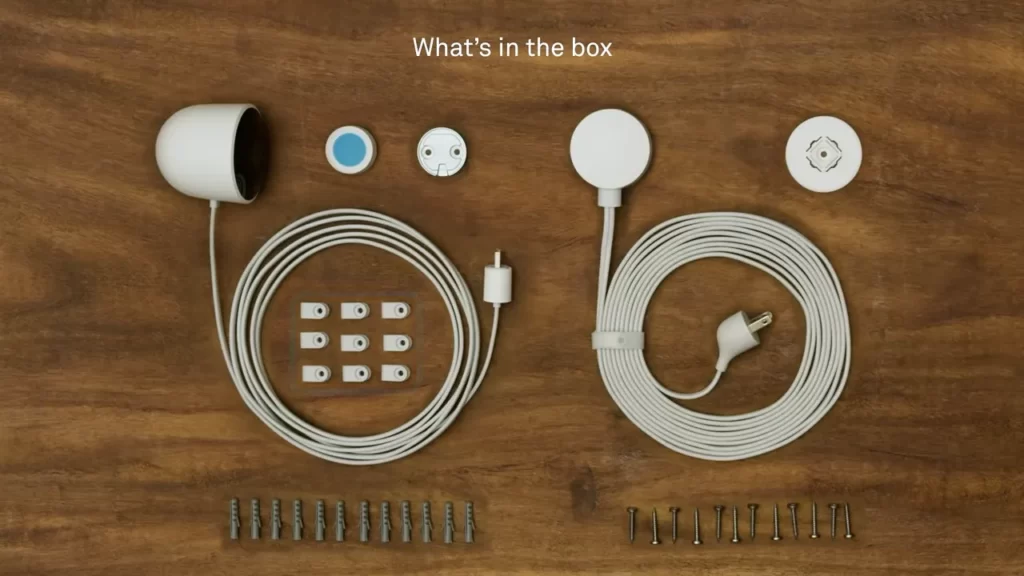
After receiving your Google Nest Outdoor Camera, the first thing you should do is verify that all the essential items are present in the package. This will ensure that you have everything you need to successfully set up the camera. Take a moment to carefully inspect and cross-check the contents against the provided list in the user manual. The package typically includes:
| Package Contents: |
|---|
| 1 Google Nest Outdoor Camera |
| Mounting plate and wall anchors |
| Screws and cable clips |
| Power adapter and cable |
| Quick Start Guide and User Manual |
Ensure that all the components are in good condition and not damaged during transit. In case you find any discrepancies or missing items, contact the customer support immediately for assistance. It’s important to have all the necessary components before proceeding to the next steps.
Familiarize Yourself with the Camera Components
Now that you’ve confirmed the package contents, it’s time to familiarize yourself with the different components of the Google Nest Outdoor Camera. This will help you understand how each part works and where it needs to be installed. Here are the key components:
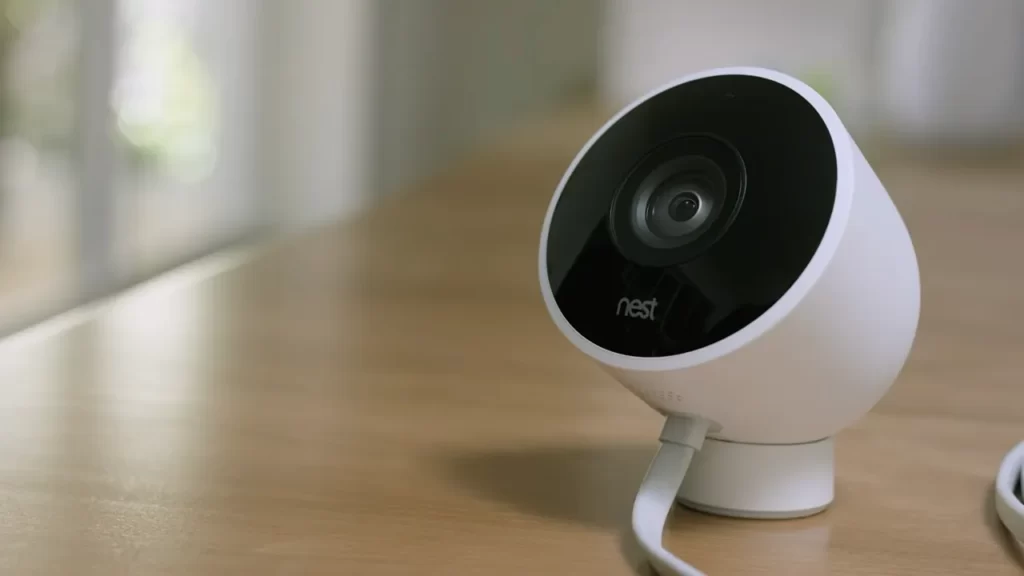
- Google Nest Outdoor Camera: This is the main camera unit responsible for capturing high-quality video and audio.
- Mounting Plate and Wall Anchors: The mounting plate provides a secure attachment point for the camera, while the wall anchors ensure stability and support.
- Screws and Cable Clips: These accessories are used to secure the camera and route the cables neatly for a clean installation.
- Power Adapter and Cable: The power adapter supplies the necessary power to the camera, and the cable connects it to a power source.
- Quick Start Guide and User Manual: These documents provide step-by-step instructions and additional information on how to set up and customize your Google Nest Outdoor Camera.
Take a moment to examine each component closely, paying attention to any labels, connectors, or buttons. This will help you gain a better understanding of how everything fits together and make the installation process smoother.
Now that you’ve successfully unboxed and familiarized yourself with the Google Nest Outdoor Camera and its components, you’re ready to move on to the next step. Stay tuned for our next blog post, where we’ll cover the installation process in detail.
Step 2: Downloading And Installing The Google Nest App
Once you have successfully set up your Google Nest Outdoor Camera, the next step is to download and install the Google Nest App on your mobile device. This app will allow you to conveniently access and control your camera’s settings, receive activity notifications, and view live or recorded video footage.
Locate the App in the App Store or Google Play Store
To get started, open the App Store on your iOS device or the Google Play Store on your Android device. Once you are on the app store homepage, follow these simple steps to find the Google Nest App:
- Tap on the search icon or the magnifying glass at the bottom of the screen
- Type in “Google Nest” in the search bar
- Tap on the “Search” button or the magnifying glass icon
- Look for the official Google Nest App by Google LLC
Alternatively, you can simply click here to be redirected to the official website where you can find direct download links for both iOS and Android devices.
Install the Google Nest App on Your Mobile Device
Once you have located the Google Nest App, it’s time to download and install it on your mobile device. Follow these steps:
- Tap on the Google Nest App icon to open the app page
- Tap on the “Download” or “Install” button
- Wait for the app to download and install, this may take a few moments depending on your internet connection
- Once the installation is complete, tap on the “Open” button to launch the Google Nest App
Create a Google Account or Sign In

In order to use the Google Nest App, you will need to have a Google Account. If you already have one, simply sign in to your account using your email address and password. If you don’t have a Google Account, follow these steps to create one:
- Tap on the “Sign In” button located on the app’s login screen
- Tap on the “Create account” option at the bottom of the screen
- Fill in your personal information, including your first name, last name, and desired email address
- Choose a strong password for your account
- Agree to the terms of service and privacy policy
- Tap on the “Next” button to proceed
- Follow the on-screen instructions to complete the account creation process
Once you have created your Google Account or signed in to your existing account, you are now ready to take full advantage of the features and functionalities of the Google Nest App.
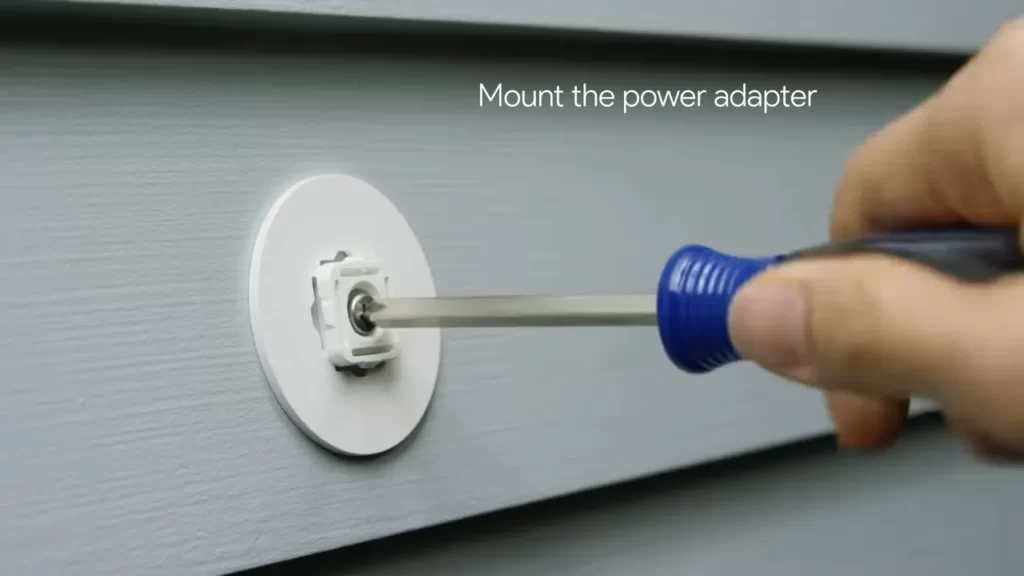
Step 3: Connecting The Google Nest Outdoor Camera To Power
Now that you have identified the ideal location and mounted your Google Nest Outdoor Camera, the next crucial step is connecting it to power. In this step, we will guide you through the process of finding the most suitable power source and ensuring a secure connection.
Identify the Power Source Options
Your Google Nest Outdoor Camera offers several power source options, allowing you to choose the one that best fits your needs. The available power source options include:
- Power Outlet: You can connect the camera to a nearby outdoor power outlet using the provided power cable. This option ensures a reliable power supply without the need for batteries or additional wiring.
- Power over Ethernet (PoE): If you have an existing PoE network setup, you can utilize the Ethernet cable to provide power to the camera. This option eliminates the hassle of running a separate power cable and ensures a stable connection.
- Hardwired Connection: For a more permanent power solution, you can hardwire the camera into your electrical system. This requires professional installation and ensures a continuous power supply.
Choose the Most Suitable Power Source
When deciding which power source to use, consider factors such as convenience, reliability, and the availability of power outlets in the desired location. If you have an accessible power outlet nearby, connecting the camera using the provided power cable is a straightforward and hassle-free option. However, if running a power cable is not feasible, utilizing a PoE network or opting for a hardwired connection may be the best solution.
In addition, consider the power requirements of your Google Nest Outdoor Camera. Make sure the chosen power source can provide the necessary voltage and current to ensure optimal camera performance.
Connect the Camera to Power
Once you have determined the most suitable power source for your Google Nest Outdoor Camera, follow these steps to establish a secure power connection:
- For a Power Outlet: Plug one end of the provided power cable into the camera’s power port and the other end into the outdoor power outlet.
- For Power over Ethernet (PoE): Connect one end of the Ethernet cable to the camera’s Ethernet port and the other end to the PoE switch or injector.
- For a Hardwired Connection: Engage a professional electrician to install the necessary wiring and ensure a safe connection from your electrical system to the camera.
Double-check that the connections are secure and the power source is providing a reliable supply of electricity. You can do this by confirming the camera’s LED indicators are illuminated and functioning correctly.
By following these steps, you can successfully connect your Google Nest Outdoor Camera to power, ensuring constant surveillance and peace of mind.
Step 4: Setting Up The Google Nest Outdoor Camera
Once you have successfully installed the Google Nest Outdoor Camera and positioned it in the right spot, it’s time to set it up and start keeping an eye on your surroundings. Setting up the camera is simple and straightforward, and the Google Nest app will guide you through the process step by step. In this section, we will walk you through the necessary steps to set up your Google Nest Outdoor Camera.
Open the Google Nest App and Sign In
To begin the setup process, open the Google Nest app on your smartphone or tablet. If you haven’t installed the app yet, go to the App Store or Google Play Store and download it. Once you have the app installed, launch it and sign in to your Google Nest account. If you don’t have an account, you can create one easily by following the prompts on the app. Remember to use your existing Google account credentials if you already have one.
Add a New Device to Your Account
After signing in, navigate to the Devices tab within the app. Here, you will find a list of all your Google Nest devices. To add your new Google Nest Outdoor Camera to your account, tap on the ‘+’ symbol or the ‘Add new device’ option, depending on the app version you have. This will initiate the camera setup process.
Follow the App’s Instructions for Camera Setup
Once you start the camera setup process, the app will guide you through each step. It will ask for your camera’s serial number and will provide you with clear instructions on how to locate it. Make sure to have the serial number handy, as you will need to enter it accurately for the setup to proceed smoothly.
The app will then prompt you to connect your camera to your Wi-Fi network. Follow the instructions to establish a secure connection between your camera and the network. Once the camera is connected to Wi-Fi, it will be able to transmit live video footage and send alerts to your mobile device when it detects any activity.
After the setup is complete, you can customize your camera’s settings within the app, such as adjusting motion detection zones and enabling notifications. These settings will allow you to tailor the camera’s functionality to suit your specific needs and preferences.
With the Google Nest Outdoor Camera successfully set up, you can now enjoy the peace of mind that comes with having a reliable surveillance solution for your outdoor space. Whether you are monitoring your front porch, backyard, or any other area, the camera’s advanced features and intuitive app interface make it easy to keep an eye on things, even when you’re not there.
Step 5: Choosing The Camera’S Wi-Fi Network
Once you have successfully mounted your Google Nest Outdoor Camera, the next step in the installation process is choosing the camera’s Wi-Fi network. This step is crucial as it ensures a secure and stable connection between your camera and your home network. Follow these simple substeps to get your camera up and running in no time.
Scan for Available Wi-Fi Networks
To begin, you need to scan for available Wi-Fi networks in your vicinity. This will help you identify and select your home Wi-Fi network for the camera. Here’s how you can perform the scan:
- Access the camera’s settings through the Google Nest app on your mobile device.
- Navigate to the Wi-Fi settings section.
- Select the “Scan for Networks” option to initiate the scanning process.
The app will display a list of available Wi-Fi networks detected by the camera. Make sure you are within range of your home network to ensure accurate results.
Select Your Home Wi-Fi Network
Once the scanning process is complete, you will see a list of available Wi-Fi networks including your home network. Locate and select your home Wi-Fi network from the list by tapping on it. Ensure that you correctly identify your network by checking its name and signal strength.
Enter the Wi-Fi Password if Required
If your home Wi-Fi network is password protected, the camera will prompt you to enter the Wi-Fi password. This step is essential to establish a secure connection. Follow these steps to enter the password:
- Tap on your home Wi-Fi network from the list.
- A dialog box will appear requesting the Wi-Fi password.
- Enter your Wi-Fi password using the on-screen keyboard.
- Double-check the entered password for accuracy.
- Once done, tap on the “Connect” button to continue.
Ensure that you enter the password correctly, including any uppercase or lowercase letters and special characters, to avoid any connectivity issues.
Once you have successfully completed these steps, your Google Nest Outdoor Camera will connect to your home Wi-Fi network and be ready to use. You can now enjoy the benefits of having a smart and reliable outdoor security camera, providing you with peace of mind and enhanced home security.
Step 6: Testing The Google Nest Outdoor Camera
Now that you have successfully installed your Google Nest Outdoor Camera, it’s time to test it out and make sure everything is working as expected. This step is crucial to ensure the camera is ready to provide you with reliable and efficient outdoor surveillance.
Verify Successful Camera Installation
Before proceeding with the testing, double-check that the camera is securely attached to the desired location. Ensure all the connections are properly made, and the camera is powered on. Look for any physical damages or loose components.
Check Live Video Feed on the App
Open the Google Nest app on your mobile device or log in to your Nest account on a computer. Go to the camera section to access the live video feed. Make sure your camera is online and transmitting the video. Look for a clear and consistent video stream without any delays or interruptions.
Adjust Camera Settings as Desired
Personalize your camera settings according to your preferences and surveillance needs. Use the app to access the camera settings menu. Here, you can adjust options such as resolution, motion detection, activity zones, and notifications. Configure the settings to match your desired specifications and requirements.
It’s worth mentioning that you may want to fine-tune the camera settings over time. Keep an eye on the video feed to ensure it aligns with your expectations. Consider making incremental adjustments if needed.
By following these steps, you have successfully completed the installation and testing process for your Google Nest Outdoor Camera. You can now enjoy secure and efficient outdoor surveillance that provides you peace of mind. Remember to regularly check your camera’s performance and settings to ensure optimal performance. Now, let’s explore some tips for maintaining your Google Nest Outdoor Camera in the next section.
Step 7: Mounting The Google Nest Outdoor Camera
So, you’ve come to the final step of installing your Google Nest Outdoor Camera – mounting it. This step is crucial as it ensures your camera is securely positioned to capture the best view of your outdoor space. In this step, we will walk you through the process of determining the mounting method, positioning the mounting bracket or drilling holes, and finally attaching the camera to the mounting bracket or wall. Let’s get started!
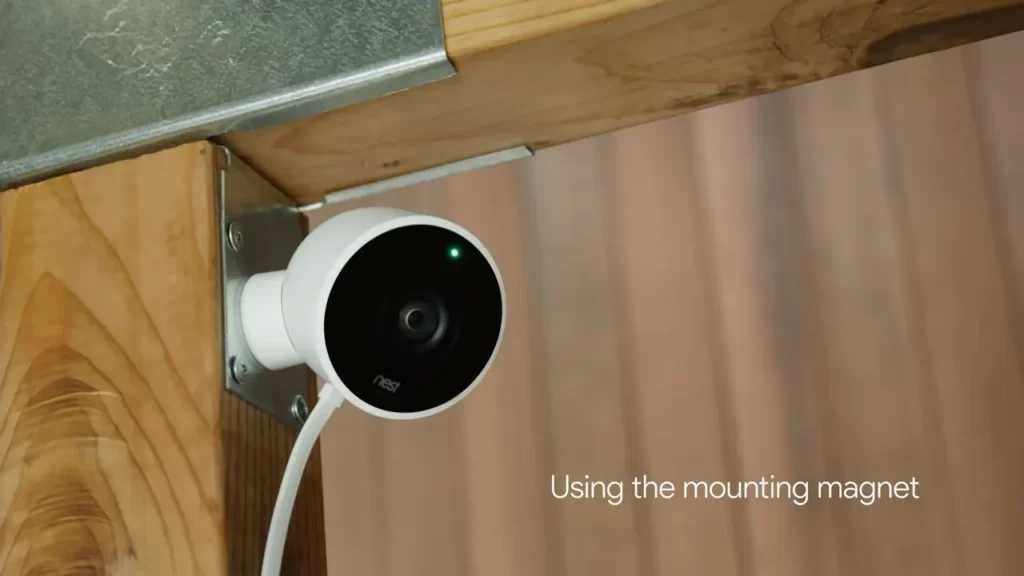
Determine the Mounting Method (Drill or Mounting Bracket)
Before you begin the installation, you need to decide whether you want to use the drill method or the mounting bracket method for mounting your Google Nest Outdoor Camera. Both methods offer a secure installation, but the suitable method for you may vary depending on your specific needs and the condition of the area where you plan to mount the camera. Drill Method: If you choose the drill method, you will need a power drill and appropriate drill bits based on the type of material you will be drilling into, such as concrete, brick, or wood. This method allows for a direct and permanent attachment of the camera to the wall or any other surface. Mounting Bracket Method: On the other hand, if you opt for the mounting bracket method, you will need to use the provided mounting bracket and screws. The mounting bracket acts as a base, providing stability and flexibility in positioning the camera. This method is especially useful if you want the option to easily adjust the camera’s angle or if you are not comfortable drilling into your outdoor walls.
Position the Mounting Bracket or Drill Holes
Once you have determined the preferred mounting method, it’s time to position the mounting bracket or drill holes for the camera. It is essential to choose a location that provides the best vantage point for monitoring your outdoor space and ensures the camera’s line of sight is not obstructed. If you have chosen the drill method, use a level to ensure your camera will be perfectly aligned. Mark the spots where you will be drilling the holes, making sure to follow the recommended guidelines provided by Google Nest. If you have opted for the mounting bracket method, place the bracket in the desired location and mark the spots where you will be attaching it to the wall.
Attach the Camera to the Mounting Bracket or Wall
With the mounting bracket or holes in place, it’s time to attach the Google Nest Outdoor Camera. Carefully align the camera with the bracket or holes and secure it using the provided screws or any applicable hardware depending on your chosen method. Make sure the camera is firmly attached to the mounting bracket or wall, ensuring its stability and reliability. Double-check the alignment and adjust if necessary to ensure optimal positioning for capturing clear and unobstructed footage. Congratulations! You have successfully mounted your Google Nest Outdoor Camera. This final step completes the installation process, allowing you to now enjoy the benefits of increased security and peace of mind knowing that your outdoor space is under constant surveillance.
Step 8: Adjusting The Viewing Angle And Focus
Once you have successfully installed your Google Nest Outdoor Camera, it’s time to fine-tune the viewing angle and focus for optimal coverage and clear video quality. This step is crucial as it ensures that you capture the specific areas you want to monitor, whether it’s your front porch, backyard, or any other outdoor space.
Use the App to Control the Camera’s Angle
To adjust the viewing angle of your Google Nest Outdoor Camera, you can conveniently use the Nest app on your smartphone or tablet. The app allows you to remotely control and adjust the camera’s position, ensuring that you capture the desired field of view.
Follow these simple steps:
- Open the Nest app and select your camera from the device list.
- Tap on the camera’s image to access the live feed.
- Look for the pan and tilt control icons, usually located on the bottom right corner of the screen.
- Tap and hold one of the control icons and drag it to adjust the camera’s angle horizontally or vertically.
- Continue adjusting until you achieve the desired viewing angle.
Fine-tune the Focus for Clear Video Quality
Clear video quality is crucial to ensure that you can identify objects and individuals captured by your Google Nest Outdoor Camera. To fine-tune the focus:
- Locate the focus control feature in the Nest app, usually positioned near the pan and tilt controls.
- Tap on the focus control icon to access the adjustment settings.
- Use the slider or numerical input to fine-tune the focus of your camera.
- Observe the live feed on the app as you adjust the focus to ensure clarity and sharpness.
- Continue fine-tuning until you achieve the desired video quality.
Test the Viewing Angle and Adjust as Needed
After adjusting the camera’s angle and focus, it’s important to test the viewing angle and make any necessary adjustments to ensure complete coverage.
Here’s how you can test and adjust the viewing angle:
- Trigger the camera’s motion detection or manually activate a test recording on the app.
- Review the recorded video playback to evaluate the coverage and any blind spots.
- If you identify any areas that are not within the camera’s field of view, go back to step 2 and adjust the angle accordingly.
- Repeat the testing process until you are satisfied with the camera’s coverage.
By following these steps, you can ensure that your Google Nest Outdoor Camera is accurately positioned, providing you with enhanced security and peace of mind.
Step 9: Troubleshooting Tips
Even with careful installation, there may be times when you encounter issues with your Google Nest Outdoor Camera. Below are some common installation problems and their solutions, as well as tips for resetting the camera if needed.
Common Installation Issues and Solutions
If you experience any of the following problems, try these solutions to get your Google Nest Outdoor Camera up and running smoothly:
- Camera not connecting to Wi-FiIf your camera is having trouble connecting to your Wi-Fi network, consider the following:
- Check that your Wi-Fi network is working properly and that the camera is within range.
- Make sure you entered the correct Wi-Fi network name and password during the setup process.
- Verify that your router is not blocking the camera from connecting to the network.
- Poor video quality or no video feedIf you’re experiencing issues with the video quality or not receiving any video feed at all, try the following:
- Ensure that your camera has a strong and stable Wi-Fi connection.
- Check the positioning of your camera and adjust it if necessary to optimize signal strength.
- Confirm that the camera lens is clean and free from any obstructions.
- Restart your router and camera to refresh the connection.
- Notifications not workingIf you’re not receiving any notifications from your Google Nest Outdoor Camera, check the following:
- Ensure that notifications are enabled in the camera settings within the Google Nest app.
- Confirm that your device is not in Do Not Disturb mode.
- Verify that the camera firmware is up to date.
Resetting the Camera
If you’ve tried the troubleshooting tips above and are still experiencing issues, resetting the camera may help resolve the problem. Follow these steps to reset your Google Nest Outdoor Camera:
- Locate the reset button on the back of the camera.
- Using a small pin or paperclip, press and hold the reset button for about 10 seconds.
- Release the reset button when the light on the front of the camera flashes blue.
- Your camera will then be restored to its factory settings.
Contacting Google Nest Support if Needed
If you’ve exhausted all troubleshooting options and are still unable to resolve the issue, it may be time to reach out to Google Nest Support. They have a dedicated team of experts who can assist you further. You can contact them by visiting the Google Nest website and navigating to their support section. Be sure to have your camera’s serial number and any relevant information on hand when reaching out for support.
Step 10: Maintaining And Updating Your Google Nest Outdoor Camera
Now that you have successfully installed your Google Nest Outdoor Camera, it is important to keep it properly maintained and updated to ensure optimal functionality. When it comes to maintaining and updating your camera, there are a few key steps you should follow. In this section, we will guide you through these steps to help you keep your Google Nest Outdoor Camera in top-notch condition.
Regularly Check Camera Functionality
Regularly checking your camera’s functionality is crucial in ensuring that it is capturing high-quality footage and providing you with reliable surveillance. Take a few minutes every week to review the camera’s live feed and make sure that everything looks clear and in focus. It is also important to check the camera’s motion detection and activity zones to ensure that they are accurately capturing any movement in the designated areas.
If you notice any issues with the camera’s functionality, such as blurry footage or malfunctioning motion detection, try troubleshooting the problem. Refer to the camera’s user manual or visit the Google Nest support website for step-by-step instructions on resolving common issues. Taking the time to regularly check your camera’s functionality will help you detect and address any issues before they become more significant problems.
Update Firmware and App for the Latest Features
To keep your Google Nest Outdoor Camera up to date with the latest features and improvements, it is essential to regularly update both the camera’s firmware and the accompanying app. These updates often include bug fixes, security enhancements, and new features that can enhance the overall performance of your camera.
To update the camera’s firmware, launch the Nest app on your device and navigate to the camera settings. Look for the firmware update option and follow the on-screen instructions to install the latest version. Similarly, make sure to update the Nest app itself by visiting your device’s app store and checking for any available updates.
By keeping your firmware and app up to date, you can enjoy the benefits of any new features or improvements that Google continuously introduces to enhance the functionality and security of your Nest Outdoor Camera.
Keep the Camera Clean and Free from Obstructions
To maintain optimal performance, it is important to keep your Google Nest Outdoor Camera clean and free from any obstructions. Regularly inspect the camera lens for dust, dirt, or smudges, as these can affect the quality of the footage. Clean the lens using a soft, lint-free cloth to ensure clear and accurate recordings.
In addition to keeping the lens clean, make sure that there are no physical obstructions blocking the camera’s view. Trim any overgrown vegetation that might hinder the camera’s line of sight or cause false motion detection alerts. By ensuring the camera is clean and unobstructed, you can maximize its effectiveness in monitoring your property.
Remember, proper maintenance and regular updates are essential in ensuring the longevity and optimal performance of your Google Nest Outdoor Camera. By following these simple steps, you can enjoy reliable surveillance and peace of mind knowing that your camera is always up to date
Frequently Asked Questions Of How To Install Google Nest Outdoor Camera
How Do I Set Up Google Camera Outside?
To set up Google Camera outside, follow these steps: 1. Choose a location with a clear view and stable surface. 2. Connect the camera to a power source and ensure it’s connected to Wi-Fi. 3. Download and open the Google Home app.
4. Tap on the plus icon, select ‘Set up device,’ and follow the prompts to add your camera. 5. Mount the camera securely using the provided hardware.
How Do I Add Nest Outdoor Camera To Nest App?
To add a Nest outdoor camera to the Nest app, follow these steps: 1. Open the Nest app on your device. 2. Tap on the “+” icon to add a new device. 3. Select “Nest camera” from the list of options.
4. Scan the QR code on the camera or enter the code manually. 5. Follow the on-screen instructions to complete the setup process.
Does Google Nest Outdoor Camera Require A Subscription?
No, a subscription is not required for the Google Nest outdoor camera.
Does Nest Outdoor Camera Need Wi-Fi?
Yes, Nest outdoor camera requires Wi-Fi connection for it to function properly.
How To Mount A Google Nest Outdoor Camera On The Wall?
Mounting a Google Nest Outdoor Camera on the wall is a simple process. First, choose the desired location and use the provided template to mark the drilling points. Then, drill the holes and secure the mounting plate using the included screws.
Finally, attach the camera to the plate and adjust the angle as needed.
Conclusion
Installing the Google Nest Outdoor Camera is a breeze with these easy steps. By following this guide, you can ensure that your camera is properly set up to enhance security and convenience. Remember to choose an optimal location, connect the camera to your Wi-Fi network, and familiarize yourself with the Nest app.
By taking these necessary precautions, you can enjoy the benefits of a well-functioning and reliable outdoor security camera. So, go ahead and get started on enhancing your home’s security today!