To install a Hikvision camera, follow these steps: Connect the camera to power and the network, assign an IP address, and adjust the camera angle and focus. Now, let’s delve into the details of setting up a Hikvision camera.
Hikvision is a leading brand in the security camera industry, offering high-quality surveillance solutions. If you’re planning to install a Hikvision camera, understanding the installation process is essential. With a few simple steps, you can have your camera up and running in no time.
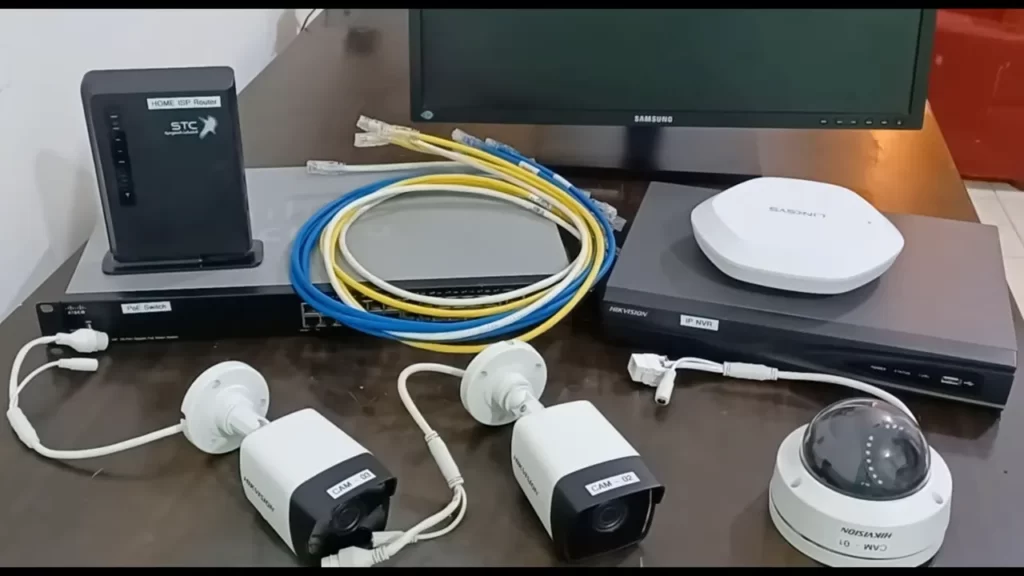
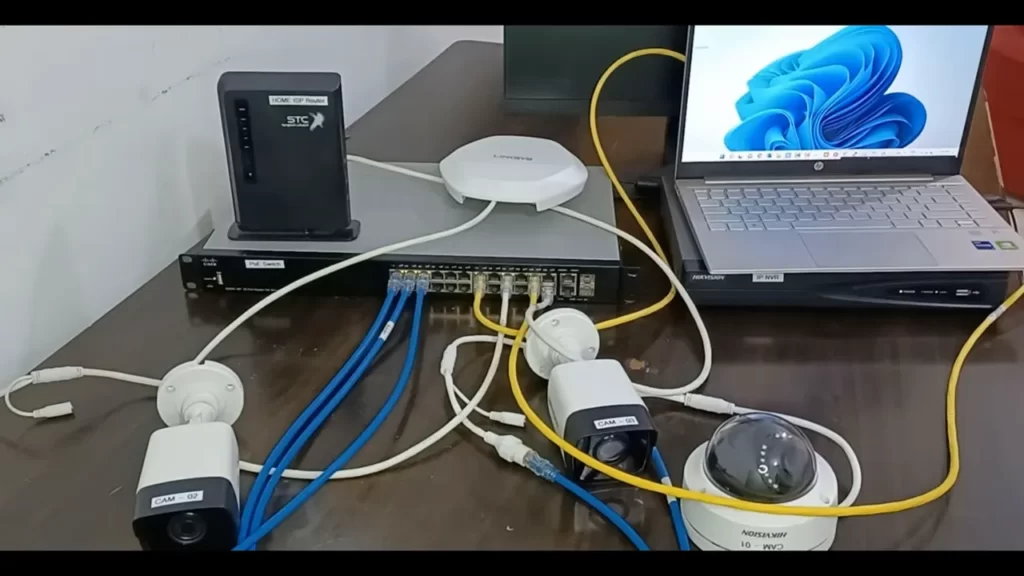
First, make sure you have all the necessary equipment, including the camera, power supply, a network cable, and a computer or mobile device for configuration. Begin by connecting the camera to a power source and your network using the provided cables. Next, access the camera’s configuration page through a web browser. Here, you’ll need to assign an IP address to the camera by selecting a unique identifier within your network’s range. Make sure to note down the IP address for future use. Finally, adjust the camera angle and focus to suit your needs. This may involve physically positioning the camera or using software controls to adjust the viewing angle and image clarity. With these simple steps, you can successfully install a Hikvision camera and enhance the security of your premises.
Understanding The Camera Components
Overview of Hikvision Cameras
Before delving into the installation process, it’s important to have a solid understanding of the various components that make up a Hikvision camera. Hikvision is a global leader in innovative video surveillance solutions, offering a wide range of cameras tailored to meet different security needs. Whether you’re looking to protect your home, office, or commercial property, Hikvision has a camera that fits the bill.
Each Hikvision camera comes equipped with several components that collectively work together to provide high-quality video footage. By familiarizing yourself with these components, you’ll be better equipped to ensure a successful installation process.
Identification and Purpose of Each Camera Component
When it comes to understanding the camera components, it’s important to know what each part does and how it contributes to the camera’s overall functionality. Here are some of the key components you’ll come across:
| Component | Purpose |
|---|---|
| Lens | The lens is responsible for focusing and capturing the video footage. It determines the field of view and determines the clarity of the image. |
| Image Sensor | The image sensor converts the captured light into an electrical signal, enabling the camera to create the video image. |
| Infrared LEDs | These LEDs emit infrared light, allowing the camera to capture clear footage even in low-light or no-light conditions. |
| Camera Housing | The camera housing protects the internal components from environmental elements such as rain, dust, and vandalism. |
| Power Supply | The power supply provides the necessary electrical power to keep the camera functioning. |
How to Choose the Right Camera for Your Needs
Choosing the right Hikvision camera is crucial to ensure optimal performance and meet your specific security requirements. Here are some factors to consider when selecting a camera:
- Resolution: Determine the level of detail you need in your video footage. Higher resolution cameras offer clearer images, but also require larger storage space.
- Field of View: Consider the area you want to monitor and choose a camera with an appropriate field of view to capture the necessary coverage.
- Indoor vs. Outdoor: Different cameras are designed for indoor or outdoor use. Consider the environmental conditions and select a camera that is suitable for the intended installation location.
- Special Features: Hikvision offers cameras with various special features such as pan-tilt-zoom (PTZ), audio recording, or advanced video analytics. Evaluate your needs and choose a camera with the desired functionalities.
By understanding the components of a Hikvision camera and considering your specific needs, you can confidently choose the right camera for your surveillance requirements. This ensures optimal performance and peace of mind knowing that your property is well-protected.
Pre-Installation Preparations
Pre-Installation Preparations
Before embarking on the installation of a Hikvision camera, it is essential to properly prepare for the process. This ensures a smooth and efficient installation, saving both time and effort. In this section, we will discuss the key pre-installation preparations you need to make.
Selecting an Appropriate Camera Location
Choosing an optimal location is crucial for your Hikvision camera to effectively monitor the desired area. Consider the following factors when selecting a suitable spot:
- The camera’s field of view: Evaluate the area you want to monitor and determine if the camera’s field of view covers the necessary range.
- Obstructions: Look for any physical obstructions such as trees, walls, or signs that may hinder the camera’s view or affect its functionality.
- Lighting conditions: Take note of the lighting conditions in the area. If there are bright lights or intense backlighting, it may impact the camera’s ability to capture clear footage.
Assessing Power and Network Requirements
Before beginning the installation, it’s essential to assess the power and network requirements of your Hikvision camera. This ensures uninterrupted operation and seamless connectivity. Consider the following:
- Power source: Determine whether the camera requires a direct power supply or if it can be powered using Power over Ethernet (PoE) technology.
- Network availability: Check if there is network connectivity in the area where you plan to install the camera. If not, you may need to extend the network infrastructure to ensure a reliable connection.
- Bandwidth: Assess the available bandwidth to ensure it can handle the camera’s data transmission requirements.
Gathering Necessary Tools and Equipment
Prior to starting the installation, gather all the necessary tools and equipment. Having everything on hand will help streamline the process and prevent unnecessary delays. The following items are typically needed:
- Ladder or stepstool: Depending on the camera’s mounting height, you may require a ladder or stepstool to reach the installation location.
- Power drill and appropriate drill bits: To secure the camera bracket, you will need a power drill and the appropriate drill bits.
- RJ45 connectors and network cable: If using a PoE camera, you will need RJ45 connectors and network cables for the connection.
- Screwdriver set: A set of screwdrivers is indispensable for securing cables and mounting brackets.
- Wire strippers and crimping tool: These tools are essential for properly terminating wires and connectors.
Step 1: Mounting The Camera
Installing a Hikvision camera is an essential step to ensuring the security of your home or business. To begin the installation process, you need to mount the camera in the most strategic location. This step is critical as it determines the camera’s field of view and overall effectiveness. In this guide, we will walk you through the process of mounting your Hikvision camera effectively.
Choosing the Mounting Location
The first step in mounting your Hikvision camera is choosing the perfect location. Consider the following factors when selecting the spot:
- Visibility: Ensure that the camera has a clear line of sight to the area you want to monitor. Avoid obstacles such as trees, buildings, or walls that may obstruct the camera’s view.
- Accessibility: Mount the camera at a height that is not easily reachable to prevent tampering or theft. This also minimizes the risk of accidental damage.
- Lighting: Take into account the lighting conditions in the chosen location. If the area is poorly lit at night, consider using a camera with infrared capabilities or ensure that external lighting is available.
- Weather resistance: If the camera will be exposed to the elements, make sure to choose a location that offers adequate protection against harsh weather conditions.
Installing the Mounting Bracket
Once you have selected the perfect spot for your Hikvision camera, the next step is to install the mounting bracket. The mounting bracket provides a sturdy and secure base for the camera. Follow these steps:
- Measure and mark the location: Use a tape measure and level to ensure that the bracket will be aligned properly. Mark the positions where you will attach the bracket to the wall or ceiling.
- Drill pilot holes: Use an appropriate drill bit to create pilot holes at the marked positions. These holes will guide the screws during installation.
- Attach the bracket: Align the bracket with the pilot holes and secure it to the wall or ceiling using screws and anchors, if necessary. Make sure the bracket is firmly attached and level.
Securing the Camera to the Bracket
Now that the mounting bracket is securely in place, it’s time to attach the Hikvision camera. Follow these steps to ensure a proper and secure installation:
- Attach the camera to the bracket: Align the camera’s mounting holes with the corresponding holes on the bracket.
- Secure the camera: Use the provided screws to fasten the camera to the bracket. Tighten the screws until the camera is firmly secured, ensuring it does not wobble or move.
- Adjust the camera angle: Before tightening the screws completely, position the camera to the desired angle to optimize its field of view. Make any necessary adjustments and then tighten the screws securely.
Congratulations! You have successfully completed the first step of installing a Hikvision camera. With the camera securely mounted, you are now ready to move on to the next steps, which involve configuring the camera’s settings and connecting it to your network. Keep an eye out for our upcoming guide on those topics.
Step 2: Connecting The Cables
Once you have identified the necessary cables and connectors for your Hikvision camera installation, the next step is to connect them properly. This step is crucial to ensure that your camera functions smoothly and securely. Follow the steps below to connect the cables correctly:
Identifying the necessary cables and connectors
The first thing you need to do is identify the cables and connectors required for your Hikvision camera installation. The most common cables and connectors you’ll need include:
- Power cable: This cable provides electrical power to the camera.
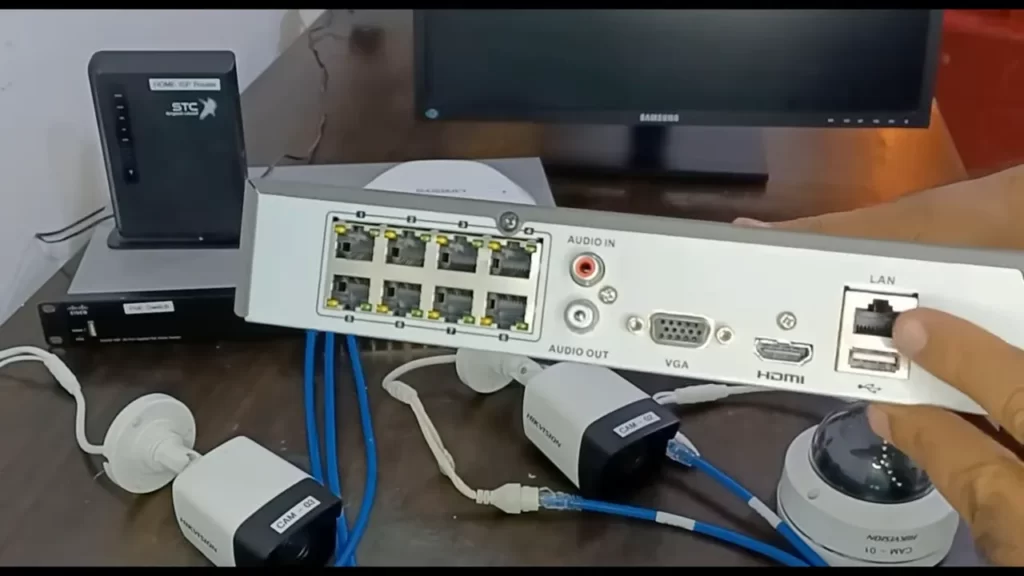
- Ethernet cable: This cable facilitates the connection between the camera and the network video recorder (NVR) or router.
- BNC cable: This cable is used to transmit video signals from the camera to the NVR.
- RG59 or RG6 coaxial cable: This cable is an alternative to the BNC cable and is used for video transmission.
- RJ45 connectors: These connectors are used to connect the Ethernet cable to the camera and NVR.
- BNC connectors: These connectors are used to connect the BNC cable to the camera and NVR.
Running cables through walls or conduits
After identifying the necessary cables and connectors, you may need to run them through walls or conduits to hide the cables and maintain a clean and professional installation. Here’s how you can do it:
- Plan the cable routing: Determine the most suitable route for running the cables. This could involve drilling holes in walls or using conduits to hide the cables.
- Measure and cut the cables: Make sure you have enough cable length to reach from the camera location to the NVR or power source. Cut the cables to the required length.
- Run the cables: Carefully run the cables through the selected route, ensuring they are securely fastened to the wall or conduit.
Connecting cables to the camera and power source
Now that you have run the cables through the walls or conduits, it’s time to connect them to the camera and power source. Follow these steps:
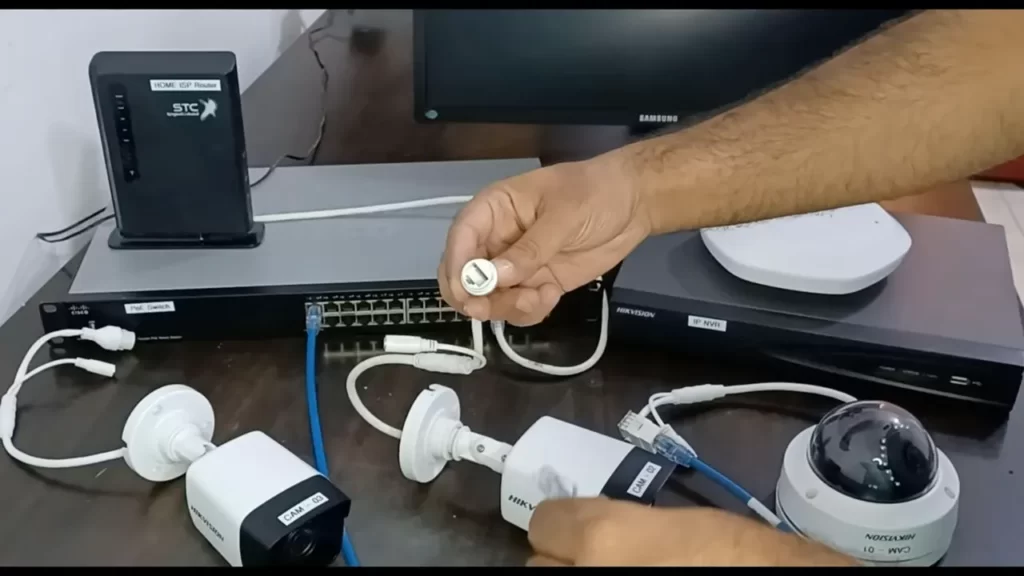
- Connect the power cable: Plug one end of the power cable into the power source, such as a power socket or a power supply box. Connect the other end to the power input port on the camera. Ensure a secure connection.
- Connect the Ethernet or BNC cable: Depending on your setup, connect either the Ethernet or BNC cable to the corresponding port on the camera. Plug the other end into the NVR or router.
- Secure the connections: Check all the connections to ensure they are properly secured. Avoid loose connections that may cause signal or power loss.
By following these steps, you will successfully connect the cables for your Hikvision camera installation. This ensures that your camera is properly powered and connected to the network, enabling it to capture high-quality surveillance footage.
Step 3: Configuring The Camera
Accessing the camera’s web interface
After the physical installation of your Hikvision camera, the next step is to access its web interface for configuration. To do this, follow these simple steps:
- Connect your computer to the same network as the camera.
- Open a web browser on your computer.
- Enter the default IP address of the camera in the address bar. To find the default IP address, you can refer to the camera’s user manual or check the label on the camera.
- Press Enter, and you will be directed to the login page of the camera’s web interface.
Setting up network configurations
Once you’ve accessed the camera’s web interface, the next step is to set up the network configurations. This will enable your camera to be accessed remotely and ensure seamless connectivity. Follow these steps:
- Log in to the camera’s web interface using the default username and password provided in the user manual or on the camera’s label.
- Navigate to the network settings page, usually found under the “Configuration” or “Network” tab.
- Configure the network settings according to your specific requirements. This includes setting a static IP address, subnet mask, gateway, and DNS server.
- Once you have entered the necessary information, click “Save” or “Apply” to save the changes.
Adjusting camera settings for optimal performance
Now that you have configured the network settings, it’s time to fine-tune the camera settings to ensure optimal performance. Follow these steps:
- Go to the camera’s web interface and log in using your credentials.
- Navigate to the settings page, usually located under the “Configuration” or “System” tab.
- Adjust the camera settings according to your needs. This includes adjusting the resolution, frame rate, exposure, white balance, and other image-related settings.
- Take advantage of advanced features such as motion detection, privacy masking, and image enhancements, if available.
- Once you have made the desired changes, click “Save” or “Apply” to apply the settings.
By following these simple steps, you can easily configure your Hikvision camera and ensure it is ready to capture high-quality, secure footage in any setting.
Step 4: Installing The Camera Software
Now that you have successfully connected your Hikvision camera to the network and configured the IP address, it’s time to take the next step: installing the camera software. This is an essential part of the setup process as it allows you to access and control your camera’s features and settings.
Downloading and installing the Hikvision software
To get started, you’ll need to download and install the Hikvision software onto your computer. Follow these simple steps: 1. Visit the official Hikvision website (https://www.hikvision.com/) and navigate to the ‘Downloads’ section. 2. Look for the software that matches your camera model and operating system. Be sure to choose the latest version for the best compatibility and performance. 3. Click on the download link and save the installation file to your computer’s hard drive. 4. Once the download is complete, locate the installation file and double-click to start the installation process. 5. Follow the on-screen prompts to install the software on your computer. Make sure to carefully read and accept the terms and conditions.
Adding the camera to the software
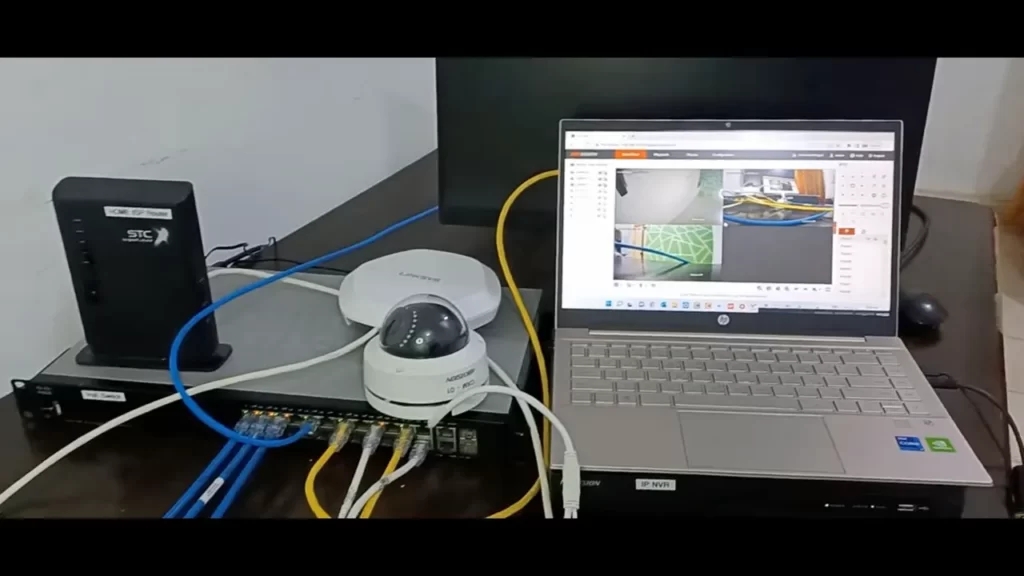
After you have installed the Hikvision software, it’s time to add your camera to it. Here’s how you can do it: 1. Launch the Hikvision software on your computer. 2. On the main interface, look for the option to add a new device or camera. This may be labeled as ‘Add New Device’ or something similar. 3. Click on the option and enter the required information, such as the camera’s IP address, username, and password. These details can usually be found in the camera’s user manual or on the camera itself. 4. Once you have entered the information, click on the ‘Add’ or ‘Save’ button to add the camera to the software. 5. The software will then attempt to establish a connection with the camera. If successful, you should see a live video feed from the camera on the software’s interface.
Configuring recording and monitoring settings
Now that your camera is successfully added to the software, it’s time to configure recording and monitoring settings. This will allow you to customize how the camera captures and stores footage. Follow these steps to get started: 1. Access the camera’s settings within the Hikvision software. This is typically done by right-clicking on the camera’s name or thumbnail and selecting ‘Settings’ or ‘Camera Settings’. 2. Navigate to the ‘Recording’ or ‘Storage’ section to configure the recording settings. Here, you can set the recording mode (continuous or event-based), the storage location, and the resolution of the recorded footage. 3. Next, go to the ‘Monitoring’ or ‘Live View’ section to customize the live monitoring settings. Here, you can adjust settings like video quality, frame rate, and PTZ (pan-tilt-zoom) controls. 4. Once you have made the desired changes, remember to save the settings before closing the configuration window. Congratulations! You have now successfully installed the Hikvision camera software and configured the necessary settings. You can now enjoy the benefits of remote monitoring and recording with your Hikvision camera.
Step 5: Testing And Troubleshooting
Checking camera functionality
After successfully installing the Hikvision camera, the next step is to check its functionality. This ensures that the camera is operating properly and captures clear, high-quality footage. Here are a few steps to help you check the camera’s functionality:
- Connect the camera to the power source and the network. Ensure that all cables are securely connected.
- Access the camera’s video feed through the Hikvision software or web interface. You should be able to view live footage from the camera.
- Adjust the camera’s focus and zoom settings to ensure clear image quality.
- Test the camera’s pan, tilt, and zoom functions, if applicable.
- Verify that the camera’s audio, if available, is working correctly.
- Check if the camera’s motion detection and other advanced features are functioning as intended.
Troubleshooting common installation issues
During the installation process, you might encounter some common issues. Here are a few troubleshooting tips to help you resolve them:
- Double-check all cable connections to ensure they are securely plugged in.
- Verify that the power source is delivering the correct voltage and that the camera is receiving power.
- Ensure that the network connection is stable and that the camera is properly configured to connect to your network.
- If you are experiencing issues with video feed, try restarting the camera and the viewing software.
- Update the camera’s firmware to the latest version to potentially resolve any known compatibility issues.
- If you are still facing issues, consult the camera’s user manual or contact Hikvision support for further assistance.
Optimizing camera positioning and settings
Properly positioning and optimizing the camera settings is essential to ensure optimal performance. Here are some tips for positioning and settings:
- Place the camera at a suitable height and angle to capture the desired area, avoiding obstructions and glare.
- Adjust the camera’s field of view and focus to capture the necessary details.
- Configure motion detection settings to reduce false alarms and optimize storage space.
- Set up scheduled recording or motion-triggered recording, depending on your requirements.
- Enable remote access to the camera’s feed for monitoring purposes.
- Regularly clean the camera lens to ensure clear image quality.
By following these steps, you can ensure that your Hikvision camera is properly tested, any installation issues are resolved, and the camera is optimized for the best performance. Remember to consult the camera’s user manual or reach out to Hikvision’s support for further guidance if needed.
Step 6: Maintaining And Upgrading The Camera
Now that you have successfully installed your Hikvision camera, it’s important to understand how to maintain and upgrade it for optimal performance. Regular cleaning, firmware and software updates, and enhancing camera functionality with additional features are crucial for the longevity and effectiveness of your camera. In this section, we will delve into each aspect in detail.
Cleaning and maintaining the camera
To ensure that your Hikvision camera continues to capture crystal-clear images, it’s essential to keep it clean and well-maintained. Dust, dirt, and smudges can affect the lens and image quality. Here are some steps you can take to keep your camera in top condition:
- Regularly wipe the camera housing with a clean, dry cloth to remove any dust or debris.
- Clean the lens gently using a lens cleaning solution or lens cleaning wipes.
- Check and clean the camera’s infrared (IR) illuminators, if applicable, to ensure proper night vision functionality.
- Inspect the camera’s cables and connections for any signs of damage or wear. Replace any faulty cables or connectors.
- Monitor the camera’s temperature and ensure it’s within the recommended operating range.
Updating firmware and software
Keeping your Hikvision camera’s firmware and software up to date is crucial for enhanced performance, bug fixes, and new feature additions. Firmware updates usually provide improvements in stability, security, and functionality. Here’s how you can update your camera’s firmware and software:
- Visit the Hikvision official website and navigate to the support page.
- Search for the firmware or software update specific to your camera model.
- Download the latest firmware or software version onto your computer.
- Connect your camera to your computer using an Ethernet cable.
- Open the camera’s web interface by entering its IP address into a web browser.
- Navigate to the settings menu and locate the firmware/software update section.
- Select the downloaded firmware/software file and initiate the update process.
- Wait for the update to complete and follow any on-screen instructions if prompted.
- Once the update is finished, restart your camera for the changes to take effect.
Enhancing camera functionality with additional features
Beyond the default features, Hikvision cameras offer a range of advanced capabilities that can be enabled or enhanced. These additional features can help you customize the camera’s behavior and maximize its usefulness. Here are some ways to enhance your Hikvision camera’s functionality:
| Feature | Description |
| Motion detection | Set up motion detection to receive alerts when movement is detected in specific areas. |
| Privacy masking | Use privacy masking to block out certain areas from being recorded or viewed. |
| Audio input/output | Utilize the camera’s audio input/output to enable two-way audio communication. |
| Advanced video analytics | Explore advanced video analytics features such as facial recognition or intrusion detection. |
With these additional features, you can tailor your camera’s capabilities to suit your specific needs, whether it’s for home security or professional surveillance systems.
By following these steps and ensuring regular maintenance and upgrades, you can optimize the performance and longevity of your Hikvision camera, giving you peace of mind in knowing that your surveillance is effective and reliable.
Frequently Asked Questions Of How To Install Hikvision Camera
How Do I Connect To My Hikvision Camera?
To connect to your Hikvision camera, follow these steps: – Install the camera on your network using an Ethernet cable. – Find the camera’s IP address using the SADP tool. – Open a web browser and enter the IP address.
– Log in with your camera’s credentials. – Enjoy access to your Hikvision camera!
Is Hikvision Easy To Install?
Yes, Hikvision is easy to install. The installation process is straightforward and user-friendly.
How Do I Connect My Hik Camera To My Computer?
To connect your HIK camera to your computer, follow these steps: 1. Install the camera software on your computer. 2. Connect the camera to your computer using the provided USB cable. 3. Open the camera software and configure the settings for connection.
4. Once connected, you can access and manage your camera’s footage on your computer.
How Do I Connect My Hikvision Camera To Wifi?
To connect your Hikvision camera to WIFI, follow these steps: 1. Access your camera’s web interface by entering its IP address in your web browser. 2. Go to the camera configuration page and navigate to the network settings. 3. Enable WIFI and input your WIFI network details.
4. Save the settings and restart your camera. 5. Your Hikvision camera should now be connected to WIFI.
How Do I Connect My Hikvision Camera To The Network?
To connect your Hikvision camera to the network, simply connect it to your router using an Ethernet cable.
Conclusion
In this blog post, we have provided you with a step-by-step guide on how to install a Hikvision camera. By following these instructions, you will be able to set up your camera efficiently and effectively. Remember to choose an optimal location, connect the necessary cables, and configure the camera settings for maximum functionality.
With the knowledge gained from this post, you can now enjoy the benefits of having a Hikvision camera in your security system.
