To install the Nest Doorbell Camera, follow these steps.
Gathering The Required Tools And Materials
List of Tools and Materials Needed for the Installation
Before you begin installing your Nest Doorbell Camera, it’s important to gather all the tools and materials required for the job. This will help ensure a smooth and hassle-free installation process. In this section, you’ll find a comprehensive list of everything you need to have on hand before starting the installation.
Tools
Here are the essential tools you’ll need to complete the installation:
- Phillips screwdriver
- Flathead screwdriver
- Drill
- Drill bits
- Tape measure
- Masonry bit (if drilling into brick or concrete)
- Level
- Wire strippers
- Wire nuts
Materials
In addition to the tools mentioned above, you’ll also need the following materials:
- Nest Doorbell Camera
- Mounting plate
- Screws
- Wiring
- Chime connector (if your doorbell system doesn’t have a built-in chime)
- Power adapter (if you prefer a wired power source instead of battery)
Prior to installation, make sure you have all the tools and materials readily available. This will save you time and frustration during the process. Now that you’re prepared, let’s move on to the next steps of installing your Nest Doorbell Camera.
Checking The Compatibility Of Your Doorbell
Before you jump into the process of installing your Nest Doorbell Camera, it’s important to verify if your current doorbell is compatible. This step will save you time and frustration down the line, ensuring a seamless installation experience.
Verifying if your current doorbell is compatible with Nest Doorbell Camera
To determine whether your current doorbell is compatible with the Nest Doorbell Camera, there are a few key factors to consider:
1. Voltage Requirements
The first thing you need to check is the voltage requirements of the Nest Doorbell Camera. It requires a doorbell transformer with a voltage range of 16V to 24V. To confirm if your current doorbell meets this requirement, you can:
- Consult the manufacturer’s documentation or contact their customer support to find the voltage specifications of your doorbell.
- Locate the doorbell transformer, usually located in the attic, basement, or near the electrical panel. Check if it falls within the required voltage range.
2. Wiring Compatibility
The Nest Doorbell Camera is designed to work with low-voltage wired doorbells. You will need to ensure that your current doorbell is wired and not wireless. Here’s how you can verify the wiring compatibility:
- Inspect your existing doorbell, looking for wiring connections. Generally, wired doorbells have two wires connected to them.
- If you’re unsure, you can consult an electrician to help you identify if your doorbell is wired or wireless.
3. Chime Compatibility
It’s essential to check if your existing doorbell chime is compatible with the Nest Doorbell Camera. To do this:
- Locate your doorbell chime inside your home.
- Check for any compatibility information provided by the chime manufacturer.
- If you can’t find any information, you can take note of the make and model of your chime and contact the manufacturer for compatibility confirmation.
By following these steps and verifying the compatibility of your current doorbell with the Nest Doorbell Camera, you can ensure a smooth and successful installation process.
Setting Up The Nest App And Account
Downloading the Nest app and creating a Nest account
To begin setting up your Nest Doorbell Camera, you will need to download the Nest app on your mobile device. The Nest app is available for both iOS and Android users and can be easily located and installed from the respective app stores. Once you have successfully downloaded the app, it’s time to create your Nest account.
To create an account, simply open the Nest app and click on the “Sign up” or “Create account” button. Fill in the required information, including your email address and a secure password. Remember to choose a strong, unique password to ensure the security of your Nest account. After providing the necessary details, click on the “Sign up” button to complete the account creation process. You will receive a confirmation email to verify your email address.
Connecting the app to your Nest Doorbell Camera
Once you have successfully created your Nest account, it’s time to connect the app to your Nest Doorbell Camera. Begin by opening the Nest app on your mobile device and logging in with your newly created account details. You will be prompted to set up your camera by following a series of on-screen instructions.
Ensure that your Nest Doorbell Camera is properly installed and connected to your home’s Wi-Fi network. The camera should be powered on, and the LED light should be blinking blue. On the app, navigate to the “Add product” or “Add camera” section.
- Select “Doorbell” from the list of available Nest products.
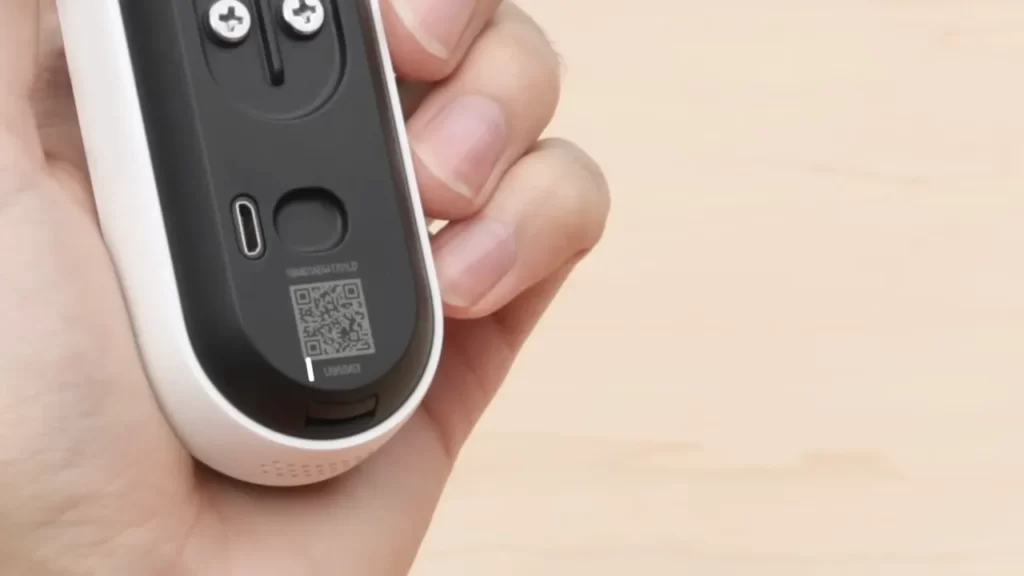
- Scan the QR code on the back of your Nest Doorbell Camera or manually enter the setup code provided.
- Follow the on-screen instructions to connect your camera to your Wi-Fi network.
- Once the setup is complete, you will be able to view the live feed from your Nest Doorbell Camera through the Nest app, and access additional features such as motion detection alerts and two-way audio communication.
Congratulations! You have successfully set up your Nest app and connected it to your Nest Doorbell Camera. Now you can enjoy the peace of mind and convenience that comes with having a smart doorbell installed.
Powering Off The House’S Power Supply
Safely shutting off the power supply for the doorbell system
Powering off the house’s power supply is an essential step when it comes to installing a Nest doorbell camera. Before you begin, it is crucial to ensure your safety by following the correct procedures. In this section, we will guide you on how to safely shut off the power supply for your doorbell system.
Here are the steps to follow:
Step 1: Locate the electrical panel
The first step is to locate the electrical panel in your house. This is usually a metal box affixed to a wall, often found in the basement or utility room. Open the electrical panel by removing the screws or releasing the latch that holds the door in place.
Step 2: Identify the circuit breaker for the doorbell system
Inside the electrical panel, you will find a series of circuit breakers or fuses. These control the power supply to different areas of your house. Look for the circuit breaker labeled “doorbell” or any other related label that indicates the doorbell system.
Step 3: Switch off the circuit breaker
Once you have identified the circuit breaker for the doorbell system, flip the switch to the “off” position. This will shut off the power supply to the doorbell and ensure that there is no electrical current flowing through the wires when you start working on the installation.
Step 4: Verify power supply is off
It is essential to double-check that the power supply to the doorbell system is indeed off to prevent any accidents. One way to do this is to test the doorbell button. If there is no response or sound, it confirms that the power supply is safely shut off.
Another method is to use a non-contact voltage tester. Hold it near the doorbell wires or the doorbell transformer, and if the tester does not light up or make any sound, it indicates that the power supply is off.
Step 5: Proceed with the installation
With the power supply to the doorbell system safely shut off, you can now proceed with the installation of your Nest doorbell camera. Remember to follow the manufacturer’s instructions and refer to the installation guide provided.
By following these steps, you can ensure your safety and the safety of your home while installing the Nest doorbell camera. Taking the time to power off the house’s power supply is a crucial step that should not be overlooked.
Removing The Existing Doorbell
Before you can install your new Nest Doorbell Camera, you’ll first need to remove the existing doorbell. Follow these simple steps to make sure the process goes smoothly.
Steps to uninstall the current doorbell and wiring
To begin with, ensure your safety by turning off the power to the doorbell circuit. This can usually be done by flipping the breaker switch labeled “doorbell” or “front door”. Remember, safety first!
Once the power is off, you’ll need a few tools to assist you, such as a screwdriver and wire cutters. Start by removing the screws that hold the doorbell cover plate in place. Carefully detach the cover plate from the wall and set it aside.
Next, you’ll need to locate the wires connected to the doorbell. Loosen the screws or clips securing the wires and gently pull them out. Take note of how each wire was connected, as this will be important when wiring your new Nest Doorbell Camera.
If the wires are exposed and not secured with screws or clips, make sure to use wire cutters to trim the wires to a manageable length. This will prevent any accidents or mishaps during the installation process.
Ensuring the removal is done correctly and safely
After successfully uninstalling the current doorbell and wiring, it’s essential to ensure everything is done correctly and safely. Follow these important tips to guarantee a hassle-free installation:
- Wear safety gloves to protect your hands from any sharp edges or electrical hazards.
- Double-check that the doorbell circuit’s power is still turned off before proceeding.
- Inspect the wires to make sure there are no signs of damage or fraying. If any wires appear compromised, it’s best to replace them before continuing.
- If you’re unsure about any aspect of the removal process or the condition of your wiring, consult a professional electrician for assistance.
By following these simple steps and safety precautions, you can confidently proceed to install your new Nest Doorbell Camera. Be sure to read the manufacturer’s instructions carefully and refer to our future blog posts for detailed information on the next steps of the installation process.
Preparing The Doorbell Wiring
Installing a Nest Doorbell Camera can enhance the security and convenience of your home. Before you dive into the installation process, it’s important to ensure that the doorbell wiring is ready for the task at hand. In this guide, we’ll walk you through the necessary steps to prepare and ensure the doorbell wiring is ready for installation. Let’s get started!
Checking the Existing Wiring
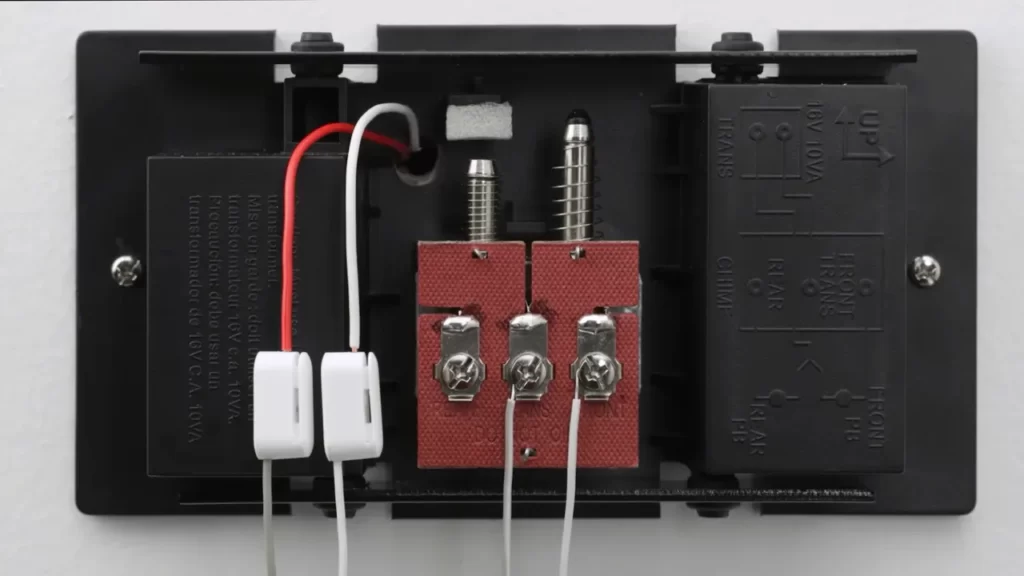
Step 1: Begin by locating your existing doorbell chime. It is usually situated on a wall near your front entrance. Check if there are any wires already connected to it. Typically, you will find two wires – one connected to the terminal labeled “TRANS” or “R” and the other to the terminal labeled “FRONT” or “F”. If these wires are present, you can proceed to connect your Nest Doorbell Camera to the existing wiring.
If there are no wires present at the doorbell chime, you may need to install the necessary wiring yourself. Don’t worry, we’ll guide you through that process as well.
Installing New Wiring (If Required)
Step 2: To install new wiring for your Nest Doorbell Camera, you’ll need a few tools and materials. These include a drill, drill bits suitable for your wall material, screwdrivers, wire stripper, and a voltage tester. Additionally, you’ll need low-voltage wires, such as 18 or 20-gauge two-conductor wire. You can find these wires at your local hardware store.
Step 3: Begin by deciding the route for your new wiring. Generally, it is best to follow existing routes such as the path taken by your current doorbell wiring or electrical wiring. This helps maintain a clean and professional installation.
Step 4: Now, using your drill and appropriate drill bits, create a small hole to pass the low-voltage wires through the wall. Make sure the hole is large enough to accommodate the wire without causing any damage to the wall or the insulation of the wire.
Step 5: Carefully run the wires from the hole down to your doorbell chime location. Keep the wires as neat as possible, securing them with clips or staples along the way. When running the wires through a wall, ensure they are not squeezed or damaged during the process.
Step 6: Once the wires reach the doorbell chime, use the wire stripper to remove a small amount of insulation from each wire end. This will expose the bare copper conductors, making it easier to connect them to the terminals on the chime.
Step 7: After preparing the wire ends, connect one wire to the terminal labeled “TRANS” or “R” and the other wire to the terminal labeled “FRONT” or “F” on your doorbell chime. Ensure the connections are secure and snug.
Step 8: Finally, use a voltage tester to ensure that the wiring is properly connected and receiving power. Follow the manufacturer’s instructions for using the voltage tester and make sure it indicates the presence of voltage at the chime terminals.
By following these steps to prepare and ensure the doorbell wiring is ready for installation, you’ll be one step closer to enjoying the benefits of your Nest Doorbell Camera. In the next section, we’ll guide you through the installation process of the doorbell itself. Stay tuned!
Mounting The Nest Doorbell Camera
Mounting the Nest Doorbell Camera is a crucial step in the installation process. This ensures that the camera is securely attached to your doorframe or wall, allowing it to function optimally and provide you with clear and reliable video footage of your doorstep. In this section, we will walk you through the steps to attach the Nest Doorbell Camera to the mounting plate and properly position and adjust the camera angle.
Attaching the Nest Doorbell Camera to the mounting plate
Before mounting the Nest Doorbell Camera, it is essential to ensure that you have properly installed the mounting plate. The mounting plate provides a sturdy base for the camera and is typically installed using screws. To attach the camera to the mounting plate, follow these steps:
- Locate the screw holes on the back of the Nest Doorbell Camera.
- Align the screw holes on the camera with the corresponding holes on the mounting plate.
- Using the screws provided, securely fasten the camera to the mounting plate. Make sure the camera is level and tightly attached.
Once the camera is attached to the mounting plate, you can proceed to position and adjust the camera angle.
Positioning and adjusting the camera angle
The positioning and angle of your Nest Doorbell Camera are crucial for capturing a clear view of your doorstep. Follow these steps to position and adjust the camera angle:
- Stand in the location where you want to mount the camera and determine the desired field of view.
- Using the fixed ring on the camera, adjust the angle until the desired field of view is achieved. Ensure that the camera is facing the correct direction and capturing the area you want to monitor.
- If necessary, make further adjustments by loosening the ring and repositioning the camera. Once you have the desired angle, tighten the ring to secure the camera in place.
It is essential to test the camera’s view after positioning it to ensure that it provides the coverage you need. Adjust as necessary until you are satisfied with the camera’s placement.
By carefully following these steps, you can successfully mount your Nest Doorbell Camera and position it for optimal functionality and coverage.
Connecting The Nest Doorbell Camera
Connecting the Nest Doorbell Camera is the next step to take after successfully installing the physical device. This crucial step will allow you to fully integrate the camera into your existing doorbell system, as well as connect it to your Wi-Fi network for seamless video monitoring and real-time alerts. In this guide, we will walk you through the process of wiring the Nest Doorbell Camera to your existing doorbell system and connecting it to your Wi-Fi network.
Wiring the Nest Doorbell Camera to the existing doorbell system
Before you can start enjoying the benefits of your Nest Doorbell Camera, you need to ensure it is properly wired into your existing doorbell system. Follow these steps to connect the camera:
- Locate the existing doorbell transformer in your home. It is typically found near your electrical panel or in the utility room.
- Make sure to turn off the power to the doorbell system by flipping the corresponding breaker switch in your electrical panel.
- Once the power is off, remove the cover of your existing doorbell chime by unscrewing the screws holding it in place.
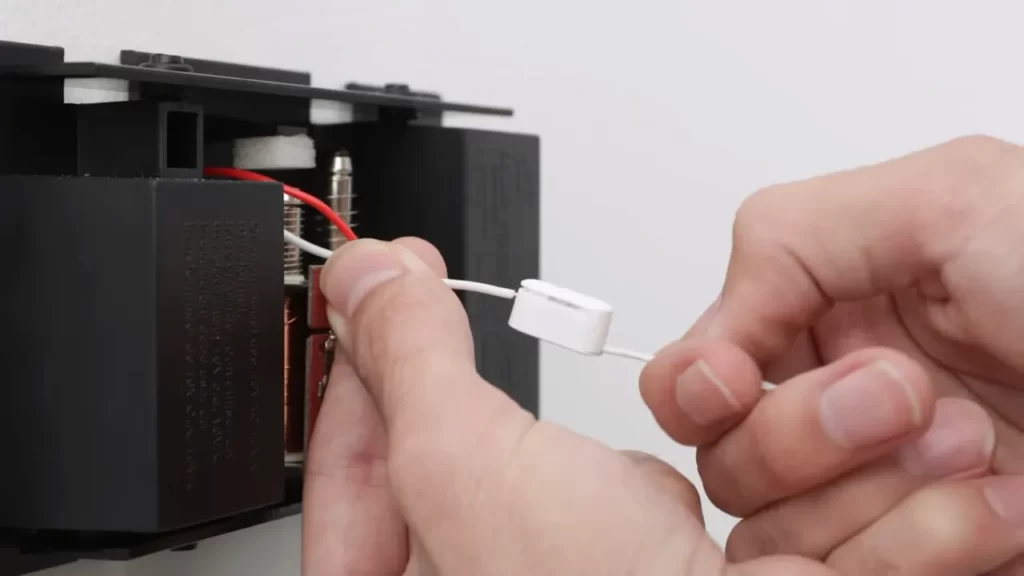
- Identify the two wires connecting the doorbell chime to the transformer. They are usually labeled “Front” and “Trans”.
- Get your Nest Doorbell Camera and connect the two wires from the doorbell chime to the corresponding terminals on the back of the camera.
- Ensure a secure connection by twisting the wires together and using wire nuts or electrical tape to insulate them.
- After confirming the wires are securely connected, reattach the cover of your doorbell chime.
- Finally, turn the power back on by flipping the breaker switch, and your Nest Doorbell Camera should now be successfully wired into your existing doorbell system.
Connecting to the Wi-Fi network
Once the Nest Doorbell Camera is wired to your doorbell system, the next step is to connect it to your Wi-Fi network. This allows you to access the camera’s live video feed and receive alerts on your mobile device. Follow these steps to connect to Wi-Fi:
- Ensure that your Wi-Fi network is functioning properly and within range of the camera’s location.
- Download and open the Nest mobile app on your smartphone or tablet.
- Sign in to your Nest account or create a new one if you haven’t already.
- Tap on the “+” button to add a new device and select “Nest Doorbell Camera” from the list of available products.
- Follow the on-screen prompts to scan the QR code on the back of your camera and enter the necessary information, including your Wi-Fi network name (SSID) and password.
- Wait for the Nest Doorbell Camera to establish a connection to your Wi-Fi network. This may take a few moments.
- Once the connection is established, you will be able to customize the camera’s settings, such as motion detection sensitivity and notification preferences through the Nest mobile app.
- Congratulations! You have successfully connected your Nest Doorbell Camera to your Wi-Fi network.
By following these steps, you have completed the process of connecting your Nest Doorbell Camera. Now, you can enjoy the convenience of monitoring your doorstep remotely, receiving real-time alerts, and enjoying enhanced security for your home.
Installing The Faceplate And Finishing Touches
Now that you have successfully mounted your Nest Doorbell Camera, it’s time to move on to the next step of the installation process: attaching the faceplate and adding those finishing touches. The faceplate not only adds a sleek and stylish look to your doorbell camera but also protects it from the elements.
Attaching the faceplate to the Nest Doorbell Camera
Attaching the faceplate to your Nest Doorbell Camera is a straightforward process that requires minimal effort. Simply follow these steps:
- Start by removing the adhesive backing from the faceplate.
- Align the holes on the faceplate with the corresponding holes on the doorbell camera.
- Press the faceplate firmly against the camera to ensure a secure attachment.
By taking these simple steps, you can ensure that your Nest Doorbell Camera will remain securely fastened and stylishly protected.
Testing the functionality of the doorbell
Before you wrap up the installation process, it’s important to test the functionality of your newly installed Nest Doorbell Camera. Follow these steps to ensure everything is in working order:
- Double-check the connections to make sure everything is properly plugged in.
- Ensure that your Wi-Fi network is functioning properly.
- Press the doorbell button to check if it rings and sends a notification to your connected device.
- Test the camera functionality by accessing the live video feed from your smartphone or another connected device.
- If there are any issues, refer to the instruction manual or contact Nest customer support for assistance.
By thoroughly testing the functionality of your Nest Doorbell Camera, you can have peace of mind knowing that your home is protected and you’ll receive timely notifications whenever someone is at your door.
With the faceplate attached and the functionality tested, you’ve now successfully completed the installation of your Nest Doorbell Camera. Take a moment to admire your work, knowing that you’ve taken an important step towards enhancing the security and convenience of your home.
Adjusting Notification Settings
Once you have successfully installed your Nest Doorbell Camera, the next step is to customize the notification settings to suit your preferences. By adjusting these settings, you can ensure that you receive alerts and notifications for all doorbell activities that matter to you the most. In this section, we will walk you through the process of setting up alerts and notifications for doorbell activities, so you can stay informed and in control at all times.
Setting up alerts and notifications for doorbell activities
To get started, follow these simple steps:
- Open the Nest app on your smartphone or tablet.
- Select your Nest Doorbell Camera from the list of devices.
- Tap on the settings icon, usually represented by a gear or cogwheel.
- Scroll down and find the “Notifications” option.
- Tap on “Notifications” to expand the settings.
- Here, you will find a list of different events that you can enable or disable notifications for, such as motion events or doorbell rings.
- Toggle the switch next to each event based on your preferences. For example, if you want to be notified every time someone rings your doorbell, ensure that the “Doorbell ring” option is turned on.
- You can further customize the notifications by adjusting the delivery method, volume, and other settings available in this section.
- Once you have made your desired changes, exit the settings menu and your new notification settings will be saved.
With these simple steps, you can now enjoy personalized alerts and notifications for various doorbell activities. Whether it’s a delivery, a visitor, or any other event, your Nest Doorbell Camera will keep you informed instantly.
Remember, by customizing your notification settings, you have the power to tailor your Nest Doorbell Camera’s alerts to fit your lifestyle and needs. Don’t miss a moment – stay connected and receive important updates wherever you are.
Creating Activity Zones
When it comes to enhancing the security of your home, the Nest Doorbell Camera is an excellent choice. Not only does it provide high-quality video footage of your front door, but it also comes with advanced features like motion detection. One of the most powerful features is the ability to create activity zones, which allows you to focus the motion detection on specific areas.
Configuring specific areas where motion detection should be focused
With the Nest Doorbell Camera, you can configure specific areas within the camera’s field of view where you want the motion detection to be focused. This ensures that the camera only picks up motion in those areas, reducing false alarms and unnecessary notifications.
To set up activity zones, follow these simple steps:
- Open the Nest app on your smartphone and select the Doorbell Camera.
- Tap on the settings icon to open the camera settings.
- Scroll down until you find the ‘Activity Zones’ option and tap on it.
- You will see a live view from the camera with a grid overlay.
- Drag and resize the grid squares to cover the areas where you want the motion detection to be active.
- Once you are satisfied with the activity zones, tap on the save button to apply the changes.
Ensuring each H3 heading adheres to HTML syntax
When creating HTML headings, it is important to follow the correct syntax to ensure that search engines and other web applications understand the structure of your content. In the case of H3 headings, the correct syntax is:
Heading Text
Make sure to enclose the heading text within the opening and closing <h3> tags to indicate that it is a level 3 heading.
Following the proper HTML syntax for headings not only helps with the readability and organization of your content but also improves search engine optimization (SEO) by providing clear signals to search engines about the hierarchy of your information.
By configuring activity zones on your Nest Doorbell Camera, you can ensure that you receive accurate and relevant motion notifications. This allows you to focus on the areas that matter most and provides an added layer of security for your home. Follow the simple steps outlined above to set up your activity zones and experience the full potential of your Nest Doorbell Camera.
Integrating The Nest Doorbell Camera With Other
Devices
Installing a Nest Doorbell Camera is just the first step towards creating a smarter and more secure home. To unlock the full potential of this smart device, you can integrate it with other compatible smart home devices. This seamless integration not only enhances the functionality of your doorbell camera but also allows you to create a personalized and interconnected smart home ecosystem. In this article, we will guide you through the process of connecting the Nest Doorbell Camera to other smart devices.
Connecting the doorbell camera to other smart home devices
By connecting your Nest Doorbell Camera with other smart home devices, you can establish a network of interconnected devices that work together to simplify your day-to-day life. Whether it’s automating tasks, enhancing security, or controlling devices with just a voice command, the possibilities are endless.
Here’s a step-by-step guide to integrating your Nest Doorbell Camera with other smart home devices:
- Check device compatibility: Before you begin, ensure that the other smart home devices you wish to connect with your doorbell camera are compatible. Many popular brands like Google Home, Amazon Echo, and Philips Hue offer native integrations with Nest devices. Refer to the documentation of each device to confirm compatibility.
- Set up the Nest app: Make sure you have the Nest app installed on your smartphone or tablet. This app acts as a central hub for controlling and managing your Nest devices. You can download the app from the Google Play Store or Apple App Store.
- Navigate to the settings: Open the Nest app and navigate to the settings menu. Look for the “Works with Nest” or “Device Connections” option. Depending on your device, the exact menu name may vary.
- Find the desired smart device: Once you are in the settings menu, search for the smart home device you want to connect with your Nest Doorbell Camera. This could be anything from a smart lock to smart lights or a smart thermostat.
- Initiate the pairing process: Follow the instructions provided on the Nest app to initiate the pairing process between your doorbell camera and the selected smart device. These instructions may involve putting the device in pairing mode, scanning QR codes, or entering specific codes.
- Complete the setup: Once the pairing process is complete, you can customize the settings and preferences for the connected device through the Nest app. This includes options such as creating automation routines, adjusting device behavior based on certain triggers, and more.
Remember, the integration process may vary depending on the specific smart home devices you wish to connect with your Nest Doorbell Camera. Always refer to the manufacturer’s instructions or support resources for detailed guidance.
By following these steps, you can seamlessly integrate your Nest Doorbell Camera with a variety of other smart home devices, creating a unified and intelligent home automation system. The possibilities for convenience, security, and energy efficiency are endless, allowing you to truly make the most of your smart home technology.
Common Issues And How To Resolve Them
Troubleshooting Tips for Common Installation Problems:
If you’re encountering issues while installing your Nest Doorbell Camera, don’t worry! We’ve got you covered with some troubleshooting tips to help you resolve them quickly. Whether it’s an issue with the mounting, connectivity, or setup process, these tips will help you get your Nest Doorbell Camera up and running smoothly.
1. Mounting Problems:
If you’re having trouble with mounting your Nest Doorbell Camera, here are a few things to check: – Ensure that the mounting plate is securely attached to the wall or door frame using the provided screws. – Double-check the alignment of the mounting plate to ensure it’s level and straight. This will ensure that the camera captures the intended area without any distortion. – If you’re mounting the camera on a metallic surface, make sure it’s not interfering with the camera’s Wi-Fi signal. Metal surfaces can sometimes reduce signal strength, so consider using a mounting plate or stand that allows for some distance between the camera and the surface.
2. Connectivity Issues:
If you’re experiencing connectivity issues with your Nest Doorbell Camera, here are a few troubleshooting steps to try: – Check your Wi-Fi network and make sure it’s working properly. Verify that other devices can connect to the network without any issues. – Bring your camera closer to your Wi-Fi router during the setup process to ensure a strong signal. Once the initial setup is complete, you can move the camera to its desired location. – If you’re using the Nest app to set up your camera, ensure that you’re using the latest version. Updates to the app often include bug fixes and improvements that can help resolve connectivity issues.
3. Setup Problems:
If you’re facing difficulties with the setup process of your Nest Doorbell Camera, consider these troubleshooting tips: – Make sure you’ve followed the step-by-step instructions provided with the camera. Going through the instructions again can often resolve issues that might have been overlooked. – Restart your camera by disconnecting the power source and reconnecting it after a few seconds. This can help refresh the camera’s settings and resolve any temporary glitches. – Reset the camera to its factory settings if all else fails. Refer to the user manual or the Nest website for instructions on how to perform a factory reset. Remember, if you’re still encountering issues after trying these troubleshooting tips, don’t hesitate to reach out to Nest customer support for further assistance. With their expertise, they’ll be able to guide you through the specific problem you’re facing and help you get your Nest Doorbell Camera installed and functioning seamlessly.
Frequently Asked Questions About Nest Doorbell Camera Installation
Installing a Nest Doorbell Camera can provide your home with an added layer of security and convenience. However, if you’ve never installed one before, you might have some questions about the process. In this section, we address common queries related to the installation process, ensuring each H3 heading adheres to HTML syntax.
What tools will I need to install the Nest Doorbell Camera?
Before getting started, gathering the necessary tools will streamline the installation process. Here’s a handy list of the tools you’ll need:
- A screwdriver (typically included in the Nest Doorbell Camera packaging)
- A power drill with a masonry bit (if mounting on a brick or concrete wall)
- A level to ensure proper alignment
- Wire cutters/strippers (if installing a wired version)
- Tape measure
Can I install the Nest Doorbell Camera on my own?
Yes, absolutely! The installation process for the Nest Doorbell Camera is designed to be user-friendly, allowing you to install it on your own. However, proper understanding of the instructions and following them step-by-step is crucial for a successful installation. If you feel unsure or uncomfortable with the process, it’s always wise to consult a professional.
Do I need an existing doorbell for the Nest Doorbell Camera to work?
No, an existing doorbell is not required for the Nest Doorbell Camera to function. The Nest Doorbell Camera comes in both wired and battery-operated versions. The wired version requires connecting it to your existing doorbell wiring while the battery-operated version runs on its internal battery. Both versions offer similar functionality and security features.
Can the Nest Doorbell Camera be installed without drilling?
Yes, the Nest Doorbell Camera can be installed without drilling. Nest provides alternative mounting options, such as adhesive strips or brackets, for individuals who prefer not to drill into their walls or door frames. However, using screws and drilling ensures a more secure and permanent installation.
How long does the installation process take?
The installation time for the Nest Doorbell Camera typically depends on various factors, including your skill level, the complexity of your installation setup, and the type of mounting option you choose. On average, the installation process takes about 30 minutes to an hour. Following the detailed instructions provided in the user manual or Nest app will help you complete the installation efficiently.
Where should I place the Nest Doorbell Camera for optimal coverage?
Choosing the right location for your Nest Doorbell Camera is crucial to ensure optimal camera coverage and functionality. Here are a few tips to help you determine the best placement:
- Mount the camera at a height of approximately 48 inches (120 cm) above the ground for the best field of view.
- Place the camera where it can get an unobstructed view of your entryway or preferred surveillance area.
- Avoid placing the camera facing direct sunlight or areas that may cause excessive glare, as this can affect the quality of the video footage.
- Ensure the camera is within the range of your Wi-Fi network for a stable connection.
By considering these factors and experimenting with different positions, you can find the perfect location that suits your specific requirements.
What should I do if I experience any issues during the installation process?
If you encounter any difficulties or have concerns throughout the installation process, always refer to the official Nest Doorbell Camera user manual for troubleshooting steps. Additionally, you can reach out to Nest customer support for further assistance.
With these frequently asked questions answered, you’re now well-equipped with the knowledge you need to install your Nest Doorbell Camera confidently. Let’s dive into the installation process and start enhancing the security of your home!
Frequently Asked Questions On How To Install Nest Doorbell Camera
Can I Install Nest Doorbell Myself?
Yes, you can install the Nest doorbell yourself. It is user-friendly and comes with clear instructions. Simply follow the provided steps to set it up and start enjoying its features. No professional installation is required.
How Do I Install Google Nest Doorbell Camera?
To install a Google Nest doorbell camera, follow these steps: 1. Download the Google Home app. 2. Open the app and select “Add” then “Set up device. ” 3. Scan the QR code on the doorbell or enter the serial number manually.
4. Follow the on-screen instructions to connect the doorbell to your Wi-Fi. 5. Mount the doorbell and adjust the angle as needed. Done!
Does Nest Doorbell Need To Be Wired?
Yes, the Nest doorbell needs to be wired for power and connectivity. It requires a connection to your existing doorbell wiring or a professional installation by a licensed electrician. This allows the doorbell to function properly and provide you with its full range of features.
How Do I Connect My Nest Doorbell Camera To Wifi?
To connect your Nest Doorbell camera to WiFi, follow these steps: 1. Download the Nest app and sign in. 2. Tap on the “Add” button to add your device. 3. Scan the QR code on your camera. 4. Select your WiFi network and enter the password.
5. Wait for the camera to connect to WiFi, and you’re all set!
How Do I Install Nest Doorbell Camera?
To install Nest Doorbell Camera, you need to follow these steps: 1. Download the Nest app. 2. Connect the doorbell to Wi-Fi. 3. Attach it to your door. 4. Set up motion detection. 5. Customize your doorbell settings.
Conclusion
To sum up, setting up the Nest Doorbell Camera is a straightforward process that offers enhanced security and peace of mind for homeowners. The step-by-step guide has provided a simple yet comprehensive understanding of how to install the camera. By following these instructions, you can easily take advantage of the advanced features of this smart device, ensuring your home remains safe and protected.
With the Nest Doorbell Camera in place, you can keep an eye on your front door and stay connected to your home, even when you’re away.