To install an outdoor security camera, mount it securely in a desired location and connect it to power and a recording device. Ensure proper setup for maximum coverage and functionality.
Outdoor security cameras are essential for protecting your property from potential threats. They provide a vital layer of surveillance that can deter intruders, monitor activity, and provide evidence in case of an incident. However, to fully benefit from these cameras, you need to install them correctly.
We’ll guide you through the process of installing an outdoor security camera. We will cover everything from selecting the right location, securing the camera, connecting it to power and a recording device, and testing its functionality. With our step-by-step instructions, you’ll be able to enhance the security of your property and have peace of mind knowing that you have a watchful eye on your surroundings.
The Role Of Outdoor Security Cameras In Home Protection
The Role of Outdoor Security Cameras in Home Protection
Outdoor security cameras play a crucial role in safeguarding your home and providing you with peace of mind. These cameras provide an effective deterrent to potential criminals, increase your sense of security, and serve as reliable evidence in case any incidents occur. Let’s explore the different ways outdoor security cameras contribute to home protection.
Deterrence and prevention of criminal activities
One of the primary functions of outdoor security cameras is their ability to deter criminals. These cameras act as a visible warning for potential wrongdoers, dissuading them from targeting your property. Criminals are less likely to attempt a break-in or any other illegal activities when they know they are being monitored.
Moreover, having visible outdoor security cameras can deter not only burglars but also vandals and trespassers. The presence of these cameras sends a strong message that your property is protected, making it less attractive as a target.
Increased peace of mind for homeowners
Feeling safe and secure within your own home is paramount, and outdoor security cameras greatly contribute to this sense of peace. By having these cameras installed, you gain visibility and control over the activities around your property, even when you’re not physically present.
With advanced features such as live feeds and remote access capabilities, you can monitor your home’s exterior in real-time from anywhere using your smartphone or computer. This constant vigilance allows you to keep an eye on who enters and exits your premises, ensuring the safety of your loved ones and belongings.
In addition to deterring criminal activities, the mere presence of outdoor security cameras can help to prevent other undesirable behaviors, like loitering or parking violations. This enhanced control and awareness contribute significantly to the overall peace of mind for homeowners.
Providing evidence in case of incidents
In unfortunate scenarios where incidents occur, outdoor security cameras serve as valuable evidence. Whether it’s a break-in, theft, vandalism, or any other suspicious activity, these cameras capture events as they unfold, providing a visual record of the event.
This recorded evidence can be crucial for law enforcement investigations and insurance claims. Having video footage of an incident can assist in identifying the perpetrators, recovering stolen items, and obtaining compensation for damages or losses.
By installing outdoor security cameras, you create a proactive and effective system that not only deters potential criminals but also provides vital evidence in case you need it. This comprehensive approach to home protection ensures that you have a layer of security that minimizes risks and maximizes your peace of mind.
Factors To Consider Before Installing An Outdoor Security Camera
Your home’s security is paramount, and installing an outdoor security camera can provide you with peace of mind. However, before you rush out and buy the first camera you see, there are several important factors to consider. By taking the time to carefully evaluate these factors, you can ensure that you choose the right camera for your specific needs. In this article, we will discuss the key factors to consider before installing an outdoor security camera.
Identifying the vulnerable areas around your property
Knowing the vulnerable areas around your property is essential in determining where to install your outdoor security camera. Take a walk around your property and assess which areas are most prone to unauthorized access or suspicious activities. These could be entry points such as doors and windows, driveways, backyards, or any other areas that are secluded and easily accessible. By identifying these vulnerable areas, you can strategically place your security camera to capture important footage.
Choosing the right type of camera
When it comes to outdoor security cameras, there are several types to choose from. The two most common types are bullet cameras and dome cameras. Bullet cameras are long and cylindrical, ideal for monitoring specific areas. Dome cameras, on the other hand, are compact and discreet, making them a popular choice for surveillance. Consider the aesthetics of your property, as well as your specific surveillance needs, when deciding on the type of camera to install.
Assessing the need for additional features (such as night vision, weatherproofing)
Depending on your location and specific requirements, you may need additional features for your outdoor security camera. Night vision is particularly important if you want your camera to capture clear footage in low-light conditions. Weatherproofing is another crucial feature, especially if your camera will be exposed to the elements. Look for cameras that are rated for outdoor use and can withstand extreme temperatures, rain, and dust. Assessing the need for such additional features will help you narrow down your options and ensure your camera can perform effectively in any situation.
Deciding on the camera’s placement and field of view
The placement and field of view of your outdoor security camera are essential in maximizing its effectiveness. Consider the specific areas you want to monitor and the angle at which you want the camera to capture footage. Ideally, the camera should be mounted at a height that provides a wide field of view while remaining discreet. Pay attention to potential obstructions like trees or buildings that may impact the camera’s visibility. Additionally, ensure that your camera’s field of view covers all the vulnerable areas you identified earlier. This thorough planning will help you determine the optimal placement for your camera and maximize its surveillance capabilities.
Installing an outdoor security camera involves careful consideration of these factors. By identifying vulnerable areas, choosing the right type of camera, assessing the need for additional features, and deciding on optimal placement and field of view, you can ensure that your outdoor security camera provides the level of protection you desire.
Gathering The Necessary Equipment And Tools
Before you begin the outdoor security camera installation process, it’s crucial to gather all the necessary equipment and tools to ensure a seamless setup. With the right gear in hand, you’ll be well-prepared to tackle the task at hand without any hiccups. Let’s break down the essential items you’ll need to get started:
Outdoor Security Camera
The first item on your list is, of course, the outdoor security camera itself. When selecting a camera, consider factors such as image quality, field of view, night vision capabilities, and weather resistance. Look for cameras that are specifically designed for outdoor use, as they’ll be equipped to withstand various weather conditions.
Mounting Accessories (Brackets, Screws)
Mounting your security camera properly is key to getting the best performance and optimal coverage. To ensure a secure installation, gather the necessary mounting accessories like brackets and screws. These items will allow you to affix the camera to a wall or other suitable surfaces effortlessly. Consider using wall anchors for added stability, particularly if you’re mounting the camera on a surface that might not provide the necessary support.
Power Supply and Cables
To keep your outdoor security camera up and running, you’ll need a reliable power supply. Some cameras can be battery-powered, while others require a direct electrical connection. Ensure you have the appropriate power adapter or battery pack, along with the necessary cables to connect the camera to the power source. It’s always a good idea to have extra cables on hand in case you need to extend the reach or replace a faulty one.
Network Connectivity Options (Ethernet or Wi-Fi)
Next, consider how you’ll connect your security camera to your network for remote viewing and monitoring. You have two primary options: Ethernet or Wi-Fi connection. If you opt for Ethernet, you’ll need an Ethernet cable that runs from your router to the camera. On the other hand, if wireless connectivity is your preference, ensure your camera supports Wi-Fi and gather the necessary details, like your network name and password.
Gathering the necessary equipment and tools is the first step towards a successful outdoor security camera installation. With these essentials in hand, you’ll be ready to move on to the next phase of the process, which involves choosing the ideal location for your camera. Stay tuned for our next blog post on finding the perfect spot to maximize your camera’s effectiveness.
Conducting A Pre-Installation Site Survey
Conducting a Pre-installation Site Survey is a crucial step in ensuring the successful installation of outdoor security cameras. This survey allows you to assess the site and make well-informed decisions about camera placement, power sources, and internet connectivity. By identifying optimal camera locations, checking the availability of power sources and internet connectivity, and assessing potential obstacles or obstructions, you can optimize the effectiveness of your security system. Let’s delve into each of these steps in detail.
Identifying optimal camera locations
When identifying optimal camera locations, consider the areas that require the most surveillance. Is there a specific entrance or vulnerable spot that you want to monitor closely? Look for areas with a high likelihood of criminal activity, such as blind spots or dark corners. By installing cameras in such strategic locations, you can maximize their coverage and deter potential intruders.
Checking the availability of power sources and internet connectivity
Prior to installing your outdoor security cameras, ensure that there are nearby power sources and a stable internet connection. Power sources can include outlets or even solar-powered options if you prefer an eco-friendly solution. Reliable internet connectivity is essential for remote monitoring and accessing footage. Remember to test the connection stability at various camera locations to ensure uninterrupted surveillance.
Assessing potential obstacles or obstructions
Before installing your security cameras, it’s crucial to assess potential obstacles or obstructions that may hinder their field of view. These could include trees, shrubs, or even architectural features. Take note of any necessary adjustments needed to optimize the camera’s viewing angle and ensure unobstructed coverage. Additionally, consider mounting heights to enhance the camera’s field of vision and reduce the risk of tampering.
By conducting a thorough pre-installation site survey, you can maximize the effectiveness of your outdoor security camera system. Identifying optimal camera locations, checking power sources and internet connectivity, and assessing potential obstacles or obstructions will help you make informed decisions during the installation process. This way, you can achieve a comprehensive surveillance system that protects your property and provides peace of mind. Take the necessary time to survey your site, and your security cameras will be positioned to deliver optimal results.
Ensuring Proper Cabling And Connections
Running cables securely and discreetly
One of the most important aspects of installing an outdoor security camera is ensuring that the cables are run securely and discreetly. This not only protects the cables from damage but also prevents them from being easily tampered with or cut by potential intruders. Here’s how you can execute this step:
- Start by identifying the most optimal route for running the cables. This could be along the walls, under eaves, or even underground if necessary.
- Secure the cables using appropriate cable clips or conduit to prevent them from sagging or getting tangled.
- Ensure that the cables are well-hidden and not easily visible. This can be achieved by routing them behind plants, through existing openings, or utilizing cable concealment products.
- Use waterproof cable connectors or outdoor-rated junction boxes to protect the connections from moisture and outdoor elements.
- Finally, label the cables at both ends to make future maintenance and troubleshooting easier.
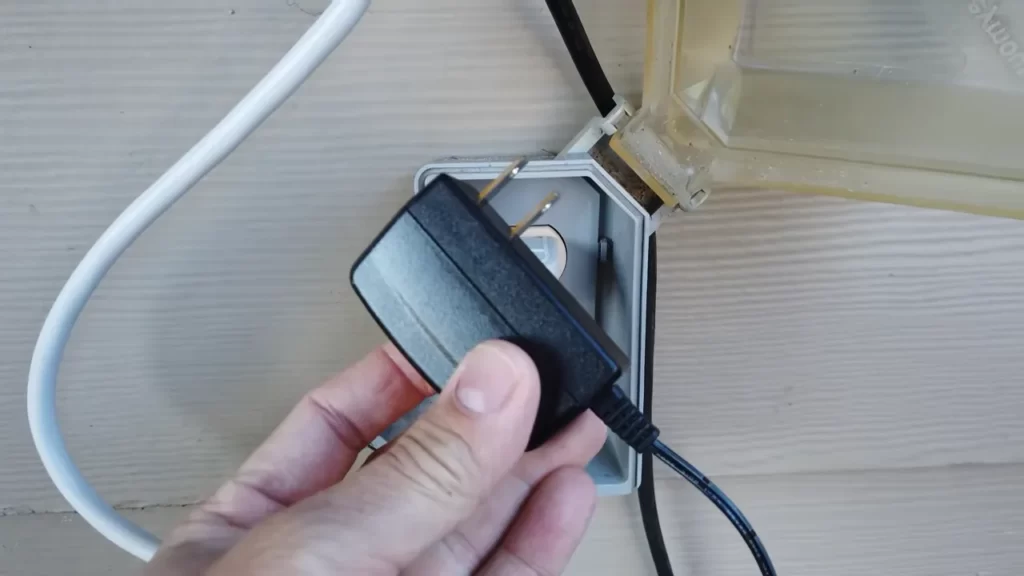
Connecting the camera to a power source and network
Once the cables are securely installed, it’s time to connect the outdoor security camera to a power source and network. Here’s what you need to do:
- Locate a power outlet nearby or use a weatherproof power box to ensure a reliable power supply to the camera.
- Connect the camera’s power cable to the power source, making sure it is firmly plugged in.
- For network connectivity, check if the camera supports both wired and wireless options. If using a wired connection, connect an Ethernet cable between the camera and your router or network switch.
- If opting for a wireless connection, follow the camera’s instruction manual to connect it to your Wi-Fi network. Ensure that the camera is within range of the router and the network key is entered correctly.
- Confirm the connection by checking the camera’s status lights, which should indicate a successful power and network connection.
Testing the camera’s functionality before final installation
Before completing the outdoor security camera installation, it’s crucial to test its functionality to ensure everything is working as expected. This can help identify any issues or adjustments that need to be made. Here’s how you can test the camera:
- Power on the camera and check if the lights are properly illuminated.
- Access the camera’s settings or mobile app to verify that it is connected to the network and accessible remotely.
- Test the camera’s video and audio quality by viewing the live feed on your computer or mobile device.
- Ensure that the camera’s field of view covers the desired area and that the image is clear and sharp.
- Experiment with different camera settings, such as motion detection or night vision, to ensure they are functioning correctly.
- If everything checks out, proceed with the final installation, which may involve mounting the camera securely and adjusting its position for optimal coverage.
By following these steps, you can ensure that the outdoor security camera is properly cabled and connected, giving you peace of mind knowing that your property is well-protected.
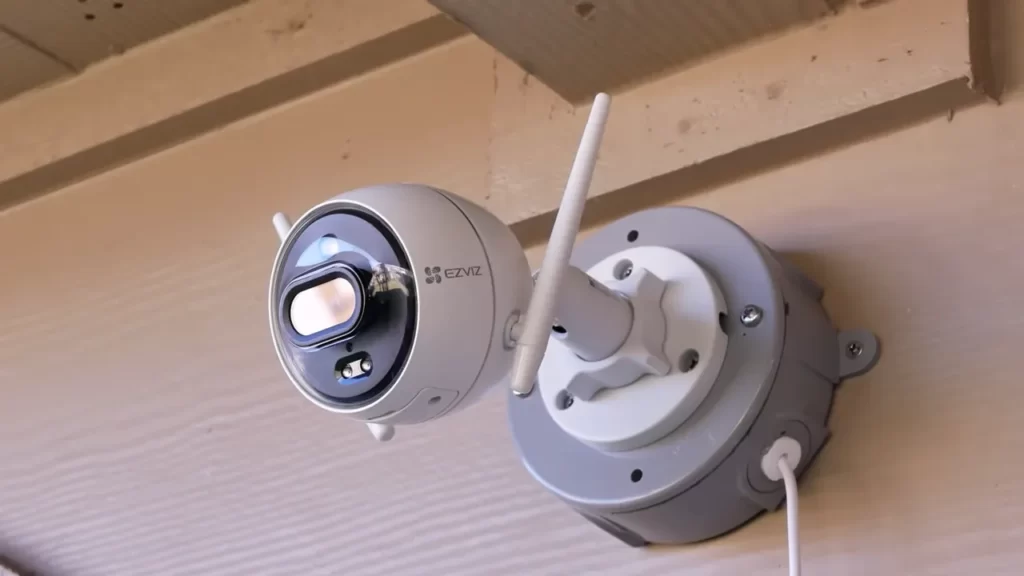
Mounting The Camera
Mounting the outdoor security camera is a crucial step in ensuring that you have a clear and unobstructed view of your surroundings. Choosing the appropriate mounting location, aligning the camera for optimal field of view, and securely attaching it to its mounting bracket are key aspects to consider. Follow the steps below to mount your outdoor security camera successfully.
Choosing the appropriate mounting location
When selecting the perfect spot to mount your outdoor security camera, there are several factors to keep in mind:
- Identify areas of vulnerability: Assess your property and determine the most vulnerable areas that need surveillance. These could include entrances, driveways, or blind spots where intruders may try to gain access.
- Consider the field of view: Look for locations that provide a wide coverage area for the camera. This ensures that you capture as much of the surroundings as possible.
- Avoid obstructions: Make sure there are no obstacles in the camera’s line of sight such as trees, fences, or walls. A clear view will enhance the camera’s effectiveness.
- Protection from weather elements: Ensure that the camera is placed in a spot that is protected from rain, snow, direct sunlight, or extreme temperatures to prevent damage to the device over time.
Aligning the camera for optimal field of view
Once you have selected the mounting location, it’s time to align the camera to achieve the best field of view:
- Use a level: Before finalizing the camera’s position, use a level to ensure that it is perfectly horizontal. This will help achieve balanced and accurate footage.
- Angle adjustment: Adjust the camera’s angle according to the specific area you want to monitor. Tilt or rotate the camera to cover the desired field of view while avoiding unnecessary blind spots.
- Test the view: It is advisable to test the camera’s field of view by monitoring the live feed on a connected device. This allows you to fine-tune the angle and make any necessary adjustments before securing the camera.
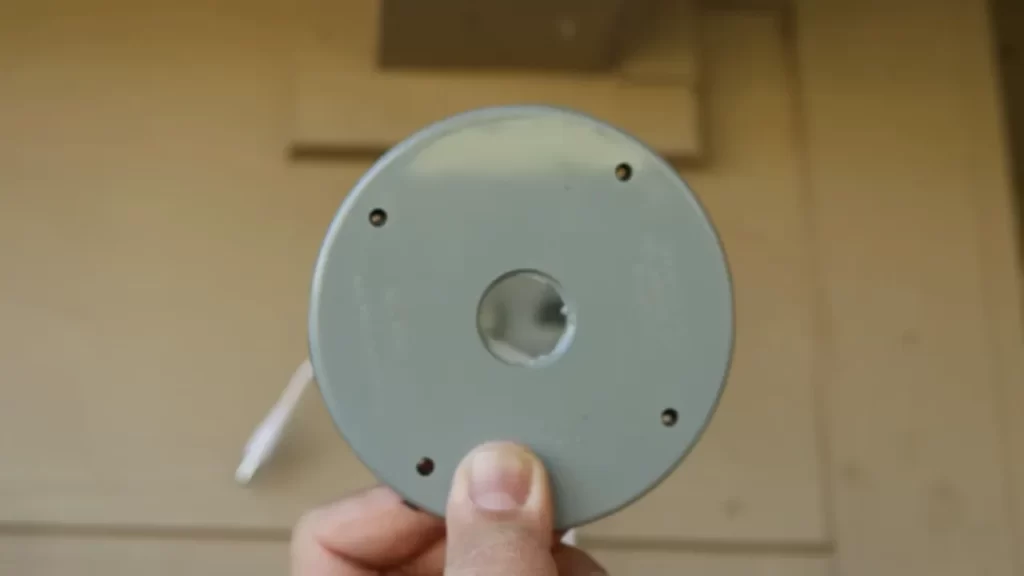
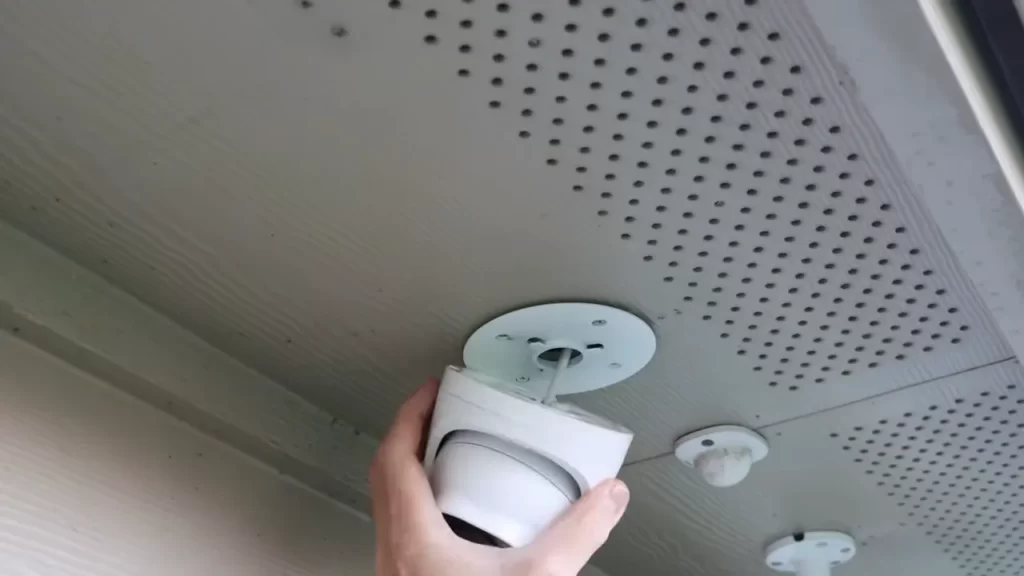
Securing the camera to its mounting bracket
After choosing the appropriate location and ensuring optimal alignment, it’s time to secure the camera to its mounting bracket:
- Attach the mounting bracket: Depending on the type of camera, follow the manufacturer’s instructions to securely attach the mounting bracket to the chosen location. Make sure it is firmly fixed to prevent any potential tampering.
- Attach the camera: Carefully align the camera with the mounting bracket and gently slide it into position. Check that it is securely attached and locked in place to avoid any accidental movements or vibrations.
- Tighten the screws: Use the supplied screws, bolts, or other fastening mechanisms to secure the camera tightly to its mounting bracket. Be cautious not to overtighten and risk damaging the camera or bracket.
- Check stability: Once secured, give the camera a gentle shake or tap to ensure it is firmly in place. It should remain stable and not loosen or shift.
By following these steps, you can successfully mount your outdoor security camera, allowing you to enhance the safety and security of your property.
Establishing Power Source And Connectivity
Installing outdoor security cameras requires careful planning and attention to detail. One of the crucial steps in the installation process is establishing a reliable power source and ensuring a seamless connectivity for your cameras. In this section, we will guide you through the process of connecting the camera to a power supply and configuring the network connection, whether it’s through Ethernet or Wi-Fi.
Connecting the camera to a power supply
Before mounting your outdoor security camera, it’s essential to ensure a stable power source. Follow these steps to connect your camera to a power supply:
- Identify a suitable power outlet nearby that can provide consistent power supply to your camera.
- Ensure that the power adapter provided with your camera is compatible with the power outlet.
- Connect the power adapter to the camera’s power input, typically located at the back or bottom of the camera.
- Plug the power adapter into the power outlet.
- Verify that the camera’s power indicator light turns on, indicating that it is receiving power.
Configuring network connection (Ethernet or Wi-Fi)
Once you have established the power source, the next step is to configure the network connection for your outdoor security camera. Depending on your preference and the available options, you can choose either Ethernet or Wi-Fi connection. Follow the appropriate steps below:
Ethernet Connection
- Locate the Ethernet port on the camera, usually found on the back or bottom.
- Connect an Ethernet cable from the camera’s Ethernet port to a compatible Ethernet port on your router or switch.
Wi-Fi Connection
- Access the camera’s settings through a web browser or the manufacturer’s dedicated mobile app.
- Navigate to the network settings section and select the Wi-Fi option.
- Scan for available Wi-Fi networks and select your desired network.
- Enter your Wi-Fi network password, if prompted.
- Once connected, the camera will automatically obtain an IP address from your network.
Testing the camera’s connectivity and adjusting settings if

necessary
After establishing the power source and network connection, it’s crucial to test the camera’s connectivity to ensure proper operation. Follow these steps to test and adjust the camera’s settings if necessary:
- Access the camera’s live view through the manufacturer’s provided software or app.
- Verify that the camera is capturing clear footage and that the desired field of view is being covered.
- Check if the camera is adequately positioned to minimize obstructions and maximize its effectiveness.
- Adjust any necessary settings, such as image quality, motion detection sensitivity, or recording modes, to suit your specific requirements.
- Ensure that the camera’s firmware is up to date to access the latest features and security improvements.
With these steps, you have successfully established the power source and connectivity for your outdoor security camera. Now you can move on to the next essential aspects of installation, such as mounting the camera securely and configuring additional features to enhance your surveillance system’s functionality.
Fine-Tuning Camera Settings
Adjusting camera angles and focus
Once you have installed the outdoor security camera in your preferred location, it’s essential to ensure optimal camera angles and focus. By doing so, you will maximize the camera’s effectiveness in capturing accurate footage. Here’s how you can fine-tune these settings:
- Start by adjusting the camera angle. Make sure the camera is pointing towards the areas you want to monitor closely. You can rotate the camera left or right until you achieve the desired coverage.
- Next, focus on adjusting the camera’s focus. Most outdoor security cameras come with a focus ring or button that allows you to manually adjust the focus. Use this feature to sharpen the image and enhance clarity.
- Keep in mind that the camera’s angle and focus may need readjustment over time, especially if weather conditions or landscaping changes. Regularly check and fine-tune these settings to maintain optimal performance.
Setting up motion detection and recording options
Motion detection and recording options play a crucial role in outdoor security camera systems. By customizing these settings, you can ensure that your camera captures relevant footage when there is activity in the monitored area. Follow these steps to set up motion detection and recording:
- Access the camera settings through the provided software, mobile app, or web interface. The exact steps may vary depending on your camera model.
- Locate the motion detection settings and enable them. Adjust the sensitivity level according to your preference. Higher sensitivity may capture more motion but may also result in false alarms triggered by irrelevant movement.
- Choose the recording options that suit your needs. You can select continuous recording or only record when motion is detected. Some cameras also offer the option to schedule recording times.
- Consider setting up storage preferences. Most outdoor security cameras offer cloud storage or local storage options. Decide which method works best for you and configure it accordingly.
Enabling remote viewing and notifications
Enabling remote viewing and notifications allows you to stay informed and keep an eye on your property even when you are away. Here’s how to set it up:
- Download and install the camera’s corresponding mobile app on your smartphone or tablet.
- Open the app and follow the on-screen instructions to connect your camera to the app. This usually involves scanning a QR code or entering a unique device identifier.
- Once connected, configure the notification settings to receive alerts on your phone when motion is detected or specific events occur.
- Ensure that you have a stable and reliable internet connection at your monitoring location for seamless remote viewing.
By fine-tuning camera angles, focus, motion detection, and remote viewing settings, you can enhance the effectiveness of your outdoor security camera system, providing you with peace of mind and a vigilant eye on your property.
Ensuring Proper Maintenance And Upkeep
Regularly cleaning the camera lens
Regularly cleaning the camera lens is essential to ensure optimal performance and clear video footage. Over time, dirt, dust, and smudges can accumulate on the lens, affecting the clarity of the images captured. To clean the lens, follow these simple steps:
- Start by turning off the camera to avoid accidental damage.
- Gently remove any loose debris or dust particles from the lens using a soft brush or compressed air.
- Dampen a microfiber cloth with a small amount of lens cleaning solution or distilled water.
- Gently wipe the lens in a circular motion, taking care not to press too hard or scratch the surface.
- Allow the lens to air dry or use a clean, dry microfiber cloth to remove any remaining moisture.
By regularly cleaning the camera lens, you can ensure that your outdoor security camera captures crystal-clear footage, providing you with added peace of mind.
Checking for loose connections or wiring issues
Regularly checking for loose connections or wiring issues is crucial to maintain the functionality of your outdoor security camera. Over time, exposure to weather conditions can cause connections to become loose or damaged, affecting the camera’s performance. Follow these steps to check for any issues:
- Begin by visually inspecting the camera’s wiring and connections.
- Ensure that all cables are properly connected and free from any wear or tear.
- If you notice any loose connections, gently secure them.
- Use a cable tester or multimeter to check for any faulty wiring or connections.
- If you find any issues, such as broken wires or damaged connectors, it is recommended to replace them to maintain the camera’s functionality.
Regularly checking for loose connections and wiring issues can help prolong the lifespan of your outdoor security camera and ensure uninterrupted protection.
Updating firmware and software for maximum security
Updating the firmware and software of your outdoor security camera is vital to maximize its security capabilities and protect against potential vulnerabilities. Manufacturers often release updates to address security flaws and improve performance. To update the firmware and software:
- Visit the manufacturer’s website or access the camera’s admin panel to check for available updates.
- Download the latest firmware or software version compatible with your camera model.
- Follow the manufacturer’s instructions to install the update, which may include transferring the file to an SD card or using a firmware update tool.
- Once the update is installed, restart the camera to apply the changes.
- Regularly check for future updates and install them as recommended.
By keeping the firmware and software of your outdoor security camera up to date, you can enhance its overall security and ensure it stays protected against potential vulnerabilities.
Supplementing Camera Installation With Additional Security Measures
When it comes to ensuring the safety of your premises, installing an outdoor security camera is just the first step. To further enhance the security of your property, it’s important to supplement the camera installation with additional security measures. By combining various security elements, you can create a comprehensive system that deters potential threats and provides you with peace of mind. In this article, we will explore three effective ways to supplement your camera installation: installing lighting fixtures for enhanced visibility, utilizing signage to indicate surveillance presence, and integrating your security camera system with an alarm system.
Installing Lighting Fixtures for Enhanced Visibility
Enhanced visibility is a crucial aspect of effective security. By installing lighting fixtures strategically around your property, you not only ensure that potential offenders are deterred by the illuminated surroundings but also provide your security camera with better footage quality during nighttime. When installing lighting fixtures:
- Place motion-activated lights near entrances, walkways, and other vulnerable areas to surprise and discourage intruders.
- Consider using LED lights for their energy efficiency and longevity.
- Opt for lights with a wide beam angle to cover more areas without compromising on brightness.
Utilizing Signage to Indicate Surveillance Presence
Signage indicating the presence of a surveillance system can act as a powerful deterrent by making potential offenders think twice before approaching your property. When utilizing signage effectively:
- Place signs at the entrance of your property and in visible locations throughout the premises.
- Choose signs that clearly convey the message of surveillance and make it evident that your property is being monitored.
- Ensure the signs are weather-resistant and have a professional appearance.
Integrating Your Security Camera System with an Alarm System
An integrated security system can provide comprehensive protection for your property. By connecting your security camera system with an alarm system:
- Ensure that your camera system is compatible with the alarm system you choose.
- Integrate motion sensors with your camera system to trigger notifications and recordings when movement is detected.
- Link your security camera system with a loud alarm or siren to deter intruders and alert nearby individuals.
By supplementing your camera installation with additional security measures, you create a robust security system that maximizes the effectiveness of your outdoor security camera. Remember to regularly maintain and update your security system to ensure its optimal performance in protecting your property.
Monitoring And Troubleshooting
Monitoring and Troubleshooting
Once you have successfully installed your outdoor security camera, it is important to regularly review the footage to identify any suspicious activities or potential security breaches. This not only helps you stay proactive in your security measures but also allows you to take prompt action in case of any incidents. Additionally, troubleshooting common camera issues is essential to ensure uninterrupted surveillance and reliable performance.
<Regularly reviewing footage for suspicious activities>
One of the key aspects of installing an outdoor security camera is to regularly review the recorded footage. By spending some time each day to review the footage, you can easily identify any suspicious activities or intrusions that might have occurred. To simplify this process, you may consider following these steps:
- Maintain a schedule: Dedicate a specific time each day to review the footage. This ensures consistency and helps you stay disciplined in monitoring your security system.
- Focus on high-risk areas: Pay closer attention to areas that are more vulnerable to potential threats, such as entry points, windows, or any blind spots that may exist.
- Look for unusual behavior: Be on the lookout for any suspicious individuals, unfamiliar vehicles, or any activity that deviates from the norm. This could include people loitering around, attempting to tamper with the camera, or engaging in any suspicious behavior.
- Document and report: If you notice any suspicious activities, document them by capturing screenshots or recording the footage. This will help provide evidence to authorities if needed.
<Troubleshooting common camera issues>
While outdoor security cameras are designed to operate seamlessly, occasional technical issues may arise. By being familiar with common camera issues, you can quickly address and resolve them to ensure uninterrupted surveillance. Here are a few common camera issues you may encounter along with their troubleshooting steps:
| Common Issue | Troubleshooting Steps |
|---|---|
| No Power Supply | 1. Check the power source and ensure it is functioning properly. 2. Verify the power cable connections from the camera to the power source. 3. Replace or repair faulty power cables or connections as needed. |
| Poor Image Quality | 1. Clean the camera lens to remove any dirt or smudges that may be affecting the quality. 2. Adjust camera settings, such as brightness, contrast, or focus, to improve image quality. 3. Ensure the camera is properly positioned, avoiding any obstructions or glare that may impact image clarity. |
| Connection Problems | 1. Check network connectivity and ensure the camera is connected to the internet. 2. Restart both the camera and the router to reestablish the connection. 3. Verify network settings and make any necessary adjustments to improve connectivity. |
<Consulting technical support or professionals when needed>
Despite your best efforts, there may be instances where troubleshooting on your own does not resolve the issues you encounter. In such cases, it is recommended to consult technical support or seek professional assistance. This ensures that the camera issue is addressed by experts who have the knowledge and experience to troubleshoot complex problems. By engaging technical support or professionals, you can have peace of mind knowing that your outdoor security camera will be functioning optimally to protect your property.
Frequently Asked Questions Of How To Install Outdoor Security Camera
Are Outdoor Security Cameras Easy To Install?
Yes, outdoor security cameras are easy to install. They require minimal effort and can be set up quickly without professional help. Just follow the instructions provided, mount them in the desired location, and connect to a power source and Wi-Fi network.
How Do You Install An Outdoor Security Camera Without Drilling?
Install an outdoor security camera without drilling by using adhesive mounts or magnetic mounts. These methods are easy, drill-free solutions that allow you to securely attach the camera to surfaces. Simply apply the adhesive or magnet to the desired spot and attach the camera.
How Do You Power An Outdoor Security Camera?
Power an outdoor security camera by connecting it to an electrical outlet or using power over ethernet (PoE) if supported. Alternatively, you can use a rechargeable battery or solar power for wireless cameras. Always refer to the camera’s manual for specific power requirements and installation instructions.
Where Do You Plug In Outdoor Security Cameras?
Outdoor security cameras are typically plugged into power outlets or connected to a wiring system. Place the camera near a power source and ensure it’s protected from rain, sun, and other harsh elements. Finally, follow the manufacturer’s instructions for step-by-step installation guidance.
How Do I Choose The Right Outdoor Security Camera For My Home?
Choose a camera with high resolution, wide angle lens, night vision, and weatherproof features.
Conclusion
Installing an outdoor security camera is a crucial step towards protecting your property and ensuring the safety of your loved ones. By following these simple steps outlined in this guide, you can easily set up your security camera system. Remember to choose a suitable location, prepare the necessary tools, and follow the manufacturer’s instructions.
By taking these proactive measures, you can enjoy peace of mind knowing that your property is well-protected. Start securing your home today!