To install Ring Doorbell 3, simply follow the manufacturer’s provided instructions for mounting and connecting the device. Now let’s explore the steps involved in installing the Ring Doorbell 3.
The Ring Doorbell 3 is a popular choice for homeowners looking to enhance their home security. This smart doorbell allows you to see and communicate with visitors at your front door, even when you’re not home. Installing the Ring Doorbell 3 is a relatively straightforward process, but it’s important to follow the instructions provided by the manufacturer to ensure proper installation.
In this guide, we will walk you through the steps involved in installing the Ring Doorbell 3, so you can enjoy the peace of mind that comes with enhanced home security.
Getting Started
Installing a Ring Doorbell 3 is an excellent way to enhance the security of your home. Whether you’re a DIY enthusiast or a first-timer, this step-by-step guide will help you successfully install your Ring Doorbell 3. Before you jump into the installation process, it’s crucial to understand the various components of the Ring Doorbell 3 and gather the necessary tools. Let’s dive right in!
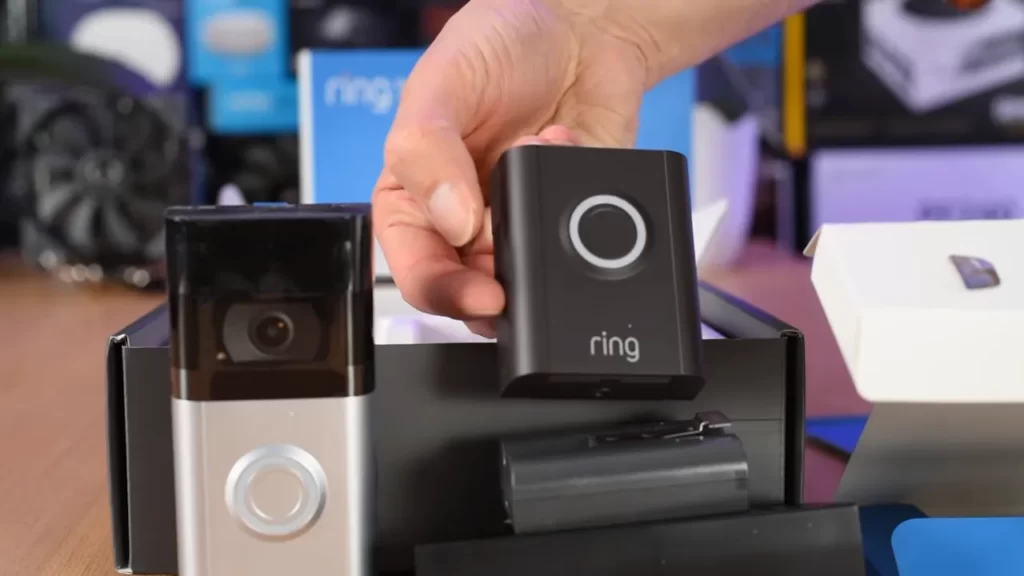
Understanding the components of Ring Doorbell 3
Before you begin the installation, familiarize yourself with the different parts of the Ring Doorbell 3. Having a clear understanding of each component will ease the installation process:
| Components | Description |
|---|---|
| Ring Doorbell 3 | The main unit of the Ring Doorbell 3 that houses the camera, microphone, and speaker. |
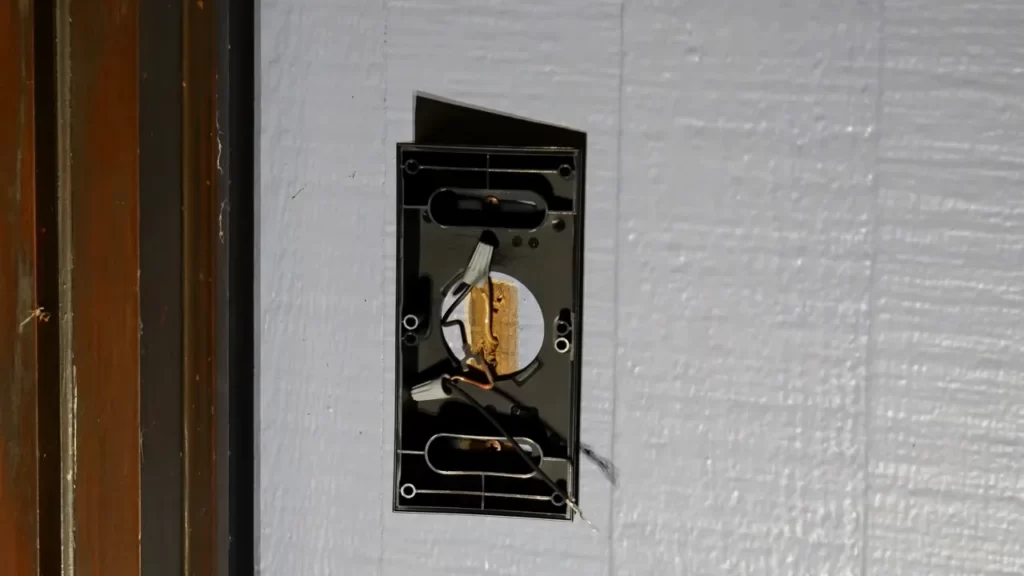
| Mounting Bracket | This bracket securely holds the Ring Doorbell 3 in place on the wall or door frame. |
| Faceplate | The faceplate is interchangeable and comes in various colors to match your home’s exterior. |
| Screwdriver | A small screwdriver is included in the package for easy installation. |
| Screws | These screws are used to attach the mounting bracket to your wall or door frame. |
| Anchors | If needed, use the anchors to provide additional support when mounting the doorbell on certain surfaces. |
| Charging Cable | The charging cable is used to charge the Ring Doorbell 3’s removable battery. |
Preparing the necessary tools for installation
Before you start installing the Ring Doorbell 3, make sure you have the following tools readily available:
- Screwdriver: A small screwdriver is provided in the package, but you can also use your own if you prefer.
- Drill (optional): A drill might be required depending on your mounting surface. It can help make the installation process faster and easier.
- Level: To ensure your doorbell is straight and properly aligned, use a level tool during the installation.
- Tape measure: Use a tape measure to accurately measure the distance between your desired installation location and your Wi-Fi router.
- Pencil: Mark the drilling spots or any other measurements with a pencil.
- Wire strippers (if required): If you are installing a hardwired Ring Doorbell 3, wire strippers will be necessary to prepare the wires for connection.
By having these tools at your disposal, you’ll be well-equipped to complete the installation smoothly and efficiently. Stay tuned for the next steps!
Mounting The Doorbell
Mounting the Ring Doorbell 3 is a crucial step in ensuring that it functions properly and provides the best possible security for your home. In this section, we will guide you through the process of choosing the ideal location for your doorbell, as well as the different mounting options available. We will also discuss how to install the mounting bracket securely to ensure stability and durability.
Choosing the ideal location for your Ring Doorbell 3
Before you begin mounting your Ring Doorbell 3, it’s important to carefully consider the location. The positioning of the doorbell can significantly affect its performance. Here are a few factors to keep in mind:
- Visibility: Make sure that your Ring Doorbell 3 is easily visible to visitors. This will deter potential intruders and ensure that your guests can easily find the doorbell.
- Wi-Fi Signal: Ensure that the doorbell is within range of your Wi-Fi signal. A strong and stable connection is essential for the doorbell to operate effectively.
- Power Outlet: Keep in mind that the doorbell requires a power source. Place it within reach of a power outlet or consider using a wired installation option if available.
- Height: Mount the doorbell at a height that allows it to capture the best view of your entryway. Ideally, it should be placed at chest height for most individuals.
- Obstructions: Avoid mounting the doorbell where it may be obstructed by objects such as plants or decorations. Clear any potential obstructions to ensure a clear view.
Mounting options: wall mount or doorframe mount
Once you have chosen the ideal location for your Ring Doorbell 3, you can decide on the mounting option that works best for your setup. The two main options are wall mount and doorframe mount:
| Wall Mount | Doorframe Mount |
|---|---|
| Pros: | Pros: |
| Easily visible to visitorsProvides a wider field of viewCan be installed at an ideal heightOffers flexibility in positioning | Blends seamlessly with the doorframeMay be more discreetCan be installed in tight spacesProvides a clear view of the entryway |
Whichever option you choose, make sure to follow the manufacturer’s instructions for proper installation.
Installing the mounting bracket securely
Before mounting your Ring Doorbell 3, you need to attach the mounting bracket. Follow these steps to ensure a secure installation:
- Prepare the surface: Clean the mounting surface thoroughly to remove any dirt, dust, or debris that may prevent the bracket from adhering properly.
- Position the bracket: Hold the mounting bracket in the desired location and use a level to ensure it is straight. Mark the screw holes with a pencil or marker for easy reference.
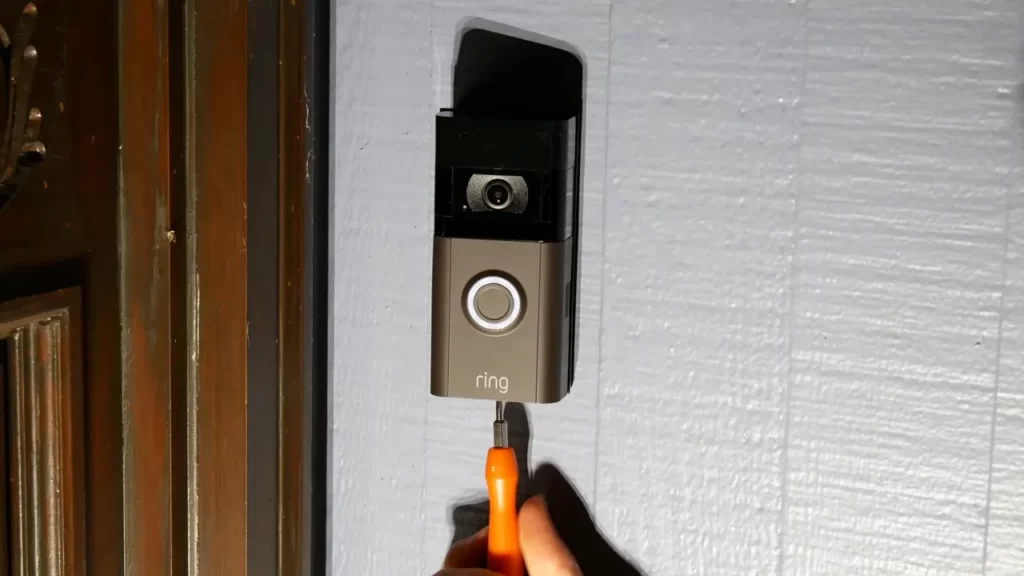
- Secure the bracket: Use the provided screws or anchors to attach the bracket to the mounting surface. Ensure that each screw is tightened securely to maintain stability.
- Attach the doorbell: Once the bracket is securely installed, follow the manufacturer’s instructions to attach the Ring Doorbell 3 to the bracket. Make sure it is firmly in place before proceeding.
By carefully choosing the location, deciding on the mounting option, and securely installing the mounting bracket, you can ensure that your Ring Doorbell 3 is mounted correctly and ready to provide reliable security for your home.
Wiring And Power Supply
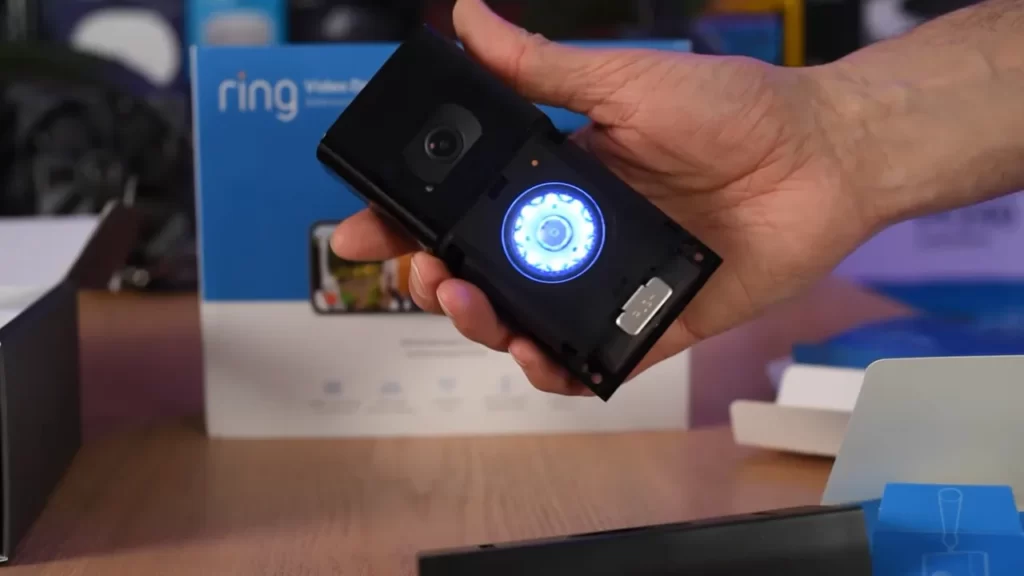
Proper wiring and power supply are crucial when installing the Ring Doorbell 3. In this section, we will guide you through the process of identifying existing doorbell wiring, connecting the Ring Doorbell 3 to the existing wiring, exploring alternative power supply options such as battery or solar, and troubleshooting any potential wiring issues.
Identifying Existing Doorbell Wiring
Before you begin installing the Ring Doorbell 3, it’s important to identify the existing doorbell wiring in your home. This will help you determine if you can connect the doorbell to the existing wiring or if you need to explore alternative power supply options.
If you have an existing doorbell, locate the doorbell chime box inside your home. Typically, it is found near the front door or in a hallway. Open the chime box and inspect the wiring connections. You should see two wires connected to the chime terminals, usually labeled “Front” or “Trans” and “Transformer”. These wires provide power to your doorbell.
Note: If you do not have an existing doorbell or if the existing wiring is not compatible, you can still install the Ring Doorbell 3 using the battery or solar power supply options.
Connecting Ring Doorbell 3 to Existing Wiring
If you have identified compatible doorbell wiring, you can connect the Ring Doorbell 3 to the existing wiring using the following steps:
- Turn off the power to your doorbell system at the circuit breaker.
- Remove your existing doorbell button and disconnect the wires.
- Connect the existing doorbell wires to the corresponding terminals on the back of the Ring Doorbell 3. Follow the labeling on the device to ensure proper connection.
- Secure the Ring Doorbell 3 to your door frame using the provided screws and mounting bracket.
- Restore power to your doorbell system at the circuit breaker.
Alternatives for Power Supply: Battery or Solar
If you do not have compatible doorbell wiring or prefer not to use it, you can power your Ring Doorbell 3 using alternative methods:
- Battery Power: The Ring Doorbell 3 comes with a rechargeable battery pack. Simply charge the battery pack using the provided USB cable and insert it into the doorbell until it clicks into place. This option provides flexibility in terms of doorbell placement and eliminates the need for wiring.
- Solar Power: For a more sustainable option, you can purchase a separate Ring Solar Charger. The charger harnesses the power of the sun to keep your Ring Doorbell 3 charged continuously. It is easy to install and ensures your doorbell remains powered without the need for frequent battery recharging.
Troubleshooting Wiring Issues
If you encounter any issues with the doorbell wiring during installation, here are a few troubleshooting steps to ensure a proper connection:
- Check that the wires are securely connected to the Ring Doorbell 3 and the existing doorbell chime box.
- Make sure the wires are not damaged or frayed.
- Double-check that the power to your doorbell system is turned on at the circuit breaker.
- If you have multiple wires, ensure they are connected to the correct terminals on the Ring Doorbell 3.
- If you continue to experience issues, consult the Ring Doorbell 3 installation guide or contact Ring customer support for further assistance.
By following these steps, you can successfully wire and power your Ring Doorbell 3, ensuring a reliable and convenient doorbell experience.
Setting Up The Device
How to Install Ring Doorbell 3: Setting Up the Device
Welcome to our step-by-step guide on setting up your Ring Doorbell 3! In this section, we will walk you through the process of connecting the device to the Ring app, configuring device settings, and syncing it with other Ring devices. Let’s get started!
Connecting Ring Doorbell 3 to the Ring app
Before you begin, make sure you have downloaded and installed the Ring app on your smartphone or tablet. With the Ring app, you’ll have full control over your Ring Doorbell 3, from accessing live video and audio feeds to adjusting motion detection settings. Follow these simple steps to connect your Ring Doorbell 3:
- Launch the Ring app on your device and log in to your Ring account. If you don’t have an account, you can create one by following the on-screen prompts.
- Tap the “Set Up a Device” button within the app and select “Security Cameras” from the list of available options.
- Scan the QR code located on the back of your Ring Doorbell 3 by positioning your smartphone or tablet’s camera in front of the code.
- Follow the in-app instructions to connect your Ring Doorbell 3 to your home’s Wi-Fi network. Make sure to enter the correct network name and password.
- Once connected, the app will confirm the successful setup of your Ring Doorbell 3.
Congratulations! You have successfully connected your Ring Doorbell 3 to the Ring app. Now let’s move on to configuring device settings and preferences.
Configuring device settings and preferences
With your Ring Doorbell 3 connected to the app, it’s time to personalize your device according to your preferences. Here are some settings you can configure:
| Setting | Description |
|---|---|
| Motion Detection | Adjust motion sensitivity and create custom motion zones to receive alerts only for areas you care about. |
| Video Recording | Choose whether you want to enable continuous video recording or only record when motion is detected. |
| Privacy Zones | Hide specific areas from the camera’s field of view to protect your privacy. |
Explore the Ring app’s settings menu to customize your Ring Doorbell 3 according to your specific needs. Now, let’s move on to syncing your Ring Doorbell 3 with other Ring devices.
Syncing Ring Doorbell 3 with other Ring devices
If you own other Ring devices, such as Ring Spotlight or Floodlight Cams, you can sync them with your Ring Doorbell 3 for enhanced security and convenience. Follow these steps to sync your devices:
- Open the Ring app and navigate to the “Devices” tab.
- Select your Ring Doorbell 3 from the list of devices to access its settings.
- Tap on “Device Settings” and then select “Linked Devices.”
- Choose the Ring devices you want to link with your Ring Doorbell 3. You can select multiple devices if desired.
- Follow the on-screen instructions to complete the sync process.
By syncing your Ring Doorbell 3 with other Ring devices, you’ll be able to create a powerful home security network that works seamlessly together to protect your property. With your setup complete, you can now enjoy the full benefits of your Ring Doorbell 3!
That’s it for setting up your Ring Doorbell 3. We hope this guide has been helpful in getting your device up and running smoothly. If you have any questions or run into any issues, feel free to consult the Ring app’s help section or reach out to Ring’s customer support. Happy monitoring!
Testing And Troubleshooting
Testing and troubleshooting your Ring Doorbell 3 is crucial to ensure that it is functioning properly and to address any issues that may arise. This section will guide you through the different aspects of verifying functionality, adjusting motion detection sensitivity, and resolving common issues and error messages.
Verifying the functionality of Ring Doorbell 3
To verify that your Ring Doorbell 3 is functioning as expected, follow these steps:
- Ensure that the doorbell is securely installed and connected to your home’s Wi-Fi network.
- Download and install the Ring app on your smartphone.
- Launch the app and log in to your Ring account.
- Locate your Ring Doorbell 3 device in the app’s dashboard and select it.
- Check the live view to confirm that you can see and hear the activity in front of your door.
- Test the two-way audio functionality by speaking into your smartphone and listening for the sound through the doorbell’s speaker.
- Trigger a motion event in front of the doorbell to ensure that the motion detection feature is working correctly.
- Verify that you receive push notifications on your smartphone when a motion event is detected.
If any of these steps do not work as expected, refer to the troubleshooting section below for guidance.
Adjusting motion detection sensitivity
The Ring Doorbell 3 comes with customizable motion detection settings to help reduce false alerts or adjust the sensitivity as per your preferences. Follow these steps to adjust the motion detection sensitivity:
- Open the Ring app and navigate to the device settings for your Ring Doorbell 3.
- Select “Motion Settings” within the settings menu.
- Choose “Motion Zones” to define the areas where you want the doorbell’s motion sensor to be active.
- Adjust the motion sensitivity slider to increase or decrease the sensitivity level. A higher sensitivity will detect more motion, while a lower sensitivity will be more selective.
- Test the adjusted settings by triggering a motion event and checking if the doorbell responds according to your desired sensitivity level.
Remember to strike a balance between sensitivity and avoiding unnecessary alerts to ensure optimal performance.
Addressing common issues and error messages
If you encounter any common issues or error messages with your Ring Doorbell 3, refer to the troubleshooting steps below:
| Error Message | Troubleshooting Steps |
|---|---|
| “Offline status” | 1. Ensure a stable Wi-Fi connection. 2. Check if the doorbell has sufficient power. 3. Restart your router and the doorbell. 4. Verify that the doorbell is within the Wi-Fi range. |
| “No notifications received” | 1. Check if you have enabled notifications for the Ring app. 2. Ensure that your smartphone’s notification settings allow Ring notifications. 3. Restart the Ring app or reinstall it. 4. Confirm that the Ring app is up to date. |
| “Poor video quality” | 1. Verify that your Wi-Fi signal strength is strong. 2. Adjust the video quality settings within the Ring app. 3. Clean the camera lens with a soft cloth. 4. Ensure proper positioning of the doorbell for optimal video capture. |
If your issue persists or you encounter a different error message, visit the Ring support website for further assistance.
Enhancing Ring Doorbell 3 Performance
Installing the Ring Doorbell 3 is just the beginning of upgrading your home security. To truly enhance the performance of your device, there are a variety of additional accessories, customization options, and integrations with smart home systems that can take your Ring experience to the next level.
Using Additional Accessories and Features
One of the best ways to enhance the performance of your Ring Doorbell 3 is to leverage additional accessories and features. These add-ons can provide added functionality and convenience to your doorbell. Here are some popular accessories worth considering:
- Ring Chime: The Ring Chime is a wireless speaker that connects to your Ring Doorbell 3 to amplify your alerts throughout your home.
- Solar Charger: By installing a solar charger, you can ensure that your Ring Doorbell 3 always stays powered without the need to regularly recharge the battery.
- Ring Video Doorbell Pro Power Kit: This kit is ideal for users who have insufficient wiring to power their Ring Doorbell 3. It provides a transformer, diode, and resistor to optimize power delivery.
- Ring Protect Subscription: Consider subscribing to the Ring Protect plan to unlock advanced features such as video recording, reviewing, and sharing.
Customizing Motion Detection Zones
To reduce false alarms and focus on what matters most to you, it’s crucial to customize the motion detection zones on your Ring Doorbell 3. By defining specific areas for motion detection, you’ll receive relevant alerts and recordings. Follow these steps to customize your motion detection zones:
- Open the Ring app on your smartphone and select your Ring Doorbell 3.
- Tap on the Device Settings.
- Select Motion Settings and then Motion Zones.
- Drag the sliders on the screen to define the areas you want to include or exclude from motion detection.
- Save your settings and enjoy a more personalized and accurate motion detection experience.
Incorporating Ring Doorbell 3 with Smart Home Systems
If you want to fully integrate your Ring Doorbell 3 with your smart home system, there are a few options available depending on your existing setup:
| Smart Home System | Integration Method |
|---|---|
| Amazon Alexa | Enable the Ring skill in the Alexa app and link it to your Ring account. Once set up, you can use voice commands to control your Ring Doorbell 3 and view live feeds on Alexa-enabled devices. |
| Google Assistant | Download the Ring app on your smartphone and link it to your Google Assistant. With this integration, you can use voice commands to control your Ring Doorbell 3 and receive alerts on compatible devices. |
| Apple HomeKit | Ring Doorbell 3 does not have direct HomeKit compatibility. However, you can use third-party devices like Homebridge or Home Assistant to bridge the gap and control your Ring Doorbell 3 through the Home app. |
By incorporating your Ring Doorbell 3 with your smart home system, you can enjoy seamless automation and control over your home security system.
Enhancing the performance of your Ring Doorbell 3 involves utilizing additional accessories, customizing motion detection zones, and integrating with smart home systems. By following these tips, you can maximize the potential of your Ring Doorbell 3 and ensure a secure and convenient home environment.
Maintaining And Updating
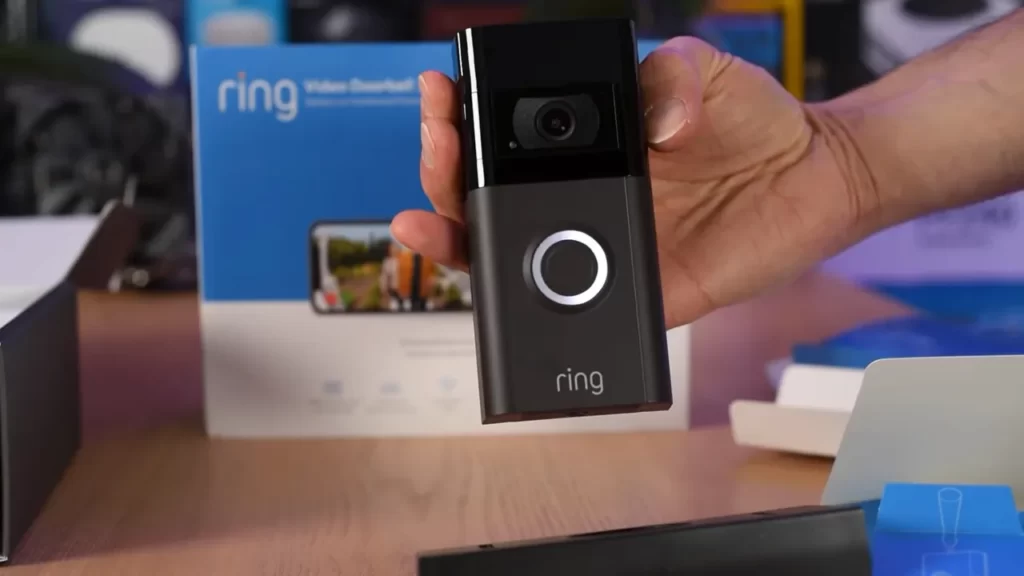
Maintaining and updating your Ring Doorbell 3 is essential for ensuring its optimal performance and longevity. In this section, we will discuss the key steps to follow for cleaning and maintaining the doorbell as well as updating its firmware and software. By regularly performing these tasks, you can enhance the functionality and reliability of your Ring Doorbell 3.
Cleaning and maintaining Ring Doorbell 3
To keep your Ring Doorbell 3 in pristine condition, it’s important to clean and maintain it regularly. Here are some simple yet effective tips to help you maintain your doorbell:
- Use a soft, lint-free cloth to gently wipe the camera lens, motion sensors, and the surface of the doorbell. Avoid using abrasive materials or harsh chemicals that can damage the device.
- Inspect the doorbell for any dust, dirt, or debris that may accumulate around the edges. Use a soft brush or compressed air to remove any obstructions.
- Check the mounting screws and ensure they are tightly secured. If any screws are loose, tighten them using a suitable screwdriver.
- Monitor the battery level of your doorbell regularly using the Ring app. If the battery is running low, it’s advisable to replace it with a fully charged one to ensure uninterrupted operation.
- Regularly clean the surrounding area of the doorbell, including the door frame and entryway, to maintain a clear line of sight for the camera and motion sensors.
Updating firmware and software for optimal performance
Updating the firmware and software of your Ring Doorbell 3 is crucial for enhancing its performance and accessing the latest features. Follow these steps to ensure your doorbell is always up to date:
- Ensure your Ring Doorbell 3 is connected to a stable Wi-Fi network.
- Open the Ring app on your smartphone or tablet, and navigate to the device settings.
- Under the “Device Settings” menu, look for the “Software Update” or “Firmware Update” option.
- If an update is available, click on the appropriate option to initiate the installation process.
- Allow the update to download and install. It may take a few minutes, so ensure your device is connected to a power source during this process.
- After the update is complete, restart your Ring Doorbell 3.
- Verify that the firmware and software have been updated by checking the device settings in the Ring app.
By regularly cleaning and maintaining your Ring Doorbell 3, as well as keeping its firmware and software up to date, you can ensure its optimal performance and longevity. These simple steps will help you make the most of your smart doorbell and provide you with peace of mind when it comes to the security of your home.
Additional Tips And Recommendations
Installing the Ring Doorbell 3 is a great step towards enhancing the security of your home. However, to make the most out of this smart doorbell, there are some additional tips and recommendations that you should consider. In this section, we will discuss how to maximize the security and privacy features, extend the Wi-Fi coverage for better connectivity, and troubleshoot advanced issues with customer support.
Maximizing security and privacy features
When it comes to securing your home, the Ring Doorbell 3 offers a range of features that you can take advantage of. To maximize the security and privacy of your doorbell, follow these recommendations:
- Enable Two-Factor Authentication: This adds an extra layer of security by requiring a verification code in addition to your password whenever you log in to the Ring app.
- Create Customized Motion Zones: Fine-tuning the motion zones will help reduce false alerts and focus on the areas you want to monitor. Identify the high-traffic or sensitive areas and adjust the motion detection accordingly.
- Adjust Motion Sensitivity: Experiment with the sensitivity settings to find the right balance. Too low, and you might miss important events, while a too high sensitivity level might result in excessive notifications.
- Utilize Privacy Zones: If there are areas you don’t want the Ring Doorbell 3 to capture, such as neighboring properties, you can set up privacy zones to block those specific areas from the camera’s view.
- Regularly Update Firmware: Keeping your Ring Doorbell 3’s firmware up to date ensures that you have the latest security features and patches to protect your device.
Extending Wi-Fi coverage for better connectivity
Having a stable Wi-Fi connection is crucial to the proper functioning of your Ring Doorbell 3. Here are some tips to extend your Wi-Fi coverage for better connectivity:
- Optimal Placement: Position your Wi-Fi router in a central location, away from obstructions and interference, to ensure the strongest signal possible.
- Use a Wi-Fi Range Extender: If your Wi-Fi signal is weak near the installation location of the Ring Doorbell 3, consider using a Wi-Fi range extender to amplify the signal and improve coverage.
- Upgrade to a Mesh Wi-Fi System: A mesh Wi-Fi system creates a network of interconnected devices, providing seamless coverage throughout your home. This can eliminate dead zones and provide a stronger signal for your Ring Doorbell 3.
Troubleshooting advanced issues with customer support
Despite the easy installation process of the Ring Doorbell 3, there might be times when you encounter advanced issues or need additional assistance. In such cases, the Ring customer support team is dedicated to helping you resolve any problems you may face. Follow these steps to troubleshoot advanced issues:
- Document the Issue: Take note of any error messages or specific problems you are experiencing with your Ring Doorbell 3. This information will help customer support diagnose the issue more effectively.
- Contact Ring Support: Reach out to Ring customer support through their website or by phone. Provide them with the details of the problem and any relevant troubleshooting steps you have already taken.
- Follow Technical Guidance: Customer support may provide you with specific instructions or troubleshooting steps to address the problem. Follow their guidance closely to resolve the issue as efficiently as possible.
- Provide Feedback: Once the issue has been resolved, it’s helpful to provide feedback to Ring customer support regarding their assistance. This can help them improve their service and assist other customers more effectively in the future.
By maximizing the security and privacy features, extending Wi-Fi coverage, and seeking customer support when needed, you can ensure a smooth and efficient experience with your Ring Doorbell 3.
Frequently Asked Questions Of How To Install Ring Doorbell 3
Does The Ring Video Doorbell 3 Need To Be Wired?
No, the Ring Video Doorbell 3 does not need to be wired. It can be powered by a rechargeable battery.
Can You Install Ring Doorbell 3 Without Existing Doorbell?
Yes, the Ring Doorbell 3 can be installed without an existing doorbell.
How To Install Ring Doorbell 3 Without Wires?
To install Ring Doorbell 3 without wires, follow these steps: First, charge the doorbell using the provided USB cable. Then, download the Ring app and create an account. Next, follow the app’s instructions to connect the doorbell to your home’s Wi-Fi network.
Finally, mount the doorbell using the provided tools.
How Long Does It Take To Install Ring Doorbell 3?
Ring Doorbell 3 installation usually takes around 15-30 minutes. It’s a simple process that involves attaching the doorbell to your door or wall, connecting it to your Wi-Fi network, and setting up the app. Just follow the step-by-step instructions provided in the manual for a smooth installation experience.
How Does The Ring Doorbell 3 Work?
The Ring Doorbell 3 uses Wi-Fi to connect to your smartphone, allowing you to see and interact with visitors from anywhere.
Conclusion
Installing the Ring Doorbell 3 is a simple process that enhances home security. With its user-friendly interface and clear step-by-step instructions, anyone can successfully install this smart doorbell. By following the guide in this blog post, you can enjoy the convenience and peace of mind that the Ring Doorbell 3 provides.
Keep your home safe, stay connected, and never miss a visitor again. Upgrade your home security today!
