o install a Ring Wired Floodlight Camera, follow these steps: Mount the camera base, connect the wires, attach the floodlights, and activate the device through the Ring app. Installing a Ring Wired Floodlight Camera is a simple process that can greatly enhance the security of your property.
This innovative device combines the functionality of a traditional floodlight with the added benefit of a high-definition camera, allowing you to monitor your surroundings remotely. In this guide, we will provide you with step-by-step instructions on how to install a Ring Wired Floodlight Camera successfully.
By following these steps, you can enjoy the peace of mind that comes with increased security and surveillance for your home or business. Let’s get started!
Why Install A Ring Wired Floodlight Camera?
Installing a Ring Wired Floodlight Camera is a smart and effective way to enhance the security of your home. With increasing concerns about safety, it is essential to invest in reliable surveillance tools that provide round-the-clock protection. A Ring Wired Floodlight Camera combines advanced technology with robust features to ensure your family’s safety and peace of mind.
Increase home security with a powerful surveillance tool
When it comes to securing your home, a Ring Wired Floodlight Camera is an indispensable tool. With its powerful surveillance capabilities, this innovative camera acts as an extra set of eyes, constantly monitoring your surroundings. Whether you are at home or away, you can rest assured that your property is protected.
The Ring Wired Floodlight Camera provides high-definition video footage, capturing every detail with clarity. Its wide-angle lens ensures comprehensive coverage, allowing you to monitor multiple areas from a single device. With customizable motion zones, you can prioritize certain areas, such as entry points or vulnerable spots, ensuring that any unusual activity is promptly detected.
In addition to video surveillance, the Ring Wired Floodlight Camera combines a built-in spotlight, illuminating your property when motion is detected. This not only helps deter potential intruders but also provides enhanced visibility, both for your security and convenience.
Deter potential intruders and provide peace of mind
A Ring Wired Floodlight Camera acts as a powerful deterrent for potential intruders. The presence of a visible camera and bright floodlights alone can make your property less appealing to burglars and trespassers. The idea of being captured on camera and illuminated in bright light is often enough to make criminals think twice before attempting any illegal activities.
Moreover, the Ring Wired Floodlight Camera integrates seamlessly with your smartphone, allowing you to receive instant notifications whenever motion is detected. Whether you are relaxing in your living room or traveling abroad, you can monitor your property in real-time. This feature brings peace of mind, knowing that you are always connected and able to verify and respond to any suspicious activity immediately.
In conclusion, a Ring Wired Floodlight Camera is an essential security tool that greatly enhances the safety of your home. With its advanced surveillance capabilities, powerful deterrent features, and effortless connectivity, you can rest easy knowing that you have taken proactive steps to protect your loved ones and your property.
Understanding The Ring Wired Floodlight Camera
Installing a reliable security camera system is crucial for enhancing the safety and security of your property. The Ring Wired Floodlight Camera is a popular choice for homeowners who want to keep a close eye on their surroundings. With its innovative features and advanced technology, this surveillance camera offers a wide range of benefits. Let’s take a closer look at the features and specifications of the Ring Wired Floodlight Camera and explore how it differs from other security camera options in the market.
Features and Specifications of the Ring Wired Floodlight Camera
The Ring Wired Floodlight Camera comes equipped with a host of impressive features that make it a top choice for security-conscious individuals. Some of its key features include:
- High-Quality Video: Capture clear and detailed footage with the Ring Wired Floodlight Camera’s HD video capabilities, allowing you to easily identify any potential threats.
- Two-Way Audio: Communicate with people near the camera through the built-in speakers and microphone, providing an added layer of convenience and security.
- Advanced Motion Detection: The camera’s motion sensors are designed to detect even the slightest movement, triggering instant alerts to your smartphone and allowing you to stay informed about any unexpected activity.
- Customizable Settings: Tailor the camera’s settings according to your specific needs and preferences, including the sensitivity of the motion sensors and the scheduling of alerts.
- Remote Access and Control: Access your camera feed from anywhere at any time using the Ring app on your smartphone or tablet, ensuring you can monitor your property no matter where you are.
- Weather Resistance: The Ring Wired Floodlight Camera is designed to withstand various weather conditions, ensuring its durability and reliability even in harsh outdoor environments.
How it Differs from Other Security Camera Options in the Market
What sets the Ring Wired Floodlight Camera apart from other security camera options in the market is its unique combination of features and functionalities. Unlike traditional security cameras that rely solely on video recording, the Ring Wired Floodlight Camera offers the added benefits of built-in floodlights and two-way audio communication. This comprehensive approach to security allows you to not only capture clear video evidence but also deter potential intruders with bright floodlights and interact with visitors through the audio system.
Furthermore, the convenience of remote access and control via the Ring app sets this camera apart from its competitors. With just a few taps on your smartphone, you can view live footage, receive instant alerts, and customize settings to suit your needs. This seamless integration of technology makes the Ring Wired Floodlight Camera an ideal choice for homeowners who prioritize convenience and reliability.
In conclusion, the Ring Wired Floodlight Camera offers an impressive array of features and specifications that make it a standout choice in the security camera market. Whether it’s the high-quality video, advanced motion detection, customizable settings, or remote access capabilities, this camera is designed to provide you with peace of mind and enhanced security for your property.
Preparing For Installation
Before you begin installing your Ring Wired Floodlight Camera, it’s important to properly prepare for the installation process. This involves gathering the necessary tools and equipment, choosing the ideal location for the floodlight camera, and checking the compatibility of your existing wiring system. By following these steps, you can ensure a smooth and successful installation.
Gathering the necessary tools and equipment
In order to install your Ring Wired Floodlight Camera, you will need to gather a few essential tools and equipment. Having these on hand will not only make the installation process easier but will also help you avoid any unnecessary delays. Here are the tools and equipment you will need:
| Tools and Equipment |
|---|
| Screwdriver (Phillips-head) |
| Drill and drill bits |
| Ladder |
| Wire strippers |
| Electrical tape |
| Wire nuts |
| Electrical tester |
Choosing the ideal location for the floodlight camera
When it comes to choosing the ideal location for your Ring Wired Floodlight Camera, there are a few factors to consider. First and foremost, you’ll want to select an area that provides optimal coverage of the desired surveillance area. This could be the front door, backyard, or any other area you wish to monitor.
Additionally, the chosen location should have access to a power source and a strong Wi-Fi signal. This will ensure that your floodlight camera functions properly and provides reliable footage. It’s also important to consider the height and angle at which the camera will be mounted to capture the best view of the area.
Checking the compatibility of your existing wiring system
Prior to installation, it’s crucial to check the compatibility of your existing wiring system. The Ring Wired Floodlight Camera requires a standard electrical box and requires that your home has existing wiring connected to a switch. If you are unsure about the compatibility of your wiring system, it’s recommended to consult with a qualified electrician.
Ensure that the wiring system can handle the electrical load of the floodlight camera and that it meets the power requirements specified by the manufacturer. This will help prevent any potential electrical issues and ensure a safe and efficient installation.
By following these steps and properly preparing for the installation of your Ring Wired Floodlight Camera, you can ensure a successful and hassle-free setup process. Now that you are ready to begin the installation, let’s move on to the next step.
Setting Up The Wiring System
Installing the Ring Wired Floodlight Camera requires a careful and methodical approach to ensure a safe and efficient setup. One of the crucial steps in this process is setting up the wiring system. By following the steps below, you can ensure a seamless installation of your Ring Wired Floodlight Camera.
Turning off the power supply to the designated area
To begin, it is essential to turn off the power supply to the area where the floodlight camera will be installed. This step will prevent any accidental electrical shocks and ensure your safety throughout the installation process. Make sure to locate the circuit breaker or fuse box and shut off the power supply to the designated area.
Safely removing the existing light fixture, if applicable
If you already have a light fixture installed in the area, you will need to remove it before proceeding with the installation of the Ring Wired Floodlight Camera. To do this, follow these steps:
- Turn off the power supply to the designated area before starting any work.
- Use a ladder to reach the light fixture, ensuring it is secure and stable.
- Remove the screws or bolts securing the existing light fixture to the mounting bracket.
- Carefully disconnect the electrical wires connected to the light fixture. Take note of the wire connections to make it easier when connecting the new wiring system.
- Once the old light fixture is detached, safely lower it down and set it aside for disposal or recycling.
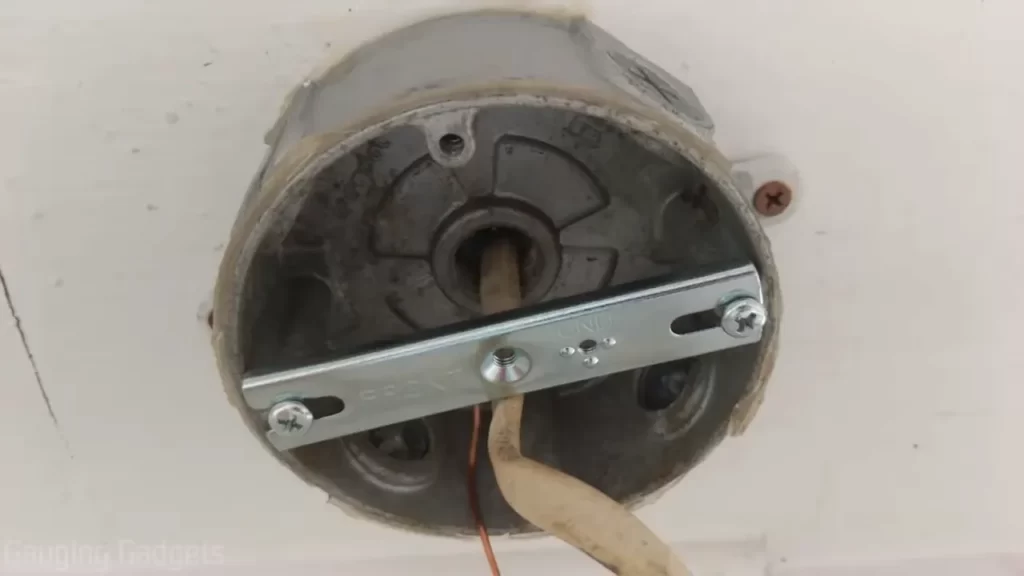
Installing a junction box, if needed, for proper wiring
connections
In some cases, you may need to install a junction box to ensure proper wiring connections for your Ring Wired Floodlight Camera. A junction box serves as a central hub for connecting multiple wires securely. Follow these steps for installing a junction box:
- Choose a suitable location for the junction box near the installation area of the floodlight camera.
- Securely mount the junction box using screws or other appropriate fasteners.
- Carefully run the electrical wires through the knockout holes in the junction box.
- Strip the insulation from the ends of the wires to expose the copper conductors.
- Connect the corresponding wires using wire nuts or other approved connectors, ensuring a tight and secure connection.
- Place the connected wires inside the junction box.
- Attach the junction box cover to protect the wires and ensure a clean and organized setup.
With the wiring system properly set up, you are now ready to proceed with the installation of your Ring Wired Floodlight Camera. Be sure to consult the manufacturer’s instructions and follow the recommended steps for a successful installation process.
Mounting The Floodlight Camera
One of the most crucial steps in installing a Ring Wired Floodlight Camera is properly mounting it. When done correctly, this ensures that the camera is securely positioned to cover the desired area and capture any suspicious activity. In this section, we will guide you through the process of mounting the floodlight camera on the desired surface.
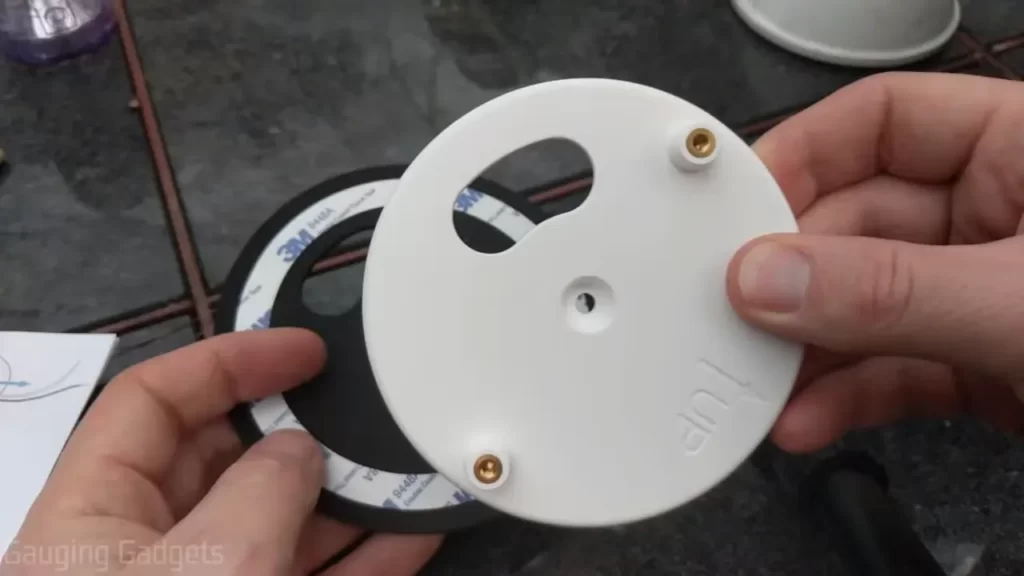
Positioning the mounting bracket securely on the desired surface
The first step in mounting the floodlight camera is to position the mounting bracket securely on the desired surface. To do this, follow these steps:
- Locate a suitable location on your wall or ceiling that provides an optimal view of the area you want to monitor.
- Using a drill, carefully mark the spots where the bracket will be screwed into place.
- On the marked spots, drill holes that are appropriate for the screws provided with the floodlight camera.
- Align the mounting bracket with the drilled holes and insert the screws into place.
- Tighten the screws using a screwdriver or drill, ensuring that the bracket is securely attached to the surface.
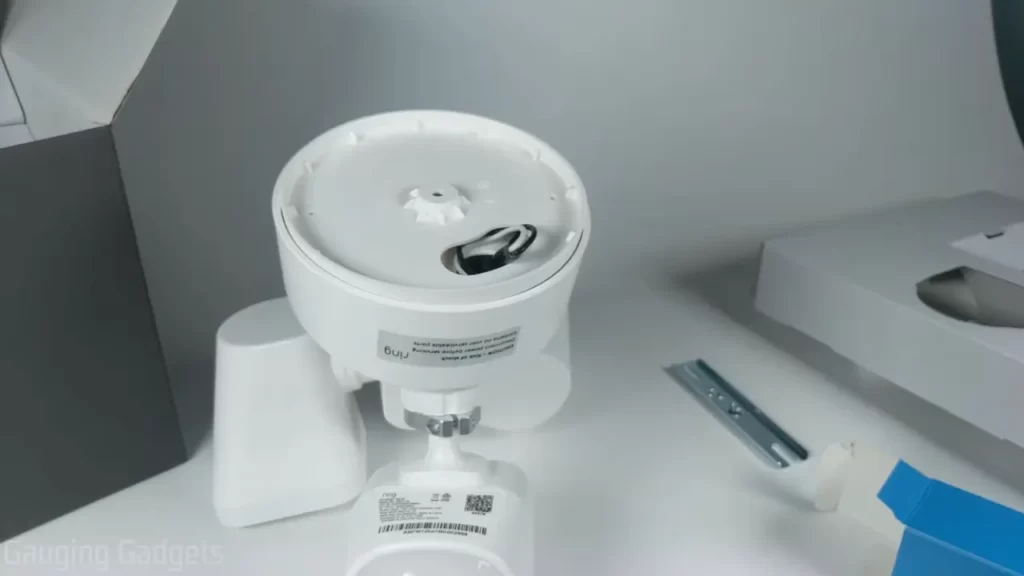
Attaching the floodlight camera to the mounting bracket
After positioning the mounting bracket, it’s time to attach the floodlight camera. Follow these steps:
- Take the floodlight camera and align it with the mounting bracket.
- Gently slide the camera onto the bracket until it clicks into place.
- Ensure that the camera is securely attached to the bracket by giving it a gentle tug.
- If needed, tighten any additional screws provided with the floodlight camera to further secure the attachment.
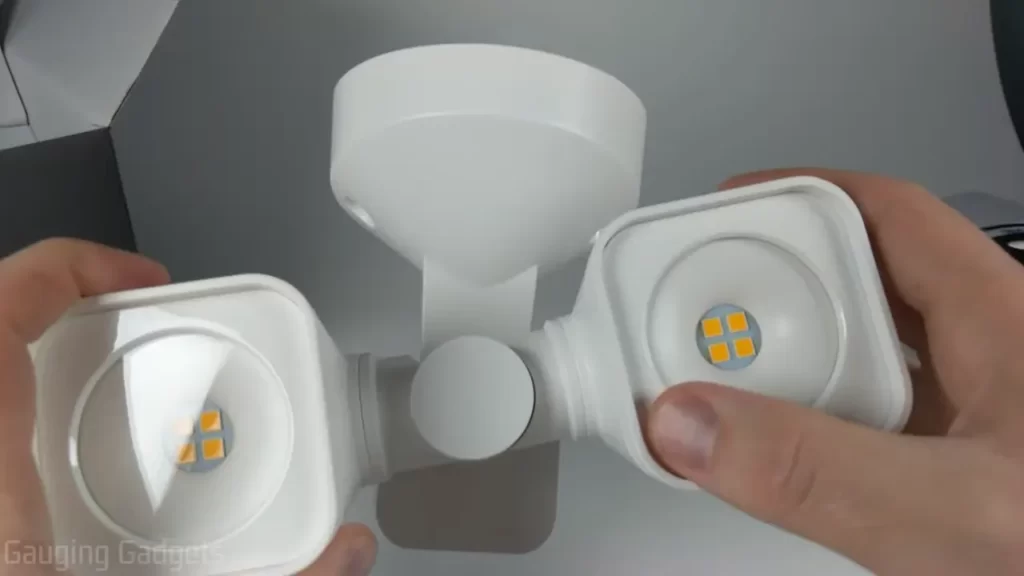
Adjusting the angle and positioning for optimal coverage
Now that the floodlight camera is attached to the mounting bracket, it’s essential to adjust the angle and positioning for optimal coverage. Here’s how:
- Loosen the adjustment screws on the mounting bracket, allowing you to adjust the angle and position of the camera.
- Manually adjust the camera’s position until it covers the desired area adequately.
- Once you have the ideal angle, tighten the adjustment screws to lock the camera in place securely.
By following these steps, you can effectively mount your Ring Wired Floodlight Camera for optimal coverage and enhanced security. Make sure to test the camera’s visibility and adjust if necessary before completing the installation process.
Connecting The Ring Floodlight Camera
Connecting the Ring Floodlight Camera When it comes to securing your home, having the right security equipment is essential. The Ring Wired Floodlight Camera is a powerful and effective home security solution that not only illuminates the surroundings but also provides video surveillance. Installing the Ring Floodlight Camera might seem complicated, but with the right guidance, it can be a straightforward process. In this article, we will guide you through the process of connecting the Ring Floodlight Camera. We will cover understanding the necessary connections and cables, establishing a stable power supply for the camera, and connecting the camera to your home Wi-Fi network. Understanding the Necessary Connections and Cables Before connecting the Ring Floodlight Camera, it is crucial to understand the necessary connections and cables involved. The Ring Floodlight Camera requires both power and internet connectivity to function properly. Here are the essential connections and cables you need to consider: 1. Power source: The Ring Floodlight Camera is wired, meaning it requires a stable power supply. You will need to connect the camera to an existing junction box or have a professional electrician install one for you. Ensure that the power source is compatible with the camera’s voltage requirements. 2. Ethernet cable: To establish a wired internet connection, you will need an Ethernet cable. This cable will connect the Ring Floodlight Camera to your home network router. Ensure that the Ethernet cable is long enough to reach the camera’s location. Establishing a Stable Power Supply for the Camera The next step in connecting the Ring Floodlight Camera is establishing a stable power supply. Follow these steps to ensure a secure and reliable power connection: 1. Turn off the power: Before working with any electrical connections, it is essential to turn off the power supply from the circuit breaker. This step ensures your safety throughout the installation process. 2. Connect the camera to the junction box: If you have an existing junction box, connect the Ring Floodlight Camera’s power cables to the designated terminals in the box. Make sure to follow the manufacturer’s instructions for proper wiring. 3. Secure the connections: Once the camera is wired to the junction box, check the connections to ensure they are secure. Loose connections can lead to power interruptions or damage to the camera. Connecting the Camera to Your Home Wi-Fi Network Finally, it’s time to connect the Ring Floodlight Camera to your home Wi-Fi network for remote access and monitoring. Follow these steps to establish the connection: 1. Download the Ring app: To connect the camera to your home Wi-Fi network, download and install the Ring app on your smartphone. The app is available for both iOS and Android devices. 2. Create a Ring account: Open the Ring app and create a new account if you don’t already have one. The account will be used to manage and control your Ring Floodlight Camera. 3. Follow the on-screen instructions: The Ring app will guide you through the setup process. Follow the on-screen instructions to pair the camera with your Wi-Fi network. Make sure to enter the correct Wi-Fi credentials to establish a successful connection. 4. Test the connection: Once the camera is connected to your home Wi-Fi network, test the connection by accessing the live video feed through the Ring app. This step ensures that the camera is functioning correctly and is accessible remotely. In conclusion, connecting the Ring Floodlight Camera requires understanding the necessary connections and cables, establishing a stable power supply, and connecting the camera to your home Wi-Fi network. By following the steps outlined in this article, you can ensure a smooth installation process and enjoy the enhanced security and peace of mind provided by the Ring Floodlight Camera.
Configuring The Camera Settings
After successfully installing your Ring Wired Floodlight Camera, it’s time to configure the camera settings to suit your specific needs. Customizing the settings allows you to have full control over the functionality and performance of your camera. In this section, we will guide you through the process of configuring the camera settings, ensuring that you get the most out of your Ring Wired Floodlight Camera.
1. Downloading the Ring app and creating an account
In order to configure the camera settings, you first need to download the Ring app and create an account. The Ring app gives you access to all the features and settings of your Ring Wired Floodlight Camera, right at your fingertips.
To get started, follow these simple steps:
- Visit the App Store or Google Play Store on your smartphone.
- Search for “Ring” in the search bar.
- Tap on the “Download” or “Install” button to begin the installation process.
- Once the app is installed, open it and tap on the “Create Account” button to sign up.
- Follow the on-screen instructions to create your account, providing the required information.
2. Pairing the floodlight camera with the app
Now that you have the Ring app installed and your account created, it’s time to pair the floodlight camera with the app. This will allow you to access and control the camera through the app.
Follow these steps to pair the floodlight camera with the app:
- Open the Ring app on your smartphone.
- Tap on the “Set up a device” option.
- Select “Security Cams” from the list of device types.
- Scan the QR code located on the back of the floodlight camera using your smartphone’s camera.
- Follow the on-screen instructions to complete the pairing process.
3. Exploring the various settings and customization options
Now that your camera is paired with the app, it’s time to explore the various settings and customization options available. This will allow you to tailor the camera’s functionality to your specific preferences.
Here are some of the key settings and customization options you can explore:
| Setting | Description |
|---|---|
| Motion Detection | Adjust the sensitivity and range of motion detection to suit your needs. This ensures that the camera only captures relevant activity. |
| Lighting Controls | Control the brightness and duration of the floodlights. This allows you to customize the lighting to your liking. |
| Camera Modes | Choose between different camera modes, such as Live View or Snapshot Capture. Each mode offers unique functionalities. |
| Alert Notifications | Configure the app to send you instant alerts when the camera detects motion or activates the floodlights. |
By exploring and adjusting these settings, you can maximize the effectiveness of your Ring Wired Floodlight Camera and ensure it meets your specific needs.
With the camera settings properly configured, you can now enjoy the peace of mind and security that your Ring Wired Floodlight Camera provides.
Testing And Troubleshooting
After successfully installing the Ring Wired Floodlight Camera, it is crucial to ensure that everything is working as intended. This includes verifying the camera’s functionality and video quality, checking for any potential issues or connectivity problems, and troubleshooting common installation and setup challenges. By following these steps, you can guarantee a seamless experience with your new security device.
Verifying the camera’s functionality and video quality
Once the installation process is complete, the first step is to verify that the camera is functioning correctly and providing high-quality video footage. To do this, follow these steps:
- Ensure that the power supply to the camera is uninterrupted.
- Access the Ring app on your smartphone or tablet. If you haven’t already, download and install the app from the App Store or Google Play Store.
- Open the app and log in with your Ring account details. If you don’t have an account yet, you will need to create one.
- Locate the Ring Wired Floodlight Camera in the app and tap on it to access its settings.
- Navigate to the Live View option and tap on it to open the live video feed.
- Observe the video feed to ensure that the camera is capturing clear and crisp images.
- If you notice any issues with the video quality, such as blurry or pixelated images, you may need to adjust the camera’s positioning or check for any obstructions.
Checking for any potential issues or connectivity problems
In addition to verifying the camera’s functionality, it is crucial to check for any potential issues or connectivity problems that may hinder its performance. Follow these steps to ensure a smooth and uninterrupted operation:
- Ensure that your Wi-Fi signal reaches the location of the Ring Wired Floodlight Camera. Weak or unstable Wi-Fi signals can lead to connectivity issues.
- Check if there are any physical obstructions, such as walls or structures, blocking the Wi-Fi signal.
- If needed, move your Wi-Fi router or add a Wi-Fi extender to improve signal strength in the camera’s area.
- If there are multiple devices connected to your Wi-Fi network, consider prioritizing the Ring Wired Floodlight Camera to prevent bandwidth congestion.
- If you experience connectivity problems, try restarting your router and the Ring Wired Floodlight Camera.
- By following these steps, you can ensure that your camera stays connected and provides uninterrupted security surveillance.
Troubleshooting common installation and setup challenges
While Ring provides detailed instructions for installing the Wired Floodlight Camera, common installation and setup challenges may still arise. Here are some troubleshooting steps to help you overcome these potential obstacles:
- If the camera is not powering on, check the power source and connections. Make sure the power supply is properly connected and that the circuit breaker is not tripped.
- If the app does not recognize the camera or you are unable to access its settings, ensure that you are using the latest version of the Ring app and that your device meets the app’s minimum requirements.
- If you encounter issues during the device registration process, double-check your internet connection and ensure that you have entered the correct Wi-Fi credentials.
- If you are experiencing delays or lags in the video feed, consider optimizing your Wi-Fi network by relocating your router or using a Wi-Fi extender.
- If you continue to face challenges or encounter any other issues, consult the Ring support resources, which include FAQs, troubleshooting guides, and a vibrant community forum.
By following these troubleshooting steps, you can overcome common installation and setup challenges, ensuring that your Ring Wired Floodlight Camera operates smoothly and provides you with the security and peace of mind you desire.
Maximizing The Security Features
Configuring motion detection settings and notification preferences
One of the key features of the Ring Wired Floodlight Camera is its advanced motion detection capability. By customizing the motion detection settings to suit your specific needs, you can ensure that you receive notifications only when necessary, minimizing false alarms and maximizing your security.
To configure the motion detection settings, follow these simple steps:
- Launch the Ring app on your smartphone.
- Select the Floodlight Camera from the list of devices.
- Tap on “Settings” and then “Motion Settings”.
- Adjust the sensitivity and range of the motion detection according to your preferences.
- Enable or disable specific zones for detection to focus on specific areas.
- Select the desired notification preferences, such as receiving alerts on your phone or through email.
By taking the time to fine-tune the motion detection settings, you can ensure that you are promptly alerted to any suspicious activity around your property.
Integrating the floodlight camera with other Ring devices, if applicable
If you have other Ring devices installed in your home, such as video doorbells or security cameras, you can seamlessly integrate them with the Ring Wired Floodlight Camera to enhance your overall security system.
Here’s how you can integrate the floodlight camera with other Ring devices:
- Open the Ring app and select the Floodlight Camera.
- Navigate to “Device Settings” and select “Linked Devices”.
- Choose the specific Ring devices you wish to link with your floodlight camera.
- Follow the on-screen prompts to complete the integration process.
Once the integration is done, you can enjoy the benefits of a synchronized security system, where all the devices work together to provide comprehensive coverage.
Exploring additional security features and subscription plans
In addition to its motion detection and integration capabilities, the Ring Wired Floodlight Camera offers a range of additional security features that can be unlocked through subscription plans.
Here are some of the additional security features you can explore:
| Feature | Description |
|---|---|
| Advanced Motion Detection | Access advanced motion detection settings to further customize your camera’s performance. |
| 24/7 Professional Monitoring | Ensure round-the-clock monitoring of your property with the assistance of a professional security team. |
| Video Recording and Storage | Save and review video footage captured by your floodlight camera for added peace of mind. |
To unlock these features and more, consider subscribing to one of Ring’s affordable subscription plans. These plans offer you enhanced security and convenience so that you can have complete control over your home’s safety.
With the Ring Wired Floodlight Camera, you can maximize its security features by configuring the motion detection settings to your preferences, integrating it with other Ring devices, and exploring additional security features through subscription plans. By taking full advantage of these capabilities, you can ensure the utmost security for your home and loved ones.
Frequently Asked Questions Of How To Install Ring Wired Floodlight Camera
How Do You Install A Hardwired Ring Floodlight Camera?
To install a hardwired Ring Floodlight Camera, follow these steps: 1) Turn off the power at the breaker. 2) Mount the camera on a wall or eave. 3) Connect the wires according to the instructions. 4) Restore power and set up the camera in the Ring app.
5) Adjust the camera settings as needed.
Do You Need An Electrician To Install Ring Floodlight Camera?
No, you do not need an electrician to install a ring floodlight camera. It is designed for easy DIY installation. Simply follow the instructions provided and you can set it up yourself.
How Do I Install And Set Up My Ring Floodlight Cam Wired Pro?
To install and set up your Ring Floodlight Cam Wired Pro, follow these steps: 1. Mount the camera on a secure surface. 2. Connect the camera to power using the provided cables. 3. Download the Ring app and create an account.
4. Follow the in-app instructions to connect the camera to your Wi-Fi network. 5. Customize your settings and you’re ready to go!
Can You Use Ring Floodlight Wired Without Bridge?
Yes, you can use the Ring Floodlight wired without a bridge. The bridge is an optional device used to connect the Floodlight with your network, but the Floodlight can function independently without it.
How To Connect Ring Wired Floodlight Camera To Wi-Fi?
To connect Ring Wired Floodlight Camera to Wi-Fi, simply follow the step-by-step instructions provided in the user manual. This will ensure a seamless connection process.
Conclusion
In this blog post, we have discussed the step-by-step process of installing the Ring Wired Floodlight Camera. By following these instructions, you can easily set up this security device and enhance the safety of your home. Remember to carefully read and implement the guidelines provided in the user manual.
With the Ring Wired Floodlight Camera, you can enjoy peace of mind knowing that your property is protected. Keep your home safe with this reliable and easy-to-use surveillance system.