To install shelving in your garage, measure the space, gather the necessary tools, mark the position of the shelves, secure brackets, and attach the shelves onto the brackets. Creating additional storage space in your garage is essential to keep it organized and clutter-free.
Installing shelving in your garage is an efficient way to maximize the available space and store your tools, equipment, and other items neatly. With a few simple steps, you can easily add shelves to your garage. This guide will walk you through the process, from measuring the space and gathering the necessary tools to securing brackets and attaching the shelves onto them.
By following these steps, you’ll have sturdy and functional shelving that will help you organize your garage efficiently.
Decluttering For Efficiency: Benefits Of Garage Shelving

One of the most common challenges homeowners face is keeping their garages neat and organized. The garage often becomes a cluttered space where tools, equipment, and other items are randomly placed, making it difficult to find what you need when you need it. However, with the addition of carefully installed garage shelving, you can transform your cluttered garage into an efficient and functional space. Decluttering your garage and installing shelving brings numerous benefits that can enhance not only the organization but also the overall safety and security of your garage.
Maximizing Storage Space
One of the primary benefits of installing shelving in your garage is the ability to maximize storage space. With proper garage shelving, you can take advantage of the vertical space in your garage, allowing you to store items off the floor and utilize every inch of available space. This vertical storage solution is especially valuable in smaller garages where floor space is limited. By utilizing the walls and ceiling to the fullest extent, you can create a well-organized and clutter-free area where everything has its designated place.
Easy Access to Tools and Equipment
Having a dedicated space for your tools and equipment is essential for any homeowner. With garage shelving, you can easily organize your tools based on their type, size, or frequency of use, making it simpler to locate and retrieve them whenever needed. No longer will you have to waste time rummaging through piles of tools or digging through boxes to find that one item buried at the bottom. Instead, you can have your tools neatly displayed and easily accessible, allowing you to tackle your projects with efficiency and ease.
Enhanced Safety and Security
Another important advantage of garage shelving is the enhanced safety and security it provides. When items are scattered on the floor or piled haphazardly, accidents can easily occur. Tripping over tools, falling objects, or getting scratched by sharp equipment are all common hazards in a cluttered garage. By installing shelving and organizing your belongings, you can significantly reduce the risk of accidents and injuries. Additionally, having items stored neatly on shelves helps prevent damage and extends the lifespan of your tools and equipment, keeping them in optimal condition for longer.
Step 1: Assessing Your Storage Needs
Before you start installing shelving in your garage, it’s important to assess your storage needs. Taking the time to assess your needs will help you determine the best shelving solutions for your space. In this step, we will guide you through the process of determining the purpose of your garage, taking inventory of your belongings, and identifying categories for organization.
Determine the Purpose of Your Garage
The first step in assessing your storage needs is to determine the purpose of your garage. Ask yourself, what do you primarily use your garage for? Is it simply a place to park your car or do you also store tools, sports equipment, or other belongings? Understanding the main function of your garage will help you decide how much storage space you require and what type of shelving will best serve your needs.
Take Inventory of Your Belongings
Next, take inventory of all the items you plan to store in your garage. This could include gardening tools, holiday decorations, sports gear, and more. By creating a list of your belongings, you’ll be able to better visualize the amount of storage space you’ll need and which items are essential to keep within reach. This step will also help you identify any items that may require special storage solutions, such as fragile or large items.
Identify Categories for Organization
Once you have an inventory of your belongings, it’s time to identify categories for organization. Group similar items together so that you can easily find what you need when you need it. For example, you may want to create separate categories for automotive supplies, gardening tools, and sports equipment. By organizing your items into categories, you’ll be able to determine how many shelves or storage units you’ll need for each category.
Creating a table can provide a clear visual representation of your categories and help you plan the placement of your shelving. Here’s an example:
| Category | Number of Items | Required Storage Space |
|---|---|---|
| Automotive Supplies | 25 | 2 shelves |
| Gardening Tools | 30 | 3 shelves |
| Sports Equipment | 15 | 1 shelf |
By assessing your storage needs in these three steps, you’ll be well-prepared to install shelving in your garage. This careful planning will not only help you maximize your storage space, but also ensure that your belongings are organized and easily accessible whenever you need them.
Step 2: Choosing The Right Garage Shelving
Once you have assessed the available space in your garage and considered your storage requirements, it’s time to choose the right garage shelving system. Proper garage shelving not only maximizes storage space but also ensures easy accessibility to your tools, equipment, and other items. Here are some factors to consider when selecting the right garage shelving:
Consider Your Storage Requirements
Before choosing garage shelving, it is essential to evaluate your storage requirements. Consider the types of items you need to store, their sizes, and the weight they will be supporting. This will help you determine the load capacity and shelf design that will best suit your needs. Whether you need to store heavy power tools, bulky sports equipment, or small gardening supplies, knowing your storage needs will guide you in making an informed decision.
Assess Available Space in Your Garage
An important aspect of choosing the right garage shelving is to assess the available space in your garage. Measure the dimensions of your garage, including the floor area, the height of the walls, and any obstacles that may affect the installation of shelving units. Take note of any electrical panels, windows, or ventilation systems that need to be accessible. This will help you decide the size and configuration of your shelving system, ensuring a perfect fit for your garage.
Types of Garage Shelving Systems
There are various types of garage shelving systems available, each offering unique benefits. Here are some popular options:
- Wall-Mounted Shelving: Ideal for maximizing floor space, wall-mounted shelving attaches to the walls using brackets or rails. It provides a flexible storage solution and keeps items off the floor.
- Freestanding Shelving Units: These stand-alone units are versatile and can be placed anywhere in your garage. They are sturdy and often feature adjustable shelves, allowing you to customize the height according to your storage needs.
- Overhead Storage Racks: Overhead storage racks are installed near the ceiling, making use of vertical space. They are great for storing bulky items like seasonal gear or large containers that are not frequently accessed.
- Cabinets and Drawers: If you want a more organized and clean look, consider installing cabinets and drawers. They provide enclosed storage and allow you to hide away items that might clutter your garage.
By understanding the different types of garage shelving systems available, you can make an informed decision based on your specific needs and preferences.
Choosing the right garage shelving can greatly enhance the functionality and organization of your garage. Take the time to assess your storage requirements, evaluate the available space, and consider the various types of shelving systems. With the right choice, you’ll have an efficiently organized garage that makes finding and storing your items a breeze.
Step 3: Preparing Your Garage For Shelving Installation
Before you can begin installing shelving in your garage, it’s essential to properly prepare the space. This step involves clearing out and cleaning the garage, repairing and patching walls and floors, as well as measuring and marking the installation points. By taking the time to complete these tasks, you’ll create a clean and secure environment to maximize the functionality and longevity of your shelving.
Clearing Out and Cleaning the Garage
The first task to tackle is clearing out your garage. Remove any items, vehicles, or debris that could obstruct the installation process. This will provide you with a clear workspace, making it easier to measure, mark, and install the shelves.
Once the garage is cleared, it’s time to clean the space thoroughly. Sweep or vacuum the floors to remove any loose dirt, dust, or debris. Consider using a power washer for deeply ingrained stains or to enhance the cleanliness of the concrete floor. Wipe down the walls and ceiling to remove any cobwebs, dust, or grease buildup, as these can affect the adhesion of shelving fixtures.
Repairing and Patching Walls and Floors
Inspect the walls and floors for any damages, such as cracks, holes, or uneven surfaces. Addressing these issues before installing shelving will prevent further damage and ensure a stable and secure foundation for your shelves.
To repair cracks or holes in the walls, use a spackling compound or drywall repair kit. Fill in the damaged areas with the compound, and smooth it out using a putty knife. Allow it to dry according to the manufacturer’s instructions, and then sand the patch to create a seamless surface.
If the garage floor has cracks or unevenness, consider using a concrete patching compound. Clean the area thoroughly, follow the product instructions to mix and apply the compound, and smooth out the surface with a trowel. Allow it to cure completely before proceeding with the shelving installation.
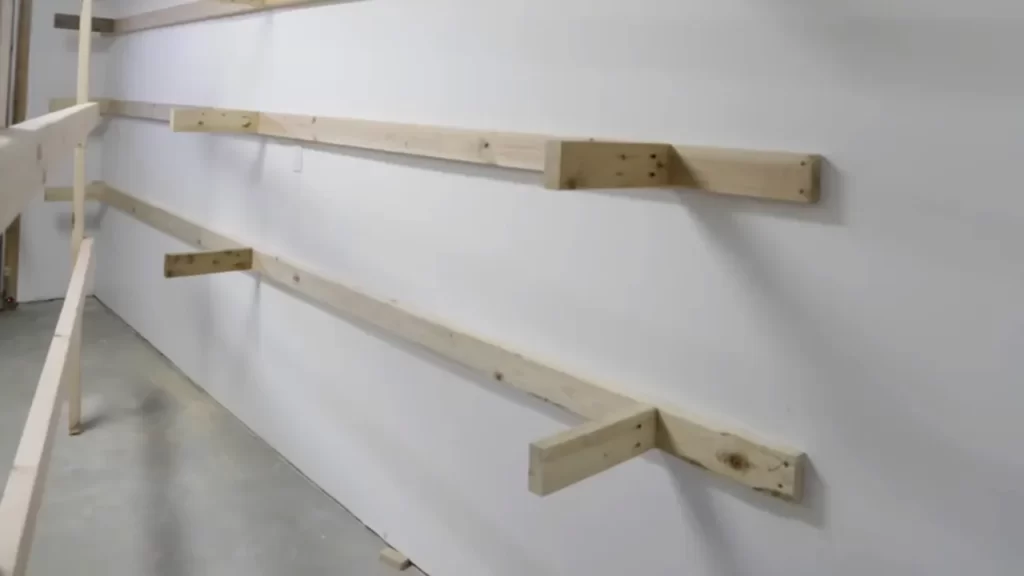
Measuring and Marking Installation Points
To ensure a well-organized and visually appealing shelving system, take precise measurements of the available space. Consider the height, width, and depth of the shelves, as well as the desired distance between each shelf.
Using a measuring tape, mark the desired height of the first shelf on the walls. Check the accuracy of the measurement by using a level. Next, measure and mark the positions of additional shelves, keeping the desired spacing in mind. This will allow you to distribute the weight evenly and maximize the storage capacity of your garage.
Take your time with this step, as accurate measurements and markings will make the installation process much smoother and prevent any issues or adjustments later on.
Now that your garage is cleared, cleaned, and properly prepared, you’re ready to move on to the exciting part – actually installing the shelving! Stay tuned for the upcoming step in our series, where we guide you through the process of installing the shelves securely and effectively.
Step 4: Installing Garage Shelving

Gathering Essential Tools and Materials
Before you can begin installing garage shelving, it’s important to gather all the essential tools and materials you’ll need for the job. By having everything on hand, you can work efficiently and ensure a smooth installation process. Here is a list of items you will need:
| Tools | Materials |
|---|---|
| – Power drill | – Shelving units |
| – Screwdriver | – Mounting hardware |
| – Level | – Wall anchors |
| – Measuring tape | – Safety goggles |
| – Pencil | – Work gloves |
Having these tools and materials ready ensures that you won’t have to interrupt your installation process to find something you need, allowing you to complete the job efficiently.
Assembling and Mounting Shelving Units
Now that you have gathered all the necessary tools and materials, it’s time to assemble and mount the shelving units. Follow these steps:
- Start by unpacking the shelving units and laying out all the components.
- Attach the shelves to the vertical supports using the provided bolts or screws.
- Make sure to follow the manufacturer’s instructions for assembly to ensure stability and safety.
- Using a level, check to ensure that each shelf is perfectly horizontal before proceeding.
- Once assembled, position the shelving units against the garage wall where you want them to be installed.
- Mark the locations for the mounting brackets or holes on the wall using a pencil and measuring tape.
- Using your power drill, create holes for the wall anchors, if necessary, then attach the mounting brackets using the provided hardware.
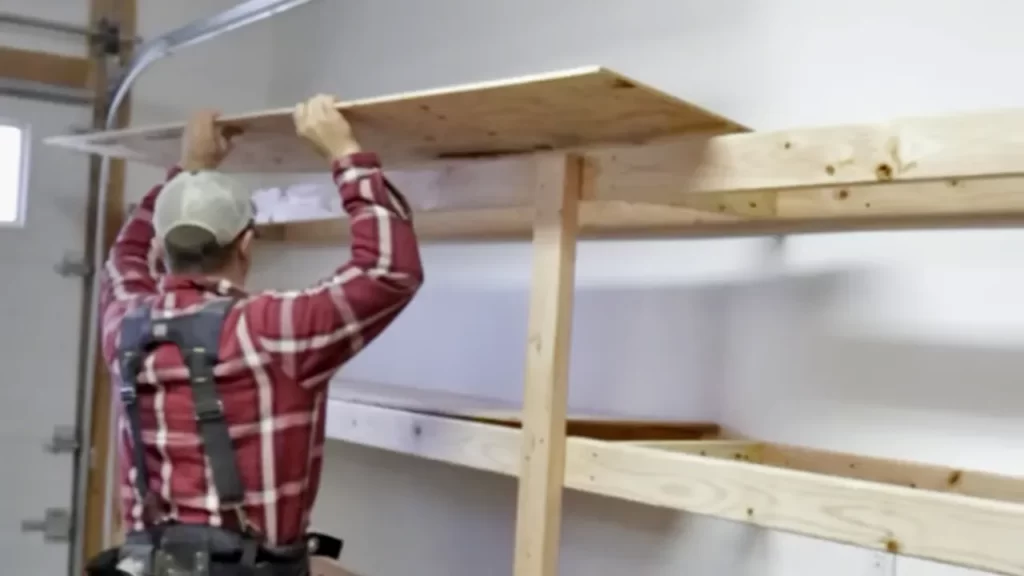
- With the help of a friend, carefully lift the assembled shelving unit and place it onto the mounting brackets.
- Secure the shelving unit to the brackets using the appropriate screws, making sure it is firmly attached.
Following these steps will help ensure that your shelving units are correctly assembled and securely mounted to the wall, providing reliable storage space in your garage.
Securing Shelving for Safety and Stability
After installing the shelving units, it’s crucial to take the necessary steps to secure them for safety and stability. Here’s what you need to do:
- Tighten any loose screws or bolts on the shelving units to prevent wobbling.
- Double-check that all brackets are securely attached to the wall.
- If the shelving units are exceptionally tall or heavily loaded, consider using additional wall anchors or braces for extra support.
- Regularly inspect the shelving units to ensure they remain in good condition and make any necessary repairs promptly.
- Avoid overloading the shelves beyond their recommended weight capacity, as it can compromise their stability.
- Lastly, always remember to wear safety goggles and work gloves while working to protect yourself from any potential injuries.
By following these safety and stability measures, you can have peace of mind knowing that your garage shelving is secure and won’t pose any risks to you or your belongings.
Step 5: Organizing Your Belongings On Garage Shelving
Now that you have successfully installed your garage shelving, it’s time to take it a step further and organize your belongings. A well-organized garage not only enhances the overall functionality of the space but also ensures easy access to your items whenever you need them. Follow these simple steps to efficiently sort and group your items, utilize storage bins and containers, and label and categorize everything for a clutter-free and organized garage.
Sorting and Grouping Items by Category
Before you start stacking your belongings on the newly installed garage shelving, take the time to sort and group them by category. This initial step will help you identify similar items and create designated areas for them. For example, gather all your gardening tools and equipment together, group sports gear in another section, and keep automotive supplies separate.
If you have a large number of items, consider using tables to list the categories and create a visual organization plan. Here’s an example:
| Category | Examples |
|---|---|
| Gardening | Shovels, rakes, pruners |
| Sports | Bicycles, balls, tennis rackets |
| Automotive | Oil, car accessories, tire inflator |
Utilizing Storage Bins and Containers
To make the most of your garage shelving space, invest in storage bins and containers. They are an excellent solution for organizing smaller items and keeping them easily accessible. Choose clear bins so you can easily identify the contents without having to open each one. Additionally, make sure the bins are stackable to maximize vertical space.
Here are a few ideas for how you can utilize storage bins and containers:
- Store smaller hand tools such as screwdrivers and pliers in a labeled bin.
- Dedicate a bin for nails, screws, and other hardware items.
- Group seasonal items like Christmas decorations and camping gear in separate containers.
Labeling and Categorizing for Easy Access
Labeling and categorizing your belongings may seem like an extra step, but it is the key to maintaining an organized garage. By clearly labeling each bin or container, you’ll always know where to find what you need, even if you haven’t used it in a while. Labeling can be as simple as using a permanent marker or invest in a label maker for a more professional look.
When categorizing your items, consider grouping them by frequency of use. Keep frequently used items at eye level or within easy reach, while less frequently used items can be placed higher up on the garage shelving. This way, you’ll have quick access to the things you use most often.
With these tips, you’ll be able to transform your cluttered garage into a well-organized space where everything has its designated place. By taking the time to sort, group, and label your belongings, you ensure an efficient system that saves you time and frustration in the long run.
Step 6: Maintaining An Organized Garage
Once you have installed shelving in your garage, it is important to maintain an organized space. Regular cleaning and decluttering, reassessing and rearranging as needed, and establishing a maintenance routine can help you keep your garage in top shape. In this section, we will discuss each of these steps in detail.
Regular Cleaning and Decluttering
Regular cleaning and decluttering of your garage space is essential to maintain an organized environment. Set aside some time every few months to go through your belongings and get rid of anything you no longer need or use. This will help you create more space and prevent unnecessary clutter.
Here are some tips for effective cleaning and decluttering:
- Start by categorizing your items into different groups, such as tools, sports equipment, and gardening supplies.
- Get rid of anything that is broken, damaged, or no longer useful.
- Consider donating or selling items that are in good condition but no longer needed.
- Create a system for organizing your belongings, such as using labeled bins or containers.
- Regularly sweep or vacuum the floor to remove dust and debris.
Reassessing and Rearranging as Needed
Even with a well-organized garage, it is important to reassess and rearrange your belongings as needed. Over time, your storage needs may change, and you may acquire new items that require a different arrangement. Keep your garage space flexible by regularly reevaluating the placement of your shelves and adjusting them accordingly.
Here are some tips for reassessing and rearranging your garage:
- Take a look at your current setup and identify any areas that are not functioning optimally.
- Consider how you can rearrange your items to create more efficient use of space.
- Experiment with different configurations to find what works best for your needs.
- Make use of hooks, pegboards, or additional shelving to maximize vertical space.
- Regularly assess your storage needs and make adjustments accordingly.
Establishing a Maintenance Routine
In order to maintain an organized garage in the long term, it is important to establish a maintenance routine. This will help you stay on top of cleaning, decluttering, and rearranging tasks, preventing your garage from becoming cluttered and disorganized again.
Here are some tips for establishing a maintenance routine:
- Set aside a specific time every few months for a thorough cleaning and decluttering session.
- Regularly assess your items and get rid of anything that is no longer needed.
- Make a habit of returning items to their designated storage spaces after use.
- Regularly inspect your shelves and storage systems for any signs of damage or wear.
- Stay proactive and address any organizational issues before they become overwhelming.
By following these steps and establishing a maintenance routine, you can ensure that your garage remains organized and functional. With a clean and clutter-free space, you will have easier access to your tools, equipment, and belongings, making it a more enjoyable and productive space overall.

Step 7: Taking Garage Organization To The Next Level
Now that you have installed shelving in your garage and have your items neatly organized, it’s time to take your garage organization to the next level. By utilizing additional storage solutions, incorporating hooks, racks, and hanging systems, and optimizing wall and ceiling space, you can maximize the efficiency and functionality of your garage.
Utilizing Additional Storage Solutions
In addition to shelving, there are various storage solutions available that can help you manage your garage clutter. Whether it’s a storage cabinet, a tool chest, or a storage bin, these additional storage options provide a designated place for your items, keeping them organized and easily accessible. Consider the following options:
- Storage Cabinets: These are perfect for storing small tools, paints, cleaning supplies, and other items that you want to keep tucked away.
- Tool Chests: A tool chest is essential for keeping your tools organized and protected. With multiple drawers and compartments, it allows for easy access and prevents your tools from getting damaged.
- Storage Bins: Ideal for storing seasonal items or items that are not frequently used, storage bins come in various sizes and can be stacked to optimize space.
Incorporating Hooks, Racks, and Hanging Systems
Hooks, racks, and hanging systems are excellent additions to your garage organization setup as they help maximize vertical space and keep items off the floor. Consider incorporating the following options:
- Wall-mounted Hooks: Perfect for hanging gardening tools, hoses, and extension cords, wall-mounted hooks keep items easily accessible while freeing up valuable floor space.
- Bike Racks: If you have bicycles, consider investing in bike racks that can be mounted on the wall or ceiling to keep them off the ground and create more floor space.
- Hanging Systems: From pegboards to rail systems, hanging systems allow you to customize your storage by attaching hooks, baskets, and shelves, providing a versatile solution for hanging various items.
Optimizing Wall and Ceiling Space
When it comes to garage organization, don’t forget about the walls and ceiling. Utilizing these areas can significantly increase your storage capacity. Consider the following options:
- Overhead Storage Racks: Install overhead storage racks on your garage ceiling to store bulky items such as luggage, seasonal decorations, or sports equipment.
- Wall Shelves: Install additional wall shelves to store frequently used items like cleaning supplies, gardening tools, and paint cans. Make use of vertical space by installing shelves from floor to ceiling.
- Ceiling Hooks: Utilize ceiling hooks to hang ladders, large tools, and other items that you want to keep out of the way but easily accessible.
By utilizing these additional storage solutions, incorporating hooks, racks, and hanging systems, and optimizing wall and ceiling space, you can transform your garage from a cluttered space to an organized oasis. Increasing your storage capacity and accessibility will make it easier to find what you need and provide you with more room to tackle various projects. Say goodbye to garage chaos and hello to a well-organized and functional workspace!
Frequently Asked Questions On How To Install Shelving In Garage
How Do You Install Wall Shelves In A Garage?
To install wall shelves in a garage, start by determining the position and height of the shelves. Use a stud finder to locate the wall studs, then mark them. Place the shelf brackets on the marked spots and secure them to the studs using screws or anchors.
Finally, place the shelf boards on top of the brackets and secure them in place.
How Much Does It Cost To Install Overhead Shelves In A Garage?
The cost to install overhead shelves in a garage varies depending on factors such as size, materials, and installation complexity. On average, you can expect to pay between $200 to $800 for the shelves and installation. However, prices can go higher or lower based on specific requirements and local market rates.
How Much Does It Cost To Put Shelves In A Garage?
Installing shelves in a garage typically costs around $200-$1000, depending on the type and size of shelves, materials used, and labor involved. It’s best to consult with professionals to get accurate cost estimates based on your specific needs.
How Far Apart Should Garage Shelf Brackets Be Placed?
Garage shelf brackets should be placed 16-24 inches apart for optimum support and stability. Ensure they are evenly spaced to distribute weight evenly and prevent sagging. Use a measuring tape and level to mark the bracket placements before installing.
Conclusion
To sum up, installing shelving in your garage can significantly improve the organization and functionality of the space. By following these simple steps, you can create a well-organized storage solution that will maximize the available space and make it easy to find and access your belongings.
Remember to choose the right materials, measure accurately, and install securely to ensure durability. With your newfound knowledge, you’ll be able to transform your garage into an efficient and clutter-free zone in no time. Happy organizing!