To install shutter hinges, begin by measuring and marking the placement on the shutter and window frame. Then, attach the hinges using screws, ensuring they are properly aligned and tightly secured.
Shutter hinges are essential for both aesthetic and functional purposes in window installations. They allow shutters to open and close smoothly while adding a decorative touch to the overall design. Installing shutter hinges requires careful measurement and precise alignment to ensure proper functioning.
This guide will provide step-by-step instructions on how to install shutter hinges correctly. By following these steps, you can easily enhance the functionality and appearance of your shutters. So, let’s get started with the installation process.
The Art Of Installing Shutter Hinges: A Step-By-Step Guide
The Art of Installing Shutter Hinges: A Step-by-Step Guide Properly installed shutter hinges are essential for the functionality and durability of your shutters. Whether you are installing new shutters or replacing old hinges, it is vital to follow the correct steps to ensure a secure and long-lasting installation. In this guide, we will take you through the process of installing shutter hinges, step-by-step. From the importance of properly installed hinges to the final touches, we will cover everything you need to know to get the job done right.
Importance of Properly Installed Shutter Hinges
Ensuring your shutter hinges are properly installed is crucial for several reasons. Firstly, it guarantees the smooth operation of your shutters, allowing them to open and close effortlessly. With properly installed hinges, you can easily adjust the angle of your shutters to control the amount of light and privacy in your space. Additionally, properly installed shutter hinges contribute to the overall strength and stability of your shutters. By securely attaching the hinges to both the shutter panels and the window frame, you can prevent sagging, warping, and other potential damage over time. Not only do properly installed hinges enhance the functionality and durability of your shutters, but they also add to the aesthetic appeal of your windows. Clean and well-maintained hinges give your shutters a polished and professional look, elevating the overall visual appeal of your home. Now that we understand the importance of properly installed shutter hinges, let’s dive into the step-by-step guide on how to install them. 1. Measure and Mark Placement: Start by measuring the distance between the shutter panel and the window frame. Mark the desired placement of the hinges on both the shutter and the frame using a pencil or a marker. Ensure that the marks align accurately for a balanced look. 2. Pre-drill Holes: Using a drill bit that matches the diameter of the screws provided with your hinges, pre-drill holes at the marked locations. This step helps to prevent the wood from splitting when you attach the hinges. 3. Attach Hinges to Shutter Panel: Line up the pre-drilled holes on the shutter panel with the corresponding holes on the hinges. Insert the screws into the holes and tighten them firmly, but not excessively, using a screwdriver or drill. 4. Attach Hinges to Window Frame: Position the shutter panel with the attached hinges against the window frame, aligning the hinges’ holes with the pre-drilled holes on the frame. Insert the screws and tighten them securely to ensure a strong attachment. 5. Test and Adjust: Once all the hinges are securely attached, test the shutters by opening and closing them. Check for smooth operation, making any necessary adjustments to the hinge placement if needed. Properly aligned hinges will ensure smooth movement and a balanced appearance. 6. Final Touches: After the hinges are properly installed, double-check their alignment and tighten any loose screws. If desired, you can also paint or stain the hinges to match the color of your shutters for a seamless and cohesive look. By following these step-by-step instructions, you can successfully install shutter hinges that provide optimal functionality, durability, and visual appeal to your shutters. A proper installation not only enhances the overall performance of your shutters but also adds value and charm to your home. Take your time and pay attention to detail throughout the process, and you’ll enjoy the benefits of well-installed shutter hinges for years to come.
Getting Started: Tools And Materials Needed
Before you can install shutter hinges, it’s important to gather the necessary tools and materials. By doing so, you’ll be well-prepared to tackle this project with ease. Here’s a list of essential tools and materials you’ll need:
Essential tools for the job
When it comes to installing shutter hinges, having the right tools on hand is crucial. Here are the essential tools you’ll need:
- Screwdriver: A screwdriver will be needed to secure the hinges to your shutters.
- Drill: Depending on the type of hinges you’re using, a drill may be necessary to create pilot holes for the screws.
- Measuring tape: Accurate measurements are key to ensure the hinges are properly aligned.
- Pencil: Marking the desired placement of the hinges on your shutters can help you achieve a neat and uniform look.
- Level: A level will ensure that your shutters are installed straight and aligned.
- Hinges: Of course, you’ll need the hinges themselves. There are various types of hinges available, each with its own specific uses.
- Screws: Make sure you have the appropriate screws for securing the hinges to your shutters.
- Safety goggles: Protecting your eyes is important while working with tools.
Types of hinges and their uses
When it comes to shutter hinges, there are different types to choose from, each serving a specific purpose. Here are a few common types:
| Type of Hinge | Use |
|---|---|
| Butt hinge | A popular hinge choice for shutters, providing a simple and sturdy solution. |
| Pintle hinge | These hinges are commonly used with traditional wooden shutters and offer a classic look. |
| L-strap hinge | Ideal for heavy shutters, these hinges provide additional support and stability. |
Choosing the right hinge for your shutters
When choosing hinges for your shutters, it’s essential to consider a few key factors. These include the weight and size of the shutters, as well as the style you’re aiming for. By selecting the appropriate hinge, you can ensure your shutters not only function properly but also enhance the overall aesthetic of your home.
Preparing The Shutters And Frame
Measuring and marking the hinge location
Before installing the shutter hinges, it is crucial to measure and mark the precise location where they will be placed. This will ensure that the shutters hang properly and function smoothly. To do this, you will need a measuring tape, a pencil, and a level.
Here are the steps to measure and mark the hinge location:
- Start by placing the shutters in the closed position and aligning them with the window frame. Ensure that they are centered and positioned correctly.
- Take the measuring tape and measure the height of the shutters. Divide this measurement by the number of hinges you will be installing to determine the even spacing between each hinge.
- Using a pencil, make small marks on the inner edge of the shutters where each hinge will be installed. These marks should be aligned vertically and evenly spaced according to the measurements taken.
- Once you have marked the positions for the hinges on the shutters, use a level to ensure that they are perfectly vertical. Adjust the marks if necessary to achieve a level alignment.
Pre-drilling holes
The next step is to pre-drill holes for the screws that will secure the hinges to both the shutters and the window frame. Pre-drilling helps prevent the wood from splitting and allows for easier installation of the screws.
Follow these guidelines to pre-drill holes for the shutter hinges:
- Start by choosing an appropriately sized drill bit. The diameter of the bit should be slightly smaller than the diameter of the screws you will be using.
- Position the shutters against the window frame, aligning the pre-marked hinge locations with the corresponding spots on the frame.
- Using the drill bit, create pilot holes at the marked locations on both the shutters and the frame. Make sure to drill deep enough for the screws to fit snugly without protruding.
- After pre-drilling all the necessary holes, use a countersink bit to create a small recess around each hole. This will allow the screw heads to sit flush with the surface of the shutters and frame.
Preparing the shutter frame
Properly preparing the shutter frame is essential to ensure a secure and stable installation of the hinges. This involves inspecting the frame for any potential issues and making necessary adjustments.
Here’s how you can prepare the shutter frame:
- Begin by examining the frame to ensure it is clean of any debris or loose particles. Use a brush or a soft cloth to remove any dirt or dust that may interfere with the hinge installation.
- Check the frame for any signs of damage or deterioration, such as cracks or rotting wood. If you notice any issues, it is important to repair or replace the damaged sections before proceeding.
- Ensure that the frame is securely attached to the window or wall. Tighten any loose screws or anchors and make sure the frame is level and plumb.
- If needed, make adjustments to the frame to ensure that it is square and properly aligned. This will help the shutters open and close smoothly and prevent any binding or sticking.
Step-By-Step Installation Process
Installing shutter hinges is a crucial step in ensuring that your shutters function properly and enhance the aesthetic appeal of your windows. In this guide, we will walk you through the step-by-step process of installing shutter hinges onto your shutter frame. Follow these instructions carefully to achieve a successful installation.
Aligning the Hinges with the Pre-Marked Locations
Before you begin the installation process, it is important to align the hinges with the pre-marked locations on the shutter frame. This will ensure that the hinges are positioned correctly, allowing the shutters to open and close smoothly.
To align the hinges, follow these steps:
- Start by placing the shutter panel onto the frame, ensuring it is in the desired position.
- Using a pencil or a marker, mark the top and bottom edges of the hinges onto the frame.
- Using a level or a square, ensure that the marks are vertically aligned and straight.
By following these steps, you can ensure that the hinges are aligned accurately, providing a sturdy foundation for the rest of the installation process.
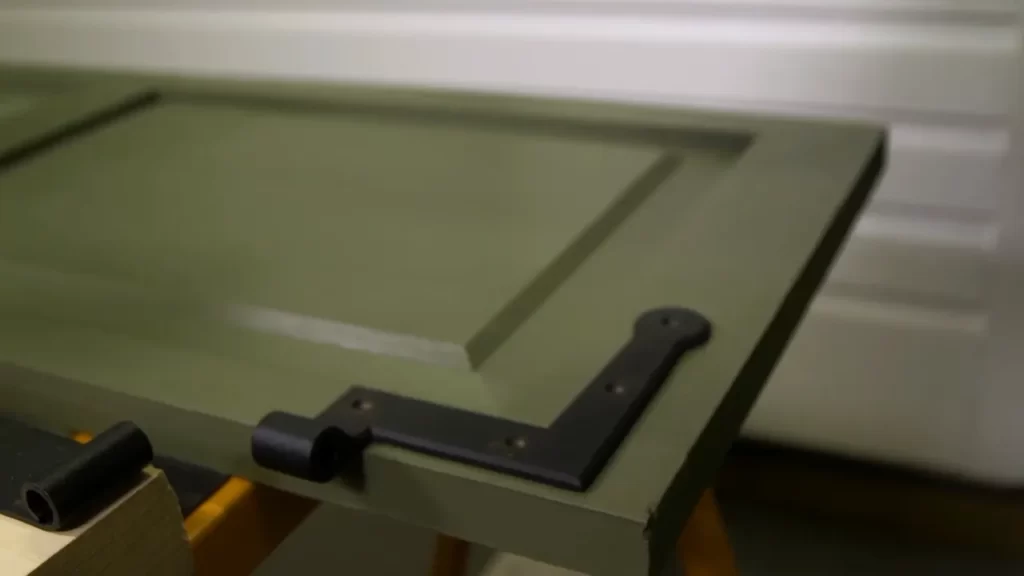
Installing the Hinges onto the Shutter Frame
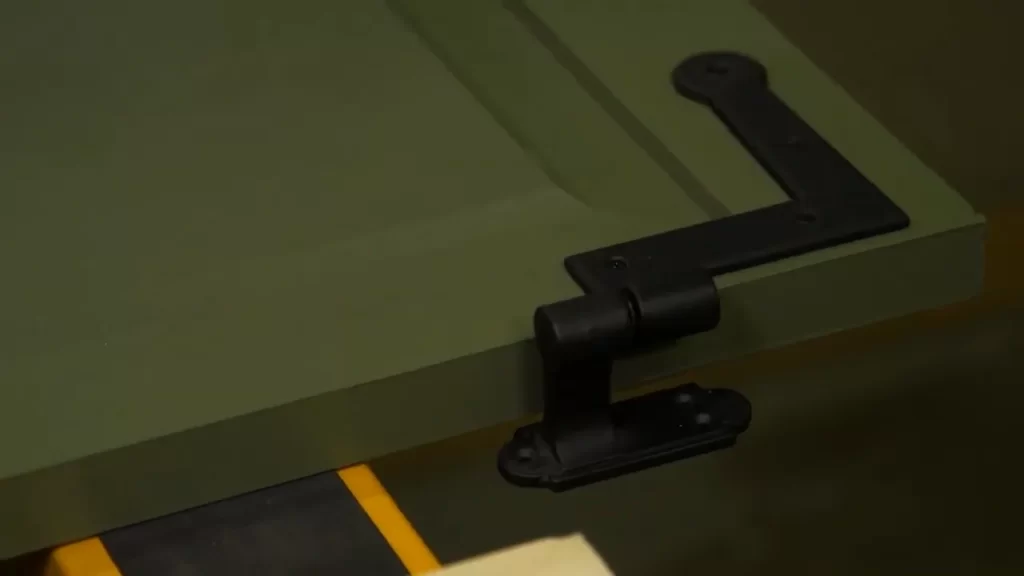
Once you have aligned the hinges with the pre-marked locations, it’s time to install them onto the shutter frame. The hinges serve as the connection between the shutters and the frame, allowing the shutters to pivot and open and close smoothly.
To install the hinges, follow these steps:
- Place the hinge onto the pre-marked location on the shutter frame, aligning the screw holes with the marks you made earlier.
- Using a screwdriver or a drill, drive the screws through the hinge holes and into the frame. Ensure that the screws are tightened securely but not overtightened, as it may damage the hinges or the frame.
- Repeat the process for the remaining hinges until all of them are installed onto the shutter frame.
By following these steps carefully, you can install the hinges onto the shutter frame securely and ensure that they are properly attached.
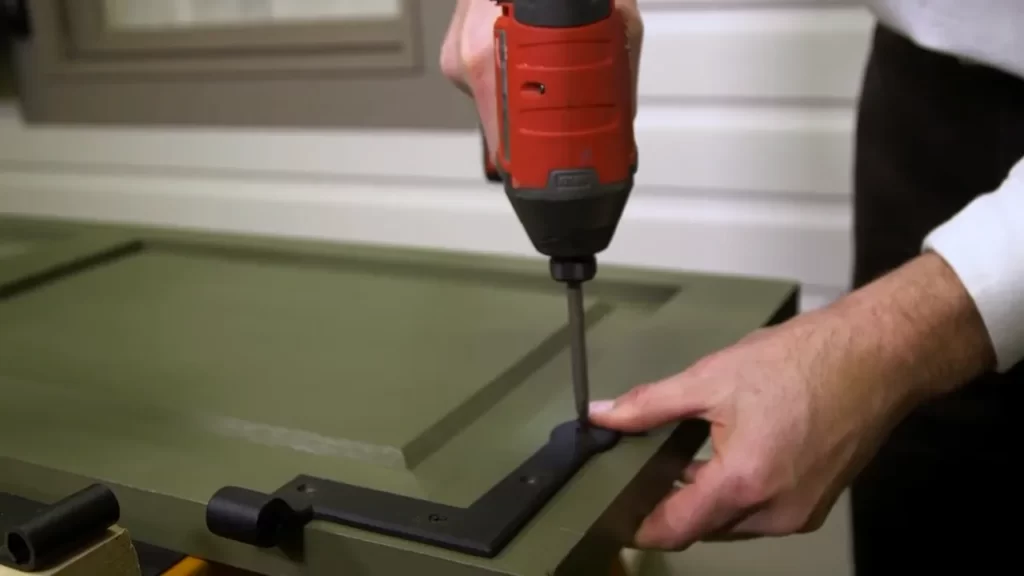
Securing the Hinges with Screws
The final step in the installation process is to secure the hinges onto the shutter frame using screws. This step is crucial in ensuring that the hinges remain in place and provide a stable connection between the shutters and the frame.
Follow these steps to secure the hinges:
- Check the alignment of the hinges and make any necessary adjustments before proceeding.
- Using a screwdriver or a drill, drive additional screws through the hinge holes and into the frame. Make sure to distribute the screws evenly across the hinges to provide adequate support.
- Double-check the tightness of the screws to ensure that they are secure but not overtightened.
By securing the hinges with screws, you can ensure that they remain in place, enabling the shutters to function smoothly and withstand daily use.
Following this step-by-step installation process will help you successfully install shutter hinges onto your shutter frame. Remember to take your time, align the hinges accurately, and secure them properly to achieve optimal results. With properly installed hinges, your shutters will not only look great but also operate efficiently for years to come.
Adjusting And Testing The Hinges
Checking for smooth operation
Once you have installed the shutter hinges, the next step is to ensure that they operate smoothly. To do this, open and close the shutters multiple times to check for any friction or sticking. Smooth operation is essential to ensure that the shutters function properly and can be easily opened and closed. If you notice any resistance or difficulty in movement, it is important to address the issue before moving forward.
Ensuring the shutters open and close properly
After checking for smooth operation, the next step is to ensure that the shutters open and close properly. To do this, fully open and close the shutters to test their functionality. Pay attention to any gaps or misalignment between the shutters and the window frame, as this can affect their operation. The shutters should open and close smoothly without any obstructions or uneven movement.
Making any necessary adjustments
If you encounter any issues while testing the hinges, it may be necessary to make adjustments. Start by inspecting the screws that hold the hinges in place. If any of the screws are loose, tighten them using a screwdriver. This will help to stabilize the hinges and improve their function. Additionally, check if the hinges are properly aligned with the shutter and window frame. If necessary, gently adjust the hinges to ensure proper alignment.
Ensuring each H3 heading adheres to HTML syntax
It is important that each H3 heading adheres to HTML syntax in order to maintain a well-structured and organized blog post. To format the H3 headings properly, enclose them within the opening and closing H3 tags. For example: “`html
Checking for smooth operation
“` This syntax will clearly define the headings and help search engines better understand the content on the page.
Maintenance Tips For Long-Lasting Hinges
Proper maintenance of your shutter hinges is crucial to ensure they remain in good working condition and have a long lifespan. Regular cleaning, lubrication, periodic inspections, and addressing any issues promptly are key aspects of maintaining your hinges. In this section, we will discuss these maintenance tips in detail to help you keep your shutter hinges functioning smoothly.
Cleaning and lubricating the hinges
Regular cleaning of your shutter hinges helps remove dirt, dust, and debris that may accumulate over time. This buildup can cause the hinges to become stiff or even corrode if left unattended. To clean the hinges:
- Use a soft brush or cloth to gently remove any loose particles from the hinges.
- Mix a mild detergent with water and apply it to a cloth or sponge to wipe down the hinges. Avoid using harsh chemicals that can damage the hinges.
- Rinse the hinges with clean water and use a dry cloth to remove any excess moisture.
Once the hinges are clean, it’s important to lubricate them properly. Lubrication helps reduce friction between the hinge components, allowing them to move smoothly. Here’s how you can lubricate your shutter hinges:
- Apply a small amount of silicone-based lubricant or a dedicated hinge lubricant to a cloth or cotton swab.
- Gently wipe the lubricant onto the hinge pivot points, making sure to reach all areas of the hinge.
- Open and close the shutter several times to distribute the lubricant evenly.
Regular cleaning and lubrication should be performed at least twice a year, but it’s a good idea to do it more frequently if your shutters are exposed to harsh weather conditions or heavy use.
Periodic inspections
Regular inspections of your shutter hinges can help identify any issues before they become major problems. Here’s what you should check during your inspections:
- Make sure the hinges are securely fastened to the shutter and the mounting surface. Tighten any loose screws or bolts.
- Check for any signs of damage, such as cracks or warping, on the hinge components.
- Ensure that the hinges are aligned properly and the shutters open and close smoothly without any obstructions.
- Inspect the paint or finish on the hinges and touch up any areas that show signs of wear or damage to prevent corrosion.
Performing these inspections every six months can help catch any potential issues early on and prevent further damage to the hinges or other parts of the shutter system.
Addressing any issues promptly
If you notice any issues during your periodic inspections or while using your shutters, it’s crucial to address them promptly. Ignoring problems can lead to further damage and more expensive repairs down the line. Here are some common issues you might encounter:
- Hinges making squeaking or grinding noises: Apply lubricant to the pivot points as mentioned earlier to eliminate the noise.
- Hinges not moving smoothly: Check for any obstructions or debris that may be hindering the hinge movement. Clean the hinges and remove any obstacles.
- Loose or wobbly hinges: Tighten the screws or bolts securing the hinges to the shutter and the mounting surface.
- Damaged or broken hinges: If the hinges are beyond repair, consider replacing them with new ones to ensure the proper functioning of your shutters.
By addressing these issues promptly, you can maintain the longevity and functionality of your shutter hinges.
Troubleshooting Common Hinge Installation Problems
Installing shutter hinges can be a rewarding task that enhances the functionality and aesthetics of your shutters. However, like any installation, there may be common problems that arise during the process. In this section, we will discuss some troubleshooting tips for addressing these issues and ensuring a successful hinge installation for your shutters.
Shutter Misalignment
One common problem that can occur during hinge installation is shutter misalignment. This may manifest as shutters that do not meet properly in the closed position or shutters that appear uneven when open. Misalignment can be caused by a variety of factors, including improper measurements or uneven installation of the hinges.
To troubleshoot shutter misalignment, try the following steps:
- Ensure proper measurements: Double-check that the measurements for the hinges and shutter frames are accurate. This will help ensure that the shutters align correctly when closed.
- Check hinge installation: Inspect the hinge installation to ensure that they are mounted evenly and securely on the shutter frames. If there are any loose screws or hinges, tighten them to improve alignment.
- Adjust hinge positions: If the misalignment persists, you may need to adjust the position of the hinges. This can be done by loosening the screws and slightly repositioning the hinge plates until the shutters align properly.
Loose or Squeaky Hinges

Another common problem with hinge installation is hinges that become loose over time or produce squeaking sounds when the shutters are operated. Loose hinges can compromise the stability and functionality of your shutters, while squeaky hinges can be a nuisance.
Here are a few troubleshooting tips for dealing with loose or squeaky hinges:
- Tighten loose screws: Check all the screws of the hinges and ensure they are tightly fastened. This will help reduce any wobbling or movement in the hinges.
- Apply lubrication: If your hinges are squeaky, applying a lubricant like WD-40 can help alleviate the noise. Be sure to apply the lubricant to the hinge pins and moving parts of the hinges.
- Replace worn-out hinges: If the hinges are severely damaged or worn-out, it may be necessary to replace them. Look for hinges that are sturdy and built to withstand frequent use.
Hinge Durability
Ensuring the durability of your shutter hinges is crucial for long-lasting performance. Hinges that are not durable can result in frequent repairs or replacements, which can be both time-consuming and costly.
To ensure the durability of your shutter hinges, consider the following:
- Choose high-quality hinges: Opt for hinges made from durable materials such as stainless steel or brass. These materials are often more resistant to corrosion and can withstand constant movement.
- Regular maintenance: Perform regular maintenance by cleaning the hinges and lubricating them, as mentioned earlier. This will help prevent rusting and keep the hinges functioning smoothly.
By troubleshooting these common hinge installation problems and implementing the necessary measures, you can ensure the proper alignment, stability, and durability of your shutter hinges. This will not only enhance the appearance of your shutters but also contribute to their smooth operation for years to come.
Enhancing The Aesthetics Of Shutter Hinges
Paint or Stain Options
If you have decided to install new shutter hinges, why not take it a step further and enhance the overall aesthetics? One way to do that is by considering the paint or stain options for your hinges. By carefully selecting the right finish, you can seamlessly integrate the hinges into the overall design of your shutters, making them a focal point rather than an afterthought.
When it comes to paint options, you have a vast array of colors to choose from. Whether you prefer a traditional white, a rustic brown, or a bold and vibrant hue, the choice is yours. Consider the existing color scheme of your shutters and home exterior to ensure a cohesive look.
If you prefer the natural beauty of wood, staining your shutter hinges is a fantastic option. This allows the unique grain and texture of the wood to shine through while providing protection against the elements. Whether you go for a light, medium, or dark stain, it can add warmth and character to your shutters.
Decorative Hinge Accents
Incorporating decorative hinge accents is another way to enhance the aesthetics of your shutter hinges. These small details can make a big difference in the overall look and feel of your shutters. Consider adding decorative elements such as scrollwork, fleur-de-lis, or other intricate designs to create a visually appealing focal point.
These accents can be made from various materials, including metal, wood, or even durable plastic. The choice of material will depend on your personal preference and the overall style of your shutters. Whichever design you choose, it’s important to ensure that the accents are securely attached to the hinge for long-lasting beauty.
Customizing the Hinge Appearance
When it comes to enhancing the aesthetics of your shutter hinges, customization is key. Luckily, there are various options available to ensure the hinges match your desired appearance. This can be particularly useful when trying to achieve a specific architectural style or replicate historical details.
One way to customize the hinge appearance is by selecting the right size and shape. Hinges come in different sizes, ranging from small-scale designs for delicate shutters to larger ones for more substantial installations. You can also choose from different shapes, such as strap hinges, butterfly hinges, or S-shaped hinges, to create a distinctive and unique look.
Additionally, consider the finish and texture of the hinges. Whether you prefer a smooth and polished look or a more rustic and weathered appearance, there are various finishes available, including brushed metal, hammered metal, or even a distressed finish. These details can add depth and character to your shutter hinges.
In conclusion, enhancing the aesthetics of your shutter hinges can greatly elevate the overall look and feel of your shutters. By carefully selecting paint or stain options, incorporating decorative hinge accents, and customizing the appearance, you can turn your shutters into a standout feature of your home’s exterior. So, why settle for ordinary when you can make a statement with your shutter hinges?
Frequently Asked Questions For How To Install Shutter Hinges
Where Should Shutter Hinges Be Placed?
Shutter hinges should be placed at the top and bottom ends of the shutter, as well as evenly spaced in between. This allows for stability and proper functionality of the shutters. The placement ensures that the hinges can support the weight of the shutters and enable easy opening and closing.
What Hinges To Use On Shutters?
Use sturdy and durable hinges on shutters to ensure reliable functionality. Consider using high-quality stainless steel hinges for their corrosion resistance and strength. These hinges should be properly installed for smooth operation and to support the weight of the shutters effectively.
How Do You Install Faux Shutter Hinges?
To install faux shutter hinges, follow these steps: 1. Measure and mark the desired hinge positions on the shutters. 2. Drill pilot holes in the marked spots. 3. Attach the hinges to the shutters using screws. 4. Align the shutters with the mounting location on the window frame.
5. Screw the hinges onto the frame, ensuring they are securely fastened.
How Do You Measure Offset For Shutter Hinges?
To measure the offset for shutter hinges, follow these steps: 1. Determine the desired gap between the shutter and the frame. 2. Measure the distance from the edge of the shutter to the hinge pin. 3. Calculate the difference between the desired gap and the distance measured.
4. Adjust the hinge position accordingly to achieve the desired offset.
How Do You Install Shutter Hinges On A Door?
To install shutter hinges on a door, first, mark the locations, then drill pilot holes, secure the hinges with screws, and finally, test the movement of the shutter.
What Tools Do I Need To Install Shutter Hinges?
To install shutter hinges, you will need a drill, drill bits, screws, a screwdriver, a measuring tape, a pencil, and a level.
Conclusion
Installing shutter hinges can be a simple and rewarding task for any DIY enthusiast. By following the step-by-step instructions in this blog post, you can ensure a smooth installation process. Remember to select the right size and type of hinges for your shutters, measure accurately, and use the correct tools.
With a little patience and care, you’ll have sturdy and perfectly functioning shutter hinges in no time. Enjoy the enhanced functionality and aesthetics of your shutters!