To install a sliding door track, measure and mark the desired location on the wall. Use a level to ensure the track is straight, then attach it with screws or adhesive.
Welcome to our guide on how to install a sliding door track. Whether you are looking to optimize space utilization or add a touch of elegance to your interior, sliding doors are a fantastic solution. Installing a sliding door track may seem daunting at first, but with a few simple steps, you’ll have your new track up and running smoothly in no time.
We will walk you through the process of measuring, marking, and attaching the track, ensuring that it is level and secure. By following these steps, you can create a seamless and functional sliding door in your home or office. So without further ado, let’s get started!
Understanding The Basics Of Sliding Door Track Systems
Understanding the Basics of Sliding Door Track Systems
Importance of choosing the right sliding door track system
Choosing the right sliding door track system is essential for a smooth and hassle-free installation process. A high-quality track system ensures that your sliding door operates effortlessly, providing convenient access between different areas in your home or office. It plays a crucial role in the overall functionality and durability of the sliding door.
Types of sliding door track systems available
There are various types of sliding door track systems available in the market, each designed to cater to different needs and preferences. Here are a few popular options:
| Track System Type | Description |
|---|---|
| Top Hung Track System | This system hangs the sliding door from the top, providing a sleek and modern look. It is ideal for larger doors and offers a smooth gliding motion. |
| Bottom Rolling Track System | This system supports the weight of the door on a track located at the bottom. It is commonly used for lighter doors and has a more economical price range. |
| Bi-Fold Track System | This system allows two door panels to fold and slide along a track, offering flexibility and space-saving benefits. |
Benefits of installing sliding door tracks
Installing sliding door tracks offers various benefits that contribute to the overall functionality and aesthetics of your space:
- Enhanced Accessibility: Sliding doors with well-installed tracks provide easy access between rooms, making it convenient for individuals of all ages and abilities.
- Space Efficiency: Sliding doors save valuable floor space as they do not swing open like traditional hinged doors. This is particularly advantageous in smaller rooms or areas with limited space.
- Natural Light and Views: Sliding doors usually feature large glass panels, allowing ample natural light to enter the space and offering stunning views of the surroundings.
- Aesthetics: Sliding door tracks come in various designs and finishes, enabling you to choose one that complements the overall decor of your space. This enhances the visual appeal and adds a touch of elegance to your interiors.
- Silent Operation: High-quality sliding door tracks ensure smooth and silent operation, preventing any frustrating noise or disruptions while opening or closing the door.
- Durability: A properly installed sliding door track system ensures long-lasting durability, providing years of efficient use without the need for frequent repairs or replacements.
By understanding the basics of sliding door track systems and considering the importance of choosing the right system for your needs, you can enjoy the numerous benefits that sliding doors offer.
Assessing The Door And Wall Structure
Before installing a sliding door track, it is crucial to assess the door and wall structure to ensure a successful installation. This step involves measuring the door dimensions, checking the condition of the wall, and determining the weight capacity of the sliding door track. By properly evaluating these elements, you can proceed with confidence and avoid any potential issues in the future.
Measuring the door dimensions
Start by measuring the door dimensions to ensure that the sliding door track matches the size of your door. To do this, follow these simple steps:
- Use a tape measure to determine the height and width of the door.
- Measure the thickness of the door as well.
Once you have these measurements, you can choose a sliding door track that is compatible with your door’s size, ensuring a proper fit.
Checking the condition of the wall
Next, assess the condition of the wall where the sliding door track will be installed. It is vital to have a sturdy and stable wall to support the weight of the door. Check for any structural issues such as cracks, water damage, or uneven surfaces. If the wall is not in ideal condition, it may be necessary to make repairs or reinforce the area before proceeding with the installation.
Determining the weight capacity of the sliding door track
One crucial aspect to consider when installing a sliding door track is its weight capacity. This will ensure that the track can support the weight of the door without any issues. To determine the weight capacity, refer to the manufacturer’s specifications or guidelines. Be sure to select a sliding door track that can handle the weight of your door, including any additional hardware or fixtures.
By carefully assessing the door and wall structure, as well as taking into account the weight capacity of the sliding door track, you are setting a strong foundation for a successful installation. These initial steps will help ensure that your sliding door operates smoothly and securely, providing you with both functionality and style for years to come.
Gathering The Necessary Tools And Materials
Gathering the necessary tools and materials is crucial for a smooth and successful installation of a sliding door track. By ensuring you have the essential tools, recommended materials, and necessary safety equipment, you can avoid any delays or issues during the installation process. Let’s take a closer look at what you’ll need for this project.
Essential tools required for installation
Before diving into the installation process, it’s important to have the right tools on hand. Here is a list of the essential tools you will need:
- Screwdriver set
- Power drill
- Tape measure
- Level
- Pencil or marker
- Hammer
- Chisel
- Adjustable wrench
- Safety goggles
Recommended materials for a smooth installation process
Along with the tools, having the right materials can make the installation process go much more smoothly. Here are some recommended materials to consider:
- Sliding door track kit (including the track, rollers, and mounting hardware)
- Wood shims
- Screws
- Wood glue
- Wood putty or filler
- Sandpaper
- Paint or stain (if desired)
Safety equipment needed for the installation
Safety should always be a top priority when installing a sliding door track. To ensure your well-being during the process, make sure to have the following safety equipment:
- Safety goggles
- Work gloves
- Dust mask
- Knee pads
By gathering these necessary tools, materials, and safety equipment, you’ll be well-prepared for the task of installing a sliding door track. Having everything you need at your fingertips will help you complete the installation efficiently and effectively.
Positioning And Marking The Track Placement
Positioning and marking the track placement is a crucial step when it comes to installing a sliding door track. It ensures that the track is placed in the ideal location on the wall, allowing the door to slide smoothly and securely. In this section, we will explore the steps involved in determining the ideal location for the track, marking the wall for the installation, and ensuring proper alignment and levelness.
Determining the ideal location for the track
To determine the ideal location for the sliding door track, consider the following factors: 1. Measure the width of the door opening: Start by measuring the width of the door opening. This will help you determine the length of the track needed for the installation. 2. Consider the height of the door: Apart from the width, also consider the height of the door. Ensure that the track is positioned at a suitable height to allow for easy movement of the door. 3. Evaluate the track’s proximity to other objects: Take note of any obstructions or objects near the door opening, such as light switches, electrical outlets, or furniture. Adjust the track’s position accordingly to avoid any hindrances.
Marking the wall for the track installation
Once you have determined the ideal location for the sliding door track, it’s time to mark the wall for the installation. Follow these steps: 1. Place the track on the wall: Hold the track against the wall at the determined height and position. Ensure it is level using a bubble level tool. 2. Mark the screw hole locations: Using a pencil, mark the screw hole locations by making small dots through the pre-drilled holes on the track. This will serve as a guide for the drilling process. 3. Remove the track: Carefully remove the track from the wall, setting it aside for the installation phase. 4. Reinforce the markings: Using a ruler or straight edge, connect the marked screw hole dots to create straight lines. This will provide a clear visual guide during the installation.
Ensuring proper alignment and levelness
To ensure that the sliding door track is properly aligned and level, follow these steps: 1. Use a stud finder: Run a stud finder along the marked lines to locate the studs in the wall. Avoid installing the track directly onto drywall as it may not provide sufficient support. 2. Pre-drill pilot holes: Using a drill and a drill bit suitable for the type of wall material, pre-drill pilot holes through the marked screw hole locations. This will make it easier to insert the screws during installation. 3. Install the track: Position the track back onto the wall, aligning the pre-drilled screw holes with the pilot holes. Insert the screws through the holes and tighten them securely using a screwdriver or drill. 4. Check for levelness: Place a level on top of the track to ensure it is perfectly level. Adjust if necessary by loosening the screws slightly and repositioning the track. By carefully positioning and marking the track placement, as well as ensuring proper alignment and levelness, you can successfully install a sliding door track that will provide smooth and convenient access to your space.
Installing The Track On The Wall
When it comes to installing a sliding door track, properly securing the track to the wall is crucial for its functionality and longevity. In this section, we will guide you through the steps of drilling pilot holes for the track, securing the track with screws or mounting brackets, and adjusting the track to achieve optimal functionality.
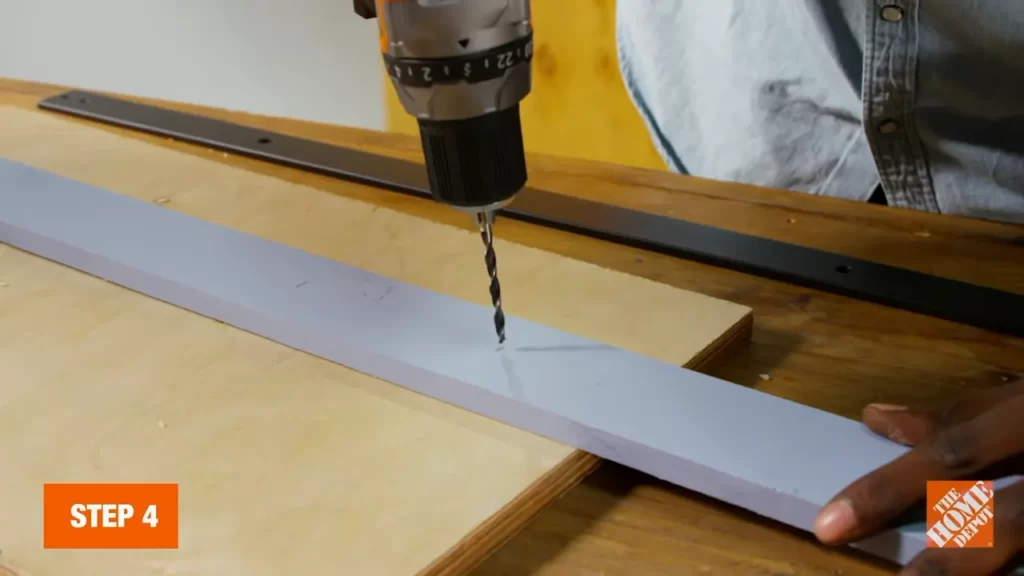
Drilling pilot holes for the track
The first step in installing the sliding door track is to drill pilot holes on the wall. These pilot holes will serve as a guide for inserting screws or mounting brackets to hold the track securely.
To drill the pilot holes, follow these steps:
- Measure and mark the desired height for the track on the wall using a tape measure and level.
- Using an appropriate drill bit size for your screws or mounting brackets, drill pilot holes at the marked positions.
- Make sure the pilot holes are properly aligned and level to ensure a straight and even installation of the track.
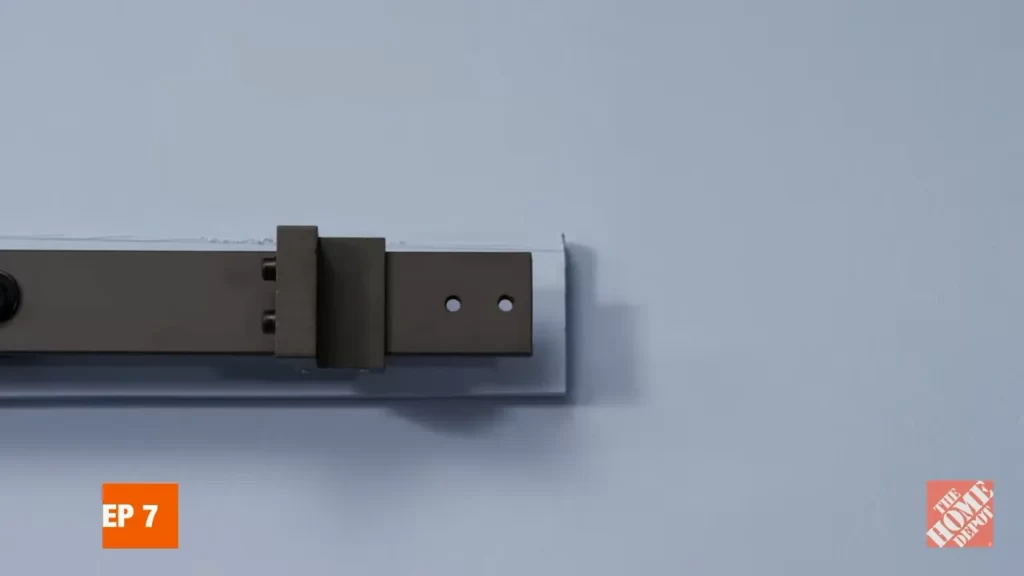
Securing the track with screws or mounting brackets
Once the pilot holes are drilled, it’s time to secure the track to the wall using screws or mounting brackets. The method of installation may vary depending on the type of track you have, so refer to the manufacturer’s instructions for specific guidance.
Here’s a general guideline for securing the track:
- Place the track on the wall, aligning the holes of the track with the pilot holes.
- Insert the screws or mounting brackets through the holes on the track and into the pilot holes.
- Tighten the screws or secure the mounting brackets to firmly attach the track to the wall. Ensure that the track is level and secure.
Adjusting the track to achieve optimal functionality
After securing the track, it’s important to double-check its functionality and make any necessary adjustments. An improperly installed or misaligned track can cause the sliding door to stick or operate poorly.
To adjust the track for optimal functionality, follow these steps:
- Check that the sliding door moves smoothly along the track without any obstructions or resistance.
- If there are any issues, adjust the track horizontally by loosening the screws or mounting brackets slightly and repositioning the track. Tighten the screws or secure the mounting brackets once the adjustment is made.
- Repeat the adjustment process until the sliding door glides smoothly along the track without any obstructions.
By following these steps for drilling pilot holes, securing the track, and adjusting for optimal functionality, you can ensure a successful installation of a sliding door track on your wall. Enjoy the convenience and accessibility that a sliding door provides in your space!
Mounting The Sliding Door On The Track
Now that you have successfully installed the sliding door track, it’s time to mount the sliding door onto it. This step is crucial to ensure the door can smoothly glide open and closed without any hiccups. Follow the steps below to achieve a secure and perfectly aligned sliding door installation.
Attaching the rollers or brackets to the door
The first step is to attach the rollers or brackets to the sliding door. These rollers or brackets will serve as the connection points between the door and the track. To properly install them, follow these instructions:
- Clean the bottom edge of the door thoroughly to remove any dust or debris that may hinder a secure attachment.
- If using rollers, position them at least 6 inches from each end of the door. For brackets, place them equally on either side of the door.
- Using a screwdriver or drill, fasten the rollers or brackets securely to the bottom edge of the door. Make sure they are level and aligned correctly.
Aligning the rollers with the track
Once the rollers or brackets are attached to the door, the next step is to align them with the sliding track. This ensures a smooth and seamless sliding motion. Follow these steps for proper alignment:
- With the help of a friend, lift the sliding door and place the rollers or brackets into the track, ensuring they fit securely.
- Slide the door back and forth along the track to check if it is aligned properly. Make any necessary adjustments to ensure both rollers or brackets move smoothly and effortlessly.
- Once the alignment is perfect, lock the door into position to prevent any accidents during the testing phase.
Testing the smooth movement of the sliding door
Now that the sliding door is mounted on the track, it’s essential to test its movement. This step helps identify any potential obstructions, misalignments, or other issues that could affect the performance of the door. Perform the following tests to ensure a smooth and effortless sliding motion:
- Gently push the door from one end to the other to check for any resistance or difficulties.
- Observe the door as it moves along the track, ensuring it stays level and doesn’t scrape against any obstacles.
- If you notice any issues, such as sticking or uneven movement, make necessary adjustments to the rollers or brackets until the door glides smoothly without any hitches.
By following these steps, you can mount your sliding door securely on the track and enjoy its hassle-free functionality. Ensure proper attachment of rollers or brackets, align them with the track, and thoroughly test the smooth movement. This careful installation process will ensure your sliding door operates flawlessly for years to come.
Installing The Door Guide And Stopper

Installing the door guide and stopper is an essential step when you’re installing a sliding door track. These components not only provide stability and prevent the door from sliding off the track but also ensure smooth and seamless operation of your sliding door. In this section, we will guide you through the process of attaching the door guide and installing a door stopper. Let’s get started!
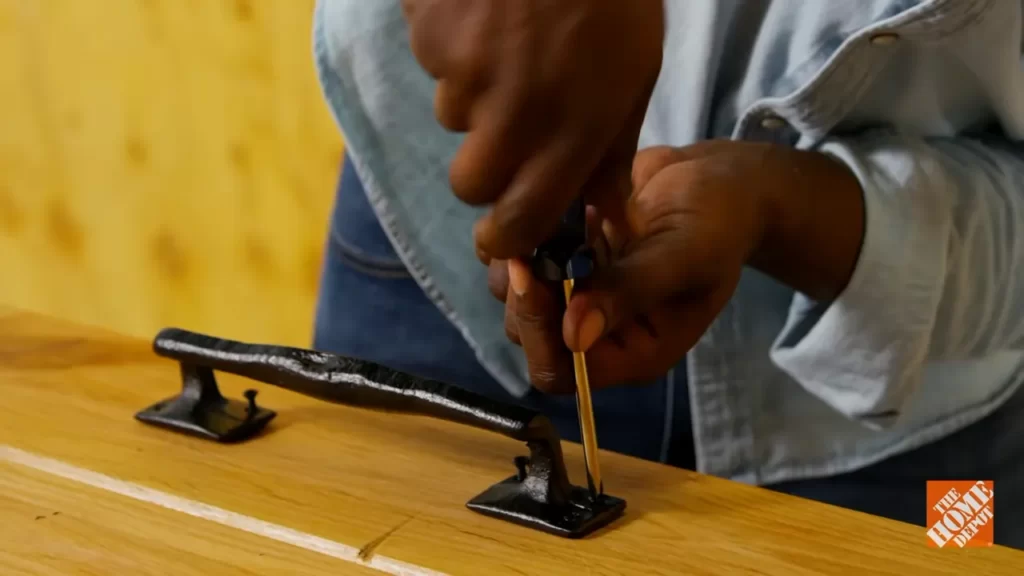
Attaching the door guide for stability
To ensure stability and prevent the sliding door from swaying, you need to attach a door guide to the floor. The door guide will keep the door aligned with the track and prevent any unwanted movement. Follow these steps to attach the door guide:
- Measure and mark the desired position for the door guide on the floor, near the bottom edge of the sliding door.
- Using a drill, create pilot holes at the marked positions.
- Align the door guide with the pilot holes and secure it to the floor using screws.
- Double-check the alignment of the door guide to ensure it is straight and level.
Once the door guide is securely attached, you can move on to installing a door stopper to prevent the door from sliding off the track.
Installing a door stopper to prevent the door from sliding off the track
A door stopper is an important component that prevents the sliding door from derailing and falling off the track. Here’s how you can install a door stopper:
- Measure and mark the desired position for the door stopper on the wall or the floor, near the edge of the sliding door.
- Drill pilot holes at the marked positions.
- Align the door stopper with the pilot holes and secure it to the wall or the floor using screws.
- Ensure that the door stopper is securely attached and that it makes contact with the door when it is fully open.
With the door guide and stopper in place, your sliding door is now more stable and secure. However, it’s important to adjust these components for perfect functionality.
Adjusting the door guide and stopper for perfect functionality
To ensure optimal performance of your sliding door, you may need to make some adjustments to the door guide and stopper. Here are some tips to help you achieve perfect functionality:
- Check that the door guide is aligned with the track and adjust if necessary to ensure smooth sliding.
- Make sure the door stopper allows the door to open and close without any obstruction but prevents it from sliding off the track.
- If needed, adjust the height of the door guide or the position of the door stopper to achieve the desired fit.
By following these steps and making necessary adjustments, you can ensure that your sliding door operates smoothly and securely.
Regular Cleaning And Lubrication
Regular cleaning and lubrication are essential for maintaining the smooth functionality of your sliding door track. Over time, the track can accumulate dust, dirt, and debris, leading to resistance and difficulty in sliding the door open or close. By following the right techniques and using the appropriate lubricant, you can ensure that your sliding door track continues to operate smoothly for years to come. In this post, we will discuss the importance of cleaning the track regularly, choosing the right lubricant for smooth sliding, and proper techniques for cleaning and lubricating the track.
Importance of Cleaning the Track Regularly
Keeping your sliding door track clean is crucial for its optimal performance. When dust and particles build up in the track, they can hinder the smooth movement of the door. This causes friction and can even lead to the door getting stuck or derailing from the track. Additionally, a dirty track can affect the overall appearance of your sliding door, making it look old and worn out. By regularly cleaning the track, you can prevent these issues and ensure that your sliding door slides effortlessly.
Choosing the Right Lubricant for Smooth Sliding
When it comes to lubricating your sliding door track, it’s essential to use the right product. Not all lubricants are suitable for this purpose, as some can attract dirt and debris, which ultimately makes the track dirtier and more difficult to slide. To ensure a smooth and hassle-free sliding operation, choose a high-quality silicone-based lubricant specifically designed for sliding door tracks. Silicone-based lubricants provide excellent lubrication without attracting dust, making them ideal for keeping your track clean and functioning effortlessly.
Proper Techniques for Cleaning and Lubricating the Track
To clean your sliding door track effectively, start by removing any loose dirt or debris using a soft brush or vacuum cleaner. Then, wipe the track with a clean, damp cloth to remove any remaining grime. Avoid using harsh chemicals or abrasive cleaners that can damage the track’s surface. After cleaning, allow the track to dry completely before proceeding with lubrication. Once dry, apply a small amount of the silicone-based lubricant along the entire track. Use a clean cloth to spread the lubricant evenly and wipe off any excess. Be sure to lubricate both the upper and lower tracks for optimal sliding performance.
Regular cleaning and lubrication are simple yet crucial maintenance tasks that can significantly extend the lifespan of your sliding door track. By understanding the importance of regular cleaning, choosing the right lubricant, and following proper techniques, you can ensure that your sliding door operates smoothly and effortlessly, enhancing the functionality and aesthetic appeal of your space.
Inspecting And Replacing Damaged Parts
Identifying signs of wear and tear on the track
Before proceeding with the installation of a sliding door track, it is crucial to inspect the existing track thoroughly. Identifying signs of wear and tear is essential to ensure smooth functioning and prevent future issues. Here are a few key indicators to look out for:
- Uneven or rough surface: Run your hand along the track to feel for any bumps or irregularities. An uneven surface can hinder the sliding motion of the door.
- Visible damage: Examine the track visually to check for any visible cracks, dents, or breaks. These damages can lead to further deterioration of the track if not addressed promptly.
- Excessive dirt or debris: Over time, dust, debris, and other particles can accumulate on the track, causing obstruction in the sliding mechanism. Ensure that the track is clean and free of any obstructions.
- Signs of rust or corrosion: Rust or corrosion can develop on the track, especially in humid or coastal areas. These corrosive elements can impede smooth movement and damage the track over time.
Troubleshooting common sliding door track issues
Sliding door tracks can sometimes encounter common issues that affect their functionality. Being aware of these problems will help you troubleshoot and address them effectively. Here are a few typical sliding door track issues:
- Door sticking or jamming: If the sliding door gets stuck or jams while opening or closing, it is often an indication of debris accumulation or misalignment of the track. Cleaning the track and adjusting the alignment can usually resolve this issue.
- Noisy operation: Excessive noise during the sliding motion can result from several factors, including lack of lubrication, loose screws, or worn-out rollers. Regular maintenance and adjustment, such as applying lubrication and tightening loose components, can help reduce the noise.
- Difficult sliding: If the door doesn’t slide smoothly and requires excessive force to move, it could be due to worn-out rollers, damaged track, or misaligned components. Replacing worn-out parts or realigning the track can restore the ease of sliding.
Steps for replacing damaged or broken parts
If you have identified any damaged or broken parts during the inspection, it is crucial to replace them to ensure proper functioning of the sliding door track. Follow these steps to replace the damaged or broken parts:
- Remove the door: Start by removing the sliding door from the track. Lift it gently and tilt it inward to disengage it from the track.
- Unscrew and detach the damaged part: Using a screwdriver, remove the screws or bolts that hold the damaged part in place. Carefully detach the damaged part from the track.
- Clean the track: While the damaged part is detached, take the opportunity to clean the track thoroughly. Remove any dirt, debris, or rust using a soft brush or cloth.
- Install the new part: Align the new part with the track and attach it securely using the appropriate screws or bolts. Ensure a tight and secure fit to prevent any wobbling or movement.
- Reinstall the door: Carefully lift the sliding door and place it back onto the track. Slide the door back and forth to ensure smooth movement along the newly replaced part.
- Test and adjust: Slide the door several times to test the functionality of the replaced part. Make any necessary adjustments to ensure proper alignment and smooth sliding.
By following these steps, you can easily inspect and replace damaged parts of a sliding door track. Regular maintenance and prompt replacement of worn-out components will help prolong the lifespan of your sliding door track and ensure hassle-free operation.
Preventing Common Sliding Door Track Problems
When it comes to installing a sliding door track, it’s crucial not just to focus on the installation process itself but also on preventing common problems that can arise over time. By taking proactive steps to maintain your sliding door track, you can ensure smooth operation and avoid issues that can lead to costly repairs. In this section, we will explore three key tips to prevent common sliding door track problems: preventing debris buildup on the track, avoiding excessive weight on the sliding door, and maintaining proper alignment and adjustment over time.
Tips to prevent debris buildup on the track
One of the most common issues that affect sliding door tracks is debris buildup. Over time, dust, dirt, and other particles can accumulate on the track, causing the sliding door to jam or operate less smoothly. To prevent this problem, here are some useful tips:
- Regularly clean the sliding door track by using a vacuum cleaner or a soft brush to remove any loose debris.
- Apply a silicone-based lubricant to the track, which can help reduce friction and prevent particles from sticking to the surface.
- Consider using a track cover or runner, which acts as a protective barrier against dust and dirt, minimizing the need for frequent cleaning.
- Inspect the track regularly to identify and remove any larger debris or obstructions that may have found their way onto the track.
Avoiding excessive weight on the sliding door
Excessive weight on the sliding door can lead to track problems and compromised functionality. To prevent this issue, follow these tips:
- Avoid placing heavy objects on the sliding door or leaning against it, as this can put undue stress on the track.
- If you need to transport large or heavy items through the sliding door, consider using a dolly or assistance to minimize the load on the door.
- Check the weight capacity of your sliding door track and ensure that it is not exceeded.
- Regularly inspect the rollers and hardware to ensure they are in good condition and can support the weight of the door.
Maintaining proper alignment and adjustment over time
Even with proper installation, sliding door tracks can experience misalignment or require adjustment over time. To ensure the continued smooth operation of your sliding door, follow these maintenance tips:
- Regularly check the alignment of the track by visually inspecting it for any signs of unevenness or damage.
- If you notice any misalignment, adjust the track using the appropriate tools and techniques specified by the manufacturer.
- Inspect the rollers for signs of wear and tear, and replace them if necessary to maintain proper alignment.
- Periodically lubricate the rollers and hinges to reduce friction and ensure smooth movement.
By following these tips to prevent debris buildup on the track, avoiding excessive weight on the sliding door, and maintaining proper alignment and adjustment over time, you can prolong the lifespan of your sliding door track and enjoy trouble-free operation for years to come.
Frequently Asked Questions On How To Install Sliding Door Track
How Do You Attach A Sliding Door Track?
To attach a sliding door track, follow these steps: 1. Measure and mark the placement for the track on the wall. 2. Use a level to ensure the track is aligned. 3. Drill pilot holes into the wall at the marked points.
4. Attach the track using screws or bolts. 5. Test the track’s functionality by sliding the door back and forth.
How Do You Put A Sliding Door Back On Track Inside?
To put a sliding door back on track inside, follow these steps: 1. Remove any obstacles or debris from the track. 2. Lift the door and align the wheels with the track. 3. Gently lower the door onto the track.
4. Test the door to ensure it slides smoothly. 5. If needed, adjust the wheels using the provided screws.
Do You Need A Bottom Track For A Sliding Door?
Yes, a bottom track is needed for a sliding door. It helps to guide and support the door, ensuring smooth and secure movement. Without a bottom track, the sliding door may be unstable and prone to misalignment.
How Do You Fix The Bottom Track On A Sliding Closet Door?
To fix the bottom track on a sliding closet door, start by removing any debris or obstructions. Then, check for any loose screws or damaged wheels. Tighten the screws or replace them if necessary. Lubricate the track with silicone spray to ensure smooth movement.
How Do You Install A Sliding Door Track?
Installing a sliding door track involves measuring, marking, and attaching the track securely to the top of the door frame using screws or fasteners.
What Tools Are Needed To Install A Sliding Door Track?
To install a sliding door track, you will need a tape measure, a level, a drill, screws or fasteners, a screwdriver or drill bit, and a helper (for larger doors).
Conclusion
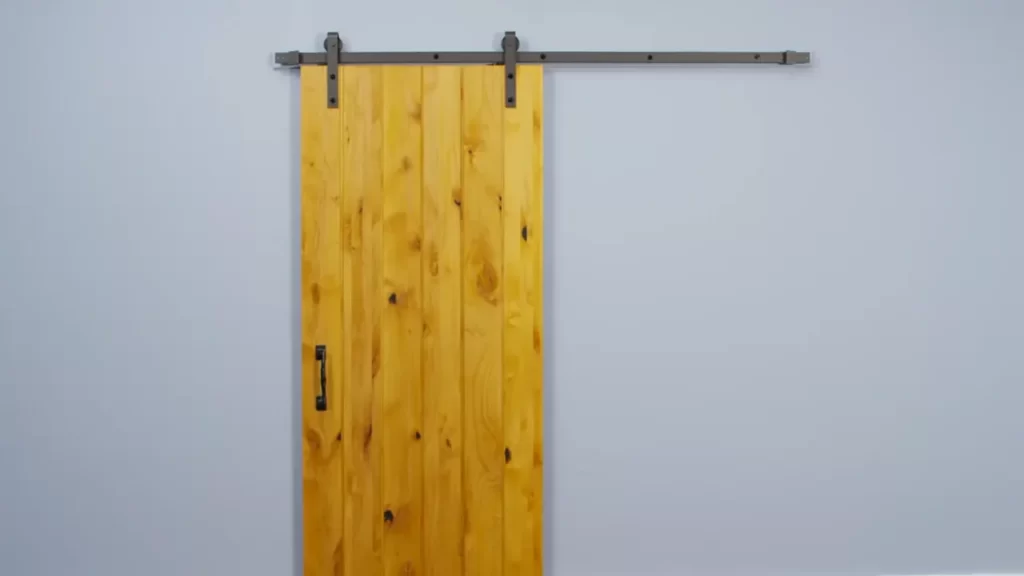
Installing a sliding door track can be a straightforward process when following the right steps. From choosing the right track to accurately measuring and aligning the components, each step is crucial for a successful installation. By carefully following the guidelines outlined in this blog post, you can ensure a smooth and functional sliding door track that adds both style and convenience to your space.
Remember, proper installation can also enhance the durability and longevity of your sliding door track. So, get started and enjoy the benefits of a well-installed sliding door track in your home or office.